Are you planning on upgrading from Windows 10 to Windows 11? Before you do, there are a few things you should do to ensure a smooth transition. In this article, we'll look at a few things to do before and after upgrading your computer to Windows 11.
Before upgrading to Windows 11
Check hardware compatibility
This is the first thing you need to do. Windows Update will typically prompt you to upgrade Windows 10 to Windows 11 if it sees that your computer has a Trusted Platform Module (TPM) version 2.0 enabled. This is the only hardware requirement that has changed between Windows 10 and Windows 11.
If your computer was built after 2018, it more than likely has a TPM 2.0 component. The problem is that manufacturers disabled the TPM prior to the release of Windows 11, as they felt it was not required for Windows 10, so why have it enabled by default?
So, computers built between 2018 and 2021 have a TPM 2.0 component included but not enabled. To enable the TPM 2.0 component, you will need to turn it on inside your system's BIOS (Basic Input/Output System). A quick check inside Windows 10 will tell you if the TPM component is enabled and what version it is.
Using a Run dialog box (Windows logo key  + R) or Search box (Windows logo key + S), you can check the status of the TPM component inside your system. Just type TPM.MSC into a Run dialog box and select OK, or type TPM.MSC into a Search box and choose tpm.msc Microsoft Common Console Document.
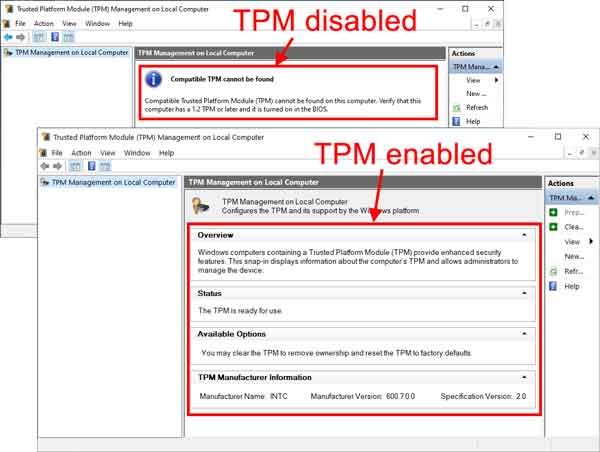
When the TPM Management console opens, it should display the TPM's status and version. If you get a message stating that a compatible TPM cannot be found and your computer was manufactured between 2018 and 2021, you should check the website of the manufacturer of your computer/motherboard for a user manual to find instructions on how to enable the TPM.
Geek tip: If you ever have to replace the CMOS battery in your computer, the BIOS can reset itself to factory defaults. If the factory defaults had the TPM turned off, then things like Bitlocker drive encryption will not work correctly.
Check your drive for errors
You should definitely check the drive that has Windows installed on it for errors. You want to make sure the folders and files contained on it aren't damaged. There is nothing worse than getting halfway through the upgrade process only to get an error that causes the upgrade to fail.
How to run a standard disk check in Windows 10
- Open File Explorer using one of the following:
- Left-click on the File Explorer icon (manilla folder) on the Taskbar.
- Press the Windows logo key + E at the same time.
- Use the Power User menu by right-clicking on the Start button and selecting File Explorer.
- In the left-side column, left-click on This PC.
- In the right-side column, right-click on the drive you want to check and select Properties.
- Left-click on the Tools tab.
- Under Error checking, left-click on Check.
- Left-click on Scan drive.
If you want to run an advanced disk check, follow the link below.
How to check your drive for errors in Windows 10
Backup your computer
As the old saying goes, "It's always better to be safe than sorry," and this couldn't be more true when it comes to your computer. Having a good 'bare metal' backup is essential when it comes to an operating system upgrade.
Yes, 99.99% of the time, nothing goes wrong with an in-place upgrade, but there is always the possibility. A full backup will definitely bring a greater degree of safety to the whole upgrade process.
Backup your files with File History and Windows Backup in Windows 10
If you decide to do a full 'bare metal' backup, you will definitely want to create a recovery drive just in case.
How to create a recovery drive in Windows 10 and Windows 11
Clean up the junk
Whether or not you upgrade your operating system, giving it a good cleaning can do wonders for your computer's performance, not to mention making the upgrade process a little bit simpler.
Removing temporary folders and files, emptying the recycle bin, and clearing out your downloads folder are just a few ways to prepare your computer before upgrading to Windows 11. Windows 10 has two (2) different programs built in to help with cleaning out junk.
Clean up your Windows 10 computer using the Storage feature
Clean up Windows 10 with Disk Cleanup
Uninstall unnecessary programs/apps
Over time, you may have installed programs that you no longer use. Before upgrading to Windows 11, it's a good idea to uninstall any unnecessary programs to free up space on your computer. This can also speed up the upgrade process and ensure Windows 11 runs smoothly.
How to uninstall a program or app in Windows 10
- Left-click on the Start menu and left-click on the Gear (Settings) icon. It should be the second icon up from the bottom.
- Left-click on the Apps category.
- In the right-hand column, you will find a list of installed programs (App & features).
- Scroll down the list of apps and left-click any program you would like to remove, and select Uninstall.
Uninstall or disable your anti-virus
If you are using any anti-virus program other than Microsoft Windows Defender, you should disable or remove it before upgrading to Windows 11. I have seen anti-virus programs slow down an upgrade and even cause it to fail.
You can save yourself a headache or two by at least disabling your anti-virus software. Although uninstalling is the best option, disabling should work just as well.
Upgrade to Windows 11
So, if you haven't yet been prompted to upgrade to Windows 11 through Windows Update and your computer has a TPM 2.0 component enabled, you can manually upgrade your computer using the Windows 11 Installation Assistant. Just download it and run it.
Windows 11 Installation Assistant
After upgrading to Windows 11
Now that you have a new operating system, you will want to ensure you have all of the latest and greatest drivers for the components inside your computer. First, you should check for driver updates on the website of your computer or motherboard manufacturer. After that, if you have a dedicated graphics card, you should look for updated drivers for it. This will help ensure that your computer runs Windows 11 smoothly and efficiently.
cf776f64-75af-449d-8ac4-5d79e3031241|0|.0|96d5b379-7e1d-4dac-a6ba-1e50db561b04