Have you ever gotten a low disk space warning on your Windows 10 computer? Do you wish you could quickly and easily clean up the unwanted temporary files and the recycle bin? If so, look no further than the Storage feature inside of Windows 10.
For years now, I have been using the Disk Cleanup program inside of each version of Windows. It has been an easy way to clean up the junk (temporary files, Internet cache, recycle bin, etc.) that can build up in Windows.
But finding the Disk Cleanup program to run it can be a little tricky. There are multiple ways to run it when you find it, which can get confusing for a novice computer user.
Thankfully, Microsoft has integrated most of the functionality of Disk Cleanup into the Storage feature inside the Windows 10 Settings program. And getting to the Storage feature could not be any easier.
How to get to Storage feature in Windows 10
- Left-click on the Start
 menu and left-click on the Gear (Settings) icon. It should be the second icon up from the bottom.
- Left-click on the System category
- In the left-hand column, left-click on Storage. All of the storage options will appear in the right-hand column.
Note: All files removed using the Storage feature are permanently deleted, so be careful what files you choose to delete. Remember that once you delete a file, it is gone for good.
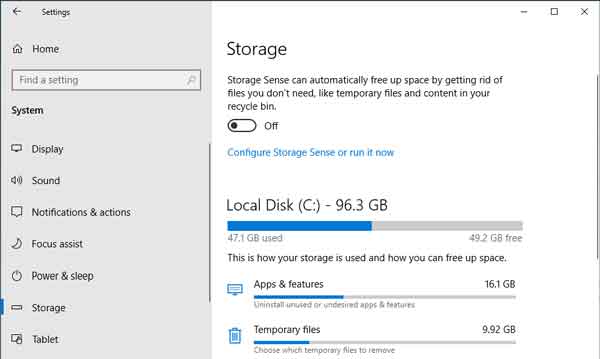
There are two (2) sections under the Storage area. The first is Storage Sense, with only a slider switch to turn it on or off and a button to bring up the configuration page.
Introduced in Windows 10 version 1809, Storage Sense is a simple 'Set and Forget' utility that can automatically clean out files you do not need anymore, like files in your Downloads folder and the recycle bin.
Storage Sense can automatically clean out a user's Downloads folder and recycle bin on a preset schedule. You can set it up to run automatically every day, every week, every month, or only when you start to run out of free disk space. You can also run it manually whenever you need to free up some disk space quickly.
The second section is part of the Storage Reserve. Storage Reserve allocates space to facilitate proper performance and successful updates to Windows 10. This section lists the drives currently attached to your computer and how that storage is being distributed. That includes all fixed or removable HDDs, SSDs, and USB external drives.
Every drive has a status bar that shows the used / free space. Below the drive status bar, you will find the categories of different types of files that can be safely deleted. You may have to click on the 'Show more categories' button to view all available categories.
The list of categories is pretty extensive, so it may take some time to go through each one. The categories range from system & reserved, apps & features, and all of the special folders (Desktop, Documents, Downloads, Music, Pictures, and Videos).
Each category has also has a status bar that shows how much space those particular files are taking up. When you click on a category listed under a drive, you will be taken to another page with more options for that category.
Now when you click on the Temporary files category, you will be presented with a selection of options of which files you want to clean up. These are similar to the categories used in Disk Cleanup.
Remember that the majority of the items listed under Temporary files can be safely deleted. You may not want to remove all the files you have in your Downloads folder, so you might think about cleaning that folder up manually with File Explorer.
Also, if you choose the Windows Update Cleanup option, the clean-up process will happen the next time you reboot your computer. So be prepared for a longer boot time the next time you restart your computer.
7146555d-b90e-4a21-8758-55fe837ad852|1|5.0|96d5b379-7e1d-4dac-a6ba-1e50db561b04