Geeks in Phoenix

Geek Blog


5 features that make Windows 11 easier to use

Windows 11 introduces a fresh user interface and features that enhance usability and efficiency. As many users transition from Windows 10, it's essential to understand what makes Windows 11 a more user-friendly operating system. Here are five (5) key features contributing to an easier user experience.

5 features that make Windows 11 easier to use

Redesigned Taskbar and Start Menu

One of the first things users will notice in Windows 11 is the revamped Taskbar and Start Menu. Microsoft has centered the Start Menu on the Taskbar by default (you can change it to left if you like), offering a more streamlined look. The new Start Menu eliminates the Live Tiles of Windows 10, opting instead for a grid of static icons that provide quick access to your most-used applications. This change doesn't just modernize the interface; it simplifies navigation by allowing users to find their apps quickly without scrolling through a long list.

Additionally, users can easily pin their favorite applications to the Taskbar, enabling even faster access. The Taskbar has also been refined, offering a more modern aesthetic that enhances usability while providing essential notifications, system status, and quick settings at your fingertips.

Improved Snap Layouts and Snap Groups

Multitasking is vital to many users' workflows, and Windows 11 makes this easier with its enhanced Snap Layouts feature. By hovering over the maximize button on any window,
Hovering over the maximize button reveals the Snap Layouts
users can access various layout options, allowing them to quickly arrange multiple windows on the screen. This feature can be especially beneficial for those managing multiple tasks simultaneously, such as writing a report while referencing web pages or documents.

Furthermore, Snap Groups allow users to save sets of windows together, making it simple to switch between tasks. This means that when you want to return to a specific set of applications, they can be restored to their previous layout in just a click. This functionality not only improves productivity but also helps maintain an organized workspace.

You can access the Snap settings via Settings > System > Multitasking.

Virtual Desktops

Windows 11 takes the concept of Virtual Desktops to new heights, allowing users to create multiple desktops tailored for different tasks. For example, a user might set up one desktop for work-related activities, another for personal use, and a third for leisure activities like gaming or entertainment.

Each Virtual Desktop can have its unique background, which helps quickly distinguish between them. Switching between these desktops is seamless, allowing users to focus on current tasks without distraction. This functionality is particularly helpful for those balancing multiple roles or workflows, as it provides a clear structure and reduces visual clutter.

You can access the Virtual Desktops settings by going to Settings > System > Multitasking.

Enhanced Touch and Pen Integration

As hybrid devices with touch capabilities grow in popularity, Windows 11 has made strides to improve touch and pen inputs. The new interface is designed to be more easily navigable for touch users, with larger icons and improved spacing between touch targets. This allows for an easier and more intuitive interaction with the operating system on touchscreen devices.

Furthermore, Windows 11 features enhanced support for stylus input, including haptic feedback, which enriches the drawing and writing experience. Users can take notes, sketch, or annotate documents effortlessly, making this feature particularly valuable for students and professionals. The overall improvements in touch and pen usability cater to a diverse audience, enhancing the operating system's accessibility.

Enhanced Accessibility Features

Windows 11 includes various accessibility features designed to make the operating system more inclusive for all users. New voice typing capabilities leverage advanced speech recognition technology to convert speech to text more accurately and dynamically.

Additionally, visual aids such as the Magnifier, Narrator, and improved high contrast mode help users with visual impairments interact more easily with the operating system. With these enhancements, Windows 11 strives to create an environment where everyone can use their devices comfortably.

Windows 11 is not just another iteration of the Windows operating system; it represents a thoughtful evolution designed to enhance usability and accessibility for a diverse user base. With its modern interface, innovative features, and powerful performance enhancements, Windows 11 makes computing easier and more enjoyable. Whether you're a casual user or a professional, these features are poised to elevate your digital experience and empower you to use your device more effectively. As users adapt to the changes, it's clear that Windows 11 lays the groundwork for a more streamlined and intuitive computing future.

Windows 11 shut down and restart options

Are you looking for a different way to shut down or restart Windows 11 besides the Start menu? Windows 11 has several ways of doing this, including the Start menu, Power User menu, keyboard shortcuts, and PowerShell. Whether you prefer using keyboard shortcuts, the Start menu Windows logo, or the command line, there's a method that suits your preference. Here are all the ways you can shut down or restart Windows 11.

Using the Windows logon screen to shut down or restart Windows 11

Using the Windows logon screen to shut down or restart Windows 11

  1. Left-click anywhere on the background or tap any key on the keyboard to bring up the log on prompt.
  2. Left-click on the Power icon in the lower right hand corner of the screen.
  3. Left-click on either Shut down or Restart.

Using the Start Menu to shut down or restart Windows 11

Using the Start menu to shut down or restart Windows 11

The simplest way to shutdown or restart your Windows 11 computer is by using the Start menu Windows logo.

  1. Left-click on the Start button Windows logo
  2. Left-click on the Power icon.
  3. Left-click on either Shut down or Restart.

Using the Power User Menu to shut down or restart Windows 11

Using the Power User menu to shut down or restart Windows 11

  1. Press the Windows Logo key Windows logo + X or right-click on the Start button Windows logo to bring up the Power User menu.
  2. Left-click on Shut down or sign out.
  3. Left-click on either Shut down or Restart.

Using the Windows Security screen to shut down or restart Windows 11

Using the Windows Security screen to shut down or restart Windows 11

  1. Press Ctrl + Alt + Del to bring up the Windows Security screen
  2. Left-click on the Power icon in the lower right hand corner of the screen.
  3. Left-click on either Shut down or Restart.

Using the Shut Down Windows dialog box to shut down or restart Windows 11

Using the Shut Down Windows dialog box to shut down or restart Windows 11

  1. With just the Desktop showing, press Alt + F4 to bring up the Shut Down Windows dialog box.
  2. Left-click on either Shut down or Restart.

Using PowerShell to shut down or restart Windows 11

Using PowerShell to shut down or restart Windows 11

  1. Left-click on the Start button Windows logo to bring up the Start menu.
  2. In the upper right-hand corner of the Start menu, left-click on All apps.
  3. Scroll down the list of programs and left-click on Windows Tools.
  4. Left-click on Windows PowerShell.

Once you have PowerShell open, type or copy and paste the following at the PowerShell prompt and then press Enter.

Stop-Computer

or

Restart-Computer

Using the Windows Shutdown and Annotation Tool to shut down or restart Windows 11

All versions of Windows include the Windows Shutdown and Annotation Tool (shutdown.exe). This app can be run from a Command Prompt or a Run dialog box. It can shut down or restart your computer. It can also log the current user off.

The most commonly used Shutdown syntax and parameters

Syntax
shutdown [/l | /s | /r ] [/f] [/t xx]
Parameters
-l Logs off the current user.
-s Shuts down your computer.
-r Shuts down and restarts your computer.
-f Forces running applications to close.
-t xx Sets the timer for system shutdown in xx seconds. The default is 30 seconds.

Using a Command Prompt to shut down or restart Windows 11

Using a Command Prompt to shut down or restart Windows 11

  1. Left-click on the Start button Windows logo to bring up the Start menu.
  2. In the upper right-hand corner of the Start menu, left-click on All apps.
  3. Scroll down the list of programs and left-click on Windows Tools.
  4. Left-click on Command Prompt.

How to open a Run Dialog box

Using a Run dialog box to shutdown or restart Windows 11

  1. Press the Windows logo key Windows logo + R

or

  1. Left-click on the Start button Windows logo to bring up the Start menu.
  2. In the upper right-hand corner of the Start menu, left-click on All apps.
  3. Scroll down the list of programs and left-click on Windows Tools.
  4. Left-click on Run.

Once you have a Command Prompt or a Run dialog box open, you will need to type or copy/paste the following syntax and parameters into it. Remember that when you press the Enter key or click OK, shutdown.exe will run with the parameter(s) you specify.

Recommened Shutdown syntax and parameters for logging off Windows 11

shutdown -l -f

Recommened Shutdown syntax and parameters for restarting Windows 11

shutdown -r -f -t 00

Recommened Shutdown syntax and parameters for shutting down Windows 11

shutdown -s -f -t 00

A complete list of Windows 11 Shutdown.exe syntax and parameters

Syntax
shutdown [/i | /l | /s | /sg | /r | /g | /a | /p | /h | /e | /o] [/hybrid] [/soft] [/fw] [/f] [/m \\computer][/t xxx][/d [p|u:]xx:yy [/c "comment"]]
Parameters
No args Display help. This is the same as typing /?.
/? Display help. This is the same as not typing any options.
/i Display the graphical user interface (GUI). This must be the first option.
/l Log off. This cannot be used with /m or /d options.
/s Shutdown the computer.
/sg Shutdown the computer. On the next boot, if Automatic Restart Sign-On is enabled, automatically sign in and lock last interactive user. After sign in, restart any registered applications.
/r Full shutdown and restart the computer.
/g Full shutdown and restart the computer. After the system is rebooted, if Automatic Restart Sign-On is enabled, automatically sign in and lock last interactive user. After sign in, restart any registered applications.
/a Abort a system shutdown. This can only be used during the time-out period. Combine with /fw to clear any pending boots to firmware.
/p Turn off the local computer with no time-out or warning. Can be used with /d and /f options.
/hybrid Performs a shutdown of the computer and prepares it for fast startup. Must be used with /s option.
/fw Combine with a shutdown option to cause the next boot to go to the firmware user interface.
/e Document the reason for an unexpected shutdown of a computer.
/m \\computer Specify the target computer.
/t xxx Set the time-out period before shutdown to xxx seconds. The valid range is 0-315360000 (10 years), with a default of 30. If the timeout period is greater than 0, the /f parameter is implied.
/c "comment" Comment on the reason for the restart or shutdown. Maximum of 512 characters allowed.
/f Force running applications to close without forewarning users. The /f parameter is implied when a value greater than 0 is specified for the /t parameter.
/d [p|u:]xx:yy Provide the reason for the restart or shutdown. p indicates that the restart or shutdown is planned. u indicates that the reason is user defined. If neither p nor u is specified the restart or shutdown is unplanned. xx is the major reason number (positive integer less than 256). yy is the minor reason number (positive integer less than 65536).

Tips for boosting productivity in Windows 11

Are you looking to boost your productivity on Windows 11? With its sleek design and improved functionality, Windows 11 offers a variety of features and tools that can help you work more efficiently. In this article, we'll explore some tips and tricks to help you get the most out of your Windows 11 experience while improving your productivity.

Tips for boosting productivity in Windows 11

Start menu: The Start menu is Windows 11's central hub, and customizing it can help you access your most-used apps and files quickly. You can rearrange, resize, and pin tiles to the Start menu to create a personalized layout that suits your workflow. This can save you time and improve your efficiency by reducing the time spent searching for apps and files.

How to personalize the Start menu in Windows 11

Virtual desktops: One of the most useful features of Windows 11 is the ability to create and manage virtual desktops. This feature allows you to create multiple desktops for different tasks and switch between them easily. For example, you can have one desktop for work-related tasks and another for personal use.

This feature can help you stay focused and organized, reducing distractions and boosting productivity. Additionally, you can set a unique background for each desktop to quickly identify your current desktop.

How to create multiple desktops in Windows 11

  1. Left-click on the Task view icon Task view icon on the Taskbar on the Taskbar and select New desktop
  2. Open the programs you want to use on that desktop
  3. Left-click on the Task view icon Task view icon on the Taskbar again to switch between desktops

How to set the background for a desktop

  1. Right-click on the desktop you want to change and select Choose background
  2. Choose an image from the recent images or left-click on Browse photos to select an image

Keyboard shortcuts: Keyboard shortcuts are a quick and easy way to perform tasks in Windows 11 without having to navigate through menus and options. Learning a few essential keyboard shortcuts can save you time and boost your productivity. For example, press the Windows logo key Windows logo + D to minimize all windows and go to the desktop, or press the Windows logo key Windows logo + E to open File Explorer.

Windows logo key shortcuts for Windows 11

My favorite left-hand Windows keyboard shortcuts

You can create keyboard shortcuts for items on your Desktop.

Everything you wanted to know about Windows shortcuts

You can also create custom keyboard shortcuts using the Keyboard Manager app inside the free Microsoft PowerToys.

Free Microsoft PowerToys for Windows 10 and Windows 11

Focus assist: Focus assist is a feature that blocks notifications and alerts while you're working on a task, reducing distractions and helping you stay focused. You can customize Focus assist settings to allow specific notifications or set it to turn on automatically during specific times or when you're presenting. This can help improve your productivity by reducing interruptions and allowing you to focus on the task at hand.

When you enable Focus assist, a timer will appear on the screen, the do not disturb button will turn on, apps in the Taskbar will not flash to get your attention, and badge notifications in the Taskbar will be turned off. There are several ways to start Focus assist in Windows 11.

How to start Focus assist from the Notiification center

  1. Left-click on the Notification icon Notification icon on the Windows 11 Taskbar(bell) on the right end of the Taskbar
  2. Adjust the length of time if you like, and then left-click on the Focus button.

How to start Focus assist from Settings

  1. Left-click on the Start button Windows logo to bring up the Start menu.
  2. In the list of pinned apps on the Start menu, left-click on Settings.
  3. Left-click on the System category in the left-hand column.
  4. Scroll down the right-hand column and left-click on Focus.

How to start Focus assist from the Clock app

  1. Left-click on the Start button Windows logo to bring up the Start menu.
  2. In the upper right-hand corner of the Start menu, left-click on All apps.
  3. Scroll down the list of programs and left-click on Clock.

Snap layouts and Snap groups: Windows 11 includes a new feature called Snap layouts and Snap groups that makes it easier to organize and manage multiple windows on your screen. Snap layouts allow you to quickly arrange your windows in predefined layouts, while Snap groups let you save and restore groups of windows for specific tasks. This can help you work more efficiently by reducing the time spent resizing and rearranging windows.

How to open Snap layouts

To open the Snap layout box, select the open program window and do either:

  • Press the Windows logo key Windows logo + Z
    or
  • Hover your mouse cursor over the Minimize or Maximize button

When you Snap every space with selected windows, this then becomes a Snap group.

Taskbar: The Taskbar in Windows 11 is more customizable than ever. It lets you pin your most-used apps and files for quick access and show only the apps you need, reducing clutter and improving productivity.

You can also easily add an existing shortcut to the Taskbar by right-clicking on almost any shortcut on the Start menu or Desktop and selecting Pin to taskbar. Additionally, you can use the Taskbar to access the Start menu, search, and virtual desktops, making it a central hub for your workflow.

Widgets: Windows 11 includes a new Widgets feature that provides quick access to news, weather, and other information. You can customize the Widgets to show only the information you need, making them useful tools for staying up-to-date on the latest news and events. This can help improve your productivity by reducing the time spent searching for information.

In conclusion, there are many ways to improve productivity on Windows 11. By using virtual desktops, customizing your Start menu, using keyboard shortcuts, enabling Focus assist, using Snap layouts and Snap groups, utilizing the Taskbar, and using the Widgets feature, you can work more efficiently and get more done in less time. By implementing these tips and tricks, you'll be well on your way to becoming a Windows 11 power user.

How to personalize the Start menu in Windows 11

Are you tired of the default Start menu in Windows 11? Do you feel like it's cluttered with unnecessary apps and features? If so, you're not alone. Many users find the Start menu overwhelming and distracting, ultimately impacting their productivity. Fortunately, there's a solution - personalizing your Start menu.

How to personalize the Start menu in Windows 11

By customizing your Start menu, you can maximize your productivity and unleash the full potential of your Windows 11 experience. You can create a unique and effective Start menu that caters to your specific needs and preferences, making your computing experience more enjoyable overall.

To get started, you'll need to explore the various customization options available in Windows 11. From rearranging your app tiles to pinning your favorite programs, there are plenty of ways to make your Start menu work for you. By taking the time to personalize your Start menu, you can streamline your workflow and access the apps and tools you need with just a few clicks.

Consider customizing your Start menu today to improve your Windows 11 experience and maximize productivity. With time and effort, you can create a Start menu tailored to your unique needs and preferences, making your computing experience more enjoyable and efficient. Let's get started.

All the changes outlined in this article are done inside the Settings app. You can bring up the Settings app by:

  • Left-clicking on the Start button Windows logo to bring up the Start menu.
  • In the list of pinned apps on the Start menu, left-click on Settings.
  • or
  • Right-click on the Start button Windows logo to bring up the Power User menu.
  • In the list of programs that appear, left-click on Settings.
  • or
  • Press the Windows logo key Windows logo + I

Once you open the Settings app, left-click on Personalization in the left-hand column. This will display all of the Personalization categories in the right-hand column.

These customizations are in no particular order. Let's start with the alignment of the Start menu on the Taskbar.

Changing the location of the Start menu on the Taskbar

Settings > Personalization > Taskbar > Taskbar behaviors

Windows 10 only allowed the Start menu to be located in the corner of the Taskbar, although you could place the Taskbar along any of the screen edges (left, right, top, or bottom). With Windows 11, you currently only have the option of the bottom of the screen.

But you can change the Start button's alignment (left or center). Inside of Taskbar behaviors, you can change the alignment between left and center using the pull-down menu.

Changing the accent color of the Start menu

Settings > Personalization > Colors

This option can be changed inside the Colors category. The only way you can change the Start menu accent color is by selecting Dark or Custom mode under Choose your mode. If you choose Dark mode, you can set the accent color for the Start menu and the Taskbar. If you choose Custom mode, you must select Dark mode for Windows to be able to set the accent color.

Changing the Start menu options

Settings > Personalization > Start

Windows 11 Start menu features and areas

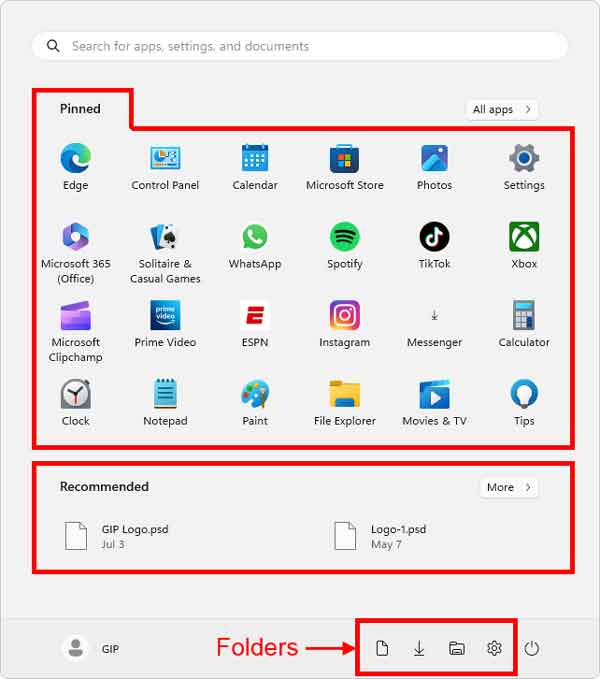
There are three (3) areas that you can customize on the Start menu; Pinned (programs /apps), Recommended (recently accessed files), and Folders (Settings, File Explorer, Documents, Downloads, Music, Pictures, Videos, Network, and Personal Folder).

The first option is the layout of the Start menu. You have three (3) choices; More pins, Default (an even mix of pins and recommendations), and More recommendations.

The next set of options you can toggle on or off. They are:

  • Show recently added apps
  • Show recently used apps
  • Show recently opened items in Start, Jump Lists, and File Explorer
  • Show recommendations for tips, shortcuts, new apps, and more

The next option is the Folders category. Here, you can select which folders appear on the Start menu next to the Power button. You can choose any or all of the following folders: Settings, File Explorer, Documents, Downloads, Music, Pictures, Videos, Network, and Personal Folder.

Changing the Pinned apps on the Start menu

To add a program or folder to the Pinned apps area, locate the folder or program and right-click on it. From the context menu that appears, select Pin to Start.

To remove a program or folder from the Pinned apps area, right-click on it and select Unpin from Start.

To rearrange the Pinned apps, press and hold the left mouse button on the app you want to move and relocate it.

Changing the Recommended files

The only way to add a file to the Recommended area is to open a file with the associated program, then save it.

To remove a file from the Recommended area, right-click on it and select Remove from the list.

How to repair the Start menu inside of Windows 11

The Start menu has been an essential component of Windows since Windows 95, helping users navigate the various programs and features. But what do you do when it does not work? Here is how to repair the Windows 11 Start menu.

How to repair the Start menu inside of Windows 11

You only realize how much you depend on the Start menu once it does not work correctly. And trying to fix it without being able to access any of the apps on it is hard. But there are ways to get to the tools required to fix the Start menu.

In this article, I want to show you some of the different things you can do to fix a broken Start menu in Windows 11. Most of the apps required for the following procedures can be found in the Control Panel under Windows Tools.

Since the Start menu is not functioning correctly, you must use an alternative way of getting to the Control Panel. Here is the easiest and fastest way to get there.

  1. Open a Run dialog box by pressing the Windows logo key Windows logo key + R (click here for more ways to open a Run dialog box).
  2. Type in Control and then left-click on OK.
  3. If viewing the Control Panel by Category, left-click on System and Security, then left-click on Windows Tools. If viewing by Large/Small Icons, left-click on Windows Tools.

Now that you have access to the Windows Tools, let's start with the solution that works most of the time, the PowerShell script.

Use PowerShell to repair the Windows 11 Start menu

1. In the Windows Tools folder, right-click on the Windows PowerShell shortcut and select Run as Administrator from the context menu that appears.

2. Copy and paste the following script into the Powershell prompt and press Enter.

Get-AppxPackage -AllUsers Microsoft.Windows.ShellExperienceHost | Foreach {Add-AppxPackage -DisableDevelopmentMode -Register "$($_.InstallLocation)\AppXManifest.xml"}

If you get an error message stating the action could not be performed because the ShellExperienceHost is running, copy and paste the following script and press Enter to end the ShellExperienceHost task.

taskkill /ID ShellExperienceHost.exe /F

Then rerun the first script.

3. You must restart your computer for the changes to take effect. Since the PowerShell is open, copy and paste the following into the Powershell and press Enter to restart your computer immediately.

shutdown.exe -r -f -t 00

Check your drive for errors

If the Start menu is still not working correctly after running the PowerShell script, it may be time to check your drive for errors. There are several ways to run a disk check, but the easiest way is through File Explorer.

  1. Press the Windows logo key Windows logo + E keys simultaneously to bring up File Explorer.
  2. In the left-side column, left-click on This PC.
  3. In the right-side column, right-click on the drive you want to check and select Properties.
  4. Left-click on the Tools tab.
  5. Under Error checking, left-click on Check.
  6. Left-click on Scan drive.

For all of the different ways to run a disk check, check out 'How to check your drive for errors in Windows 11'.

Check for corrupt system files

If the Start menu is still not working, you might want to check for corrupt system files. To run the System File Checker (SFC), you must use either a Command Prompt or PowerShell with administrative privileges. Open the Windows Tools folder, right-click on the Command Prompt or Windows PowerShell shortcut, select Run as Administrator from the context menu, Copy and paste the following into it, and then press Enter.

SFC /SCANNOW

If the scan finds corrupt files and fixes them, restart your computer. If it finds errors but cannot fix them, check out our article 'How to check and repair system files in Windows 11' for more in-depth ways to repair system files.

Repair Windows 11 with an in-place upgrade

If all else fails to fix the Start menu, performing an in-place upgrade might be the thing to do. I have seen in-place upgrades fix some of the most annoying problems with Windows. Check out our article 'How to perform a repair upgrade of Windows 11'.

Reset Windows 11

This would be the last resort to getting the Start menu running correctly again. The following article, 'How to reset Windows 11', will guide you through the steps you must take to reset Windows 11.

Free computer diagnostics

Repairing a PC can sometimes be expensive, and that is why we offer free basic in-shop diagnostics. Give one of our professional and experienced technicians a call at (602) 795-1111, and let's see what we can do for you.

Check out our reviews

Geeks In Phoenix LLC, BBB Business Review

Customer service is #1

Here at Geeks in Phoenix, we take pride in providing excellent customer service. We aim to give the highest quality of service  from computer repair, virus removal, and data recovery.

Bring your computer to us and save

Repairing a computer can be time-consuming. That is why we base our in-shop service on the time we work on your computer, not the time it takes for your computer to work! From running memory checking software to scanning for viruses, these are processes that can take some time.

Contact us

If you have any questions, please feel free to give us a call at (602) 795-1111  and talk with one of our Geeks. Or you can send us a message from our contact page , and one of our Geeks will get back to you as soon as possible. Or you can stop by and see us. Here are our hours and location.

Like Geeks in Phoenix on Facebook

Follow Geeks in Phoenix on Twitter

Watch Geeks in Phoenix on YouTube