Geeks in Phoenix

Geek Blog


How to repair the Start menu inside of Windows 11

The Start menu has been an essential component of Windows since Windows 95, helping users navigate the various programs and features. But what do you do when it does not work? Here is how to repair the Windows 11 Start menu.

How to repair the Start menu inside of Windows 11

You only realize how much you depend on the Start menu once it does not work correctly. And trying to fix it without being able to access any of the apps on it is hard. But there are ways to get to the tools required to fix the Start menu.

In this article, I want to show you some of the different things you can do to fix a broken Start menu in Windows 11. Most of the apps required for the following procedures can be found in the Control Panel under Windows Tools.

Since the Start menu is not functioning correctly, you must use an alternative way of getting to the Control Panel. Here is the easiest and fastest way to get there.

  1. Open a Run dialog box by pressing the Windows logo key Windows logo key + R (click here for more ways to open a Run dialog box).
  2. Type in Control and then left-click on OK.
  3. If viewing the Control Panel by Category, left-click on System and Security, then left-click on Windows Tools. If viewing by Large/Small Icons, left-click on Windows Tools.

Now that you have access to the Windows Tools, let's start with the solution that works most of the time, the PowerShell script.

Use PowerShell to repair the Windows 11 Start menu

1. In the Windows Tools folder, right-click on the Windows PowerShell shortcut and select Run as Administrator from the context menu that appears.

2. Copy and paste the following script into the Powershell prompt and press Enter.

Get-AppxPackage -AllUsers Microsoft.Windows.ShellExperienceHost | Foreach {Add-AppxPackage -DisableDevelopmentMode -Register "$($_.InstallLocation)\AppXManifest.xml"}

If you get an error message stating the action could not be performed because the ShellExperienceHost is running, copy and paste the following script and press Enter to end the ShellExperienceHost task.

taskkill /ID ShellExperienceHost.exe /F

Then rerun the first script.

3. You must restart your computer for the changes to take effect. Since the PowerShell is open, copy and paste the following into the Powershell and press Enter to restart your computer immediately.

shutdown.exe -r -f -t 00

Check your drive for errors

If the Start menu is still not working correctly after running the PowerShell script, it may be time to check your drive for errors. There are several ways to run a disk check, but the easiest way is through File Explorer.

  1. Press the Windows logo key Windows logo + E keys simultaneously to bring up File Explorer.
  2. In the left-side column, left-click on This PC.
  3. In the right-side column, right-click on the drive you want to check and select Properties.
  4. Left-click on the Tools tab.
  5. Under Error checking, left-click on Check.
  6. Left-click on Scan drive.

For all of the different ways to run a disk check, check out 'How to check your drive for errors in Windows 11'.

Check for corrupt system files

If the Start menu is still not working, you might want to check for corrupt system files. To run the System File Checker (SFC), you must use either a Command Prompt or PowerShell with administrative privileges. Open the Windows Tools folder, right-click on the Command Prompt or Windows PowerShell shortcut, select Run as Administrator from the context menu, Copy and paste the following into it, and then press Enter.

SFC /SCANNOW

If the scan finds corrupt files and fixes them, restart your computer. If it finds errors but cannot fix them, check out our article 'How to check and repair system files in Windows 11' for more in-depth ways to repair system files.

Repair Windows 11 with an in-place upgrade

If all else fails to fix the Start menu, performing an in-place upgrade might be the thing to do. I have seen in-place upgrades fix some of the most annoying problems with Windows. Check out our article 'How to perform a repair upgrade of Windows 11'.

Reset Windows 11

This would be the last resort to getting the Start menu running correctly again. The following article, 'How to reset Windows 11', will guide you through the steps you must take to reset Windows 11.

How to manually upgrade Windows 10 to Windows 11

Are you thinking about upgrading your computer from Windows 10 to Windows 11? Does your computer meet the Windows 11 hardware requirements? If you answered yes to both questions, consider performing a manual in-place upgrade from Windows 10 to Windows 11.

How to manually upgrade Windows 10 to Windows 11

Upgrading Windows has never been a really popular undertaking, but rather a chore that we put off as long as we can. In the corporate IT world, you usually do not deploy a new operating system until the second version is released.

The reasoning behind waiting for the second version is that all of the major bugs should be worked out by then. And it also gives software developers more time to perfect their software for Windows 11.

With the release of Windows 11 22H2, we now have the second version of Windows 11, which should be ready for the corporate environment. And if it is good enough for corporate, it should be good enough for you and me.

Microsoft recommends using Windows Update to perform the upgrade, but some people like myself want to decide when it will happen. I don't particularly appreciate getting an alert from Windows Update about an update waiting to be installed, only to find out that it is to Windows 11 (it has happened twice to me now).

When I started working with computers, upgrading your version of Windows was an all-day ordeal. Insert the floppy disk, read the floppy disk, eject the floppy disk, and repeat until complete. I still have the thirteen (13) floppy disks for upgrading to Windows 95.

Yes, in the past, upgrading the versions of Windows has been tedious. At least the process has gotten a little easier, but the steps to getting there are still the same. I still follow the same procedures upgrading Windows now as I did years ago; check for hardware compatibility, backup the drive that contains Windows, clean up Windows, check the Windows drive for errors, and then upgrade.

Since Windows 11 was built on the code of Windows 10, all of the programs you have currently installed in Windows 10 should work perfectly fine in Windows 11. But remember that there may be apps presently installed that you would not be able to reinstall on Windows 11, Quickbooks 2021, and earlier versions, for example.

Consider taking note of a few things that have changed in Windows 11 before upgrading. If you use pinned apps/websites or tablet mode, these features have been removed from Windows 11.

Check for hardware compatibility

The PC Health Check app running on Windows 10

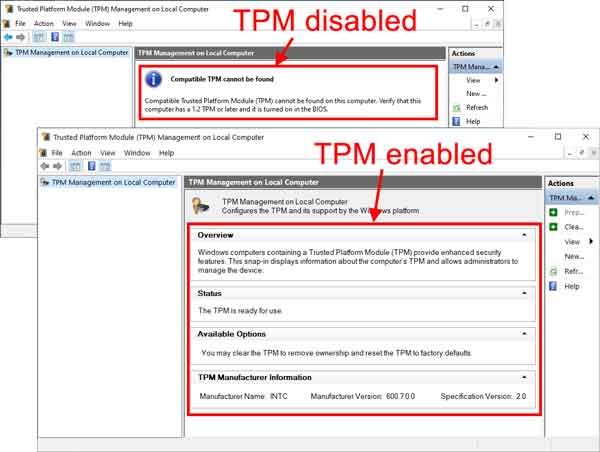
The minimum hardware requirements for Windows 10 and Windows 11 are similar but do have differences. The significant hardware requirement for Windows 11 is TPM (Trusted Platform Module) version 2.0. If your computer was manufactured between 2018 and now, it probably has TPM 2.0 and may need to be enabled. Motherboard manufacturers disabled this feature by default before the release of Windows 11.

Since then, manufacturers now enable TPM by default. If your computer fails the PC Health Check (link below), and is only a couple of years old, check with the manufacturer of your system/motherboard on how to enable the TPM, as each platform uses a different name for TPM (Intel has PTT, AMD has fTPM) .

Also, if your computer has less than 4 GB of memory or is running a 32-bit version of Windows 10, you will not be able to upgrade to Windows 11. A good rule of thumb is that any computer built before 2018 will not be compatible with Windows 11.

To be on the safe side, Microsoft has a tool called PC Health Check that you can use to check Windows 11 compatibility. Once you verify compatibility, you can proceed to the next step.

PC Health Check

Backup your Windows 10 drive

The Backup and Restore app running on Windows 10

As I said before, the upgrade from Windows 10 to Windows 11 is pretty simple, but you never know what can happen. So as the old saying goes, "An ounce of prevention is worth a pound of cure," so backing up the drive where Windows 10 is installed is suggested but not required.

Backup your files with File History and Windows Backup in Windows 10

Clean up Windows 10

The Disk Cleanup app running on Windows 10

A little general cleaning is highly recommended to help to ensure nothing goes wrong with the upgrade and to facilitate a faster upgrade process. Clearing out temp files, Internet caches, and Windows Update can also free up some disk space.

Clean up your Windows 10 computer using the Storage feature

Clean up Windows 10 with Disk Cleanup

Check your Windows 10 drive for errors

A quick check of the disk with Windows installed on it is recommended to ensure the upgrade goes without any problems. It is better to find any errors now instead of during the upgrade. Remember, taking a few minutes now to check the drive can save you from having to use the backup you created earlier.

How to check your drive for errors in Windows 10

Upgrade Windows 10 to Windows 11

Windows 10 upgrading to Windows 11

Microsoft currently has two (2) ways to upgrade Windows 10 to Windows 11 manually; the Installation Assistant or installation media. The Installation Assistant is the easiest way to go, but the complete instructions on using both methods are on the Windows 11 download page.

Download Windows 11

How to perform a repair upgrade of Windows 11

Are you having some problems with your computer and wish you could reinstall Windows 11 without losing your files and apps? Maybe you want to upgrade to the latest version of Windows 11, and Windows Update is not offering it. Here is how to perform a repair upgrade installation of Windows 11.

How to perform a repair upgrade of Windows 11

There is one thing every Windows user fears, and that is reinstalling Windows. The fear of losing your files and installed programs will deter most people until the problem becomes too bad to ignore.

But with Windows 11, you can do a repair upgrade reasonably easily. So what is a repair upgrade? It is reinstalling Windows 11 using the same version (repair) or a newer version (repair/upgrade). It is often called an in-place repair or upgrade.

Now I have repaired several Windows computers using this method, which works most of the time. I remember one laptop with issues with being unable to right-click using the touchpad or mouse, and an in-place repair installation fixed the problem.

We first need to download the latest version of Windows 11 from Microsoft (see the link below). We will be downloading an ISO file that we will use to reinstall Windows 11. An ISO file is the format for optical disks (CD, DVD, BD).

Download Windows 11

When you reach the Windows 11 download page, scroll down until you find Download Windows 11 Disk Image (ISO). You can also create an ISO file using the Create Windows 11 Installation Media, which involves a few more steps.

Once you have the ISO file downloaded, you will need to make it a virtual DVD drive. Locate the ISO file in File Explorer and right-click on it.
Mounting an ISO file as a virtual drive in Windows 11
From the context menu that appears, select Mount. If you receive a security warning, left-click on Open. It will now appear as a DVD drive inside File Explorer.

Click on the DVD drive to display the contents. In the list of files and folders, you will find a program named Setup.
Running Windows 11 Setup with administrator privileges
To ensure we are running the install with the correct privileges, right-click on Setup and select Run as administrator from the context menu that appears. This will start the repair upgrade installation.

The first window that appears is the Windows 11 Setup screen. Usually, you would click on the Next button and proceed with the installation.
The Windows 11 Setup main screen
But if you are performing a repair installation, you may want to change whether or not to download updates, drivers, and features at this time by clicking on the Change how Setup downloads updates link.
Select whether or not to download updates and drivers before installing Windows 11
I have found that delaying downloads until after the installation is complete works best for repairing Windows.

Next, you will get the EULA (End User License Agreement), click on Accept and continue. On the next screen, you can change if you keep your files and apps or remove them.
Select whether or not to save your personal files and apps
By default, both files and apps are saved. When you are ready to start the installation, click on Install.

Once the repair upgrade starts, it can take some time to finish.
The different stages of the repair upgrade of Windows 11
Grab something to drink and find something to do. Your computer will restart several times during the installation.

How to repair the Windows 10 Start menu apps

When it comes to using Windows 10, the Start menu app tiles are a popular way to open some of your favorite programs. But what happens if the app tiles stop functioning correctly? Here is how to repair the Start menu apps.

How to repair the Windows 10 Start menu apps

The Start menu apps are not standard desktop Windows programs; they are Universal Apps, UWP (Universal Windows Platform), to be exact. They are designed to run on all Microsoft devices, including Xbox, Surface Hub, and HoloLens. Microsoft has set quite a few of them as default apps in Windows 10 for opening photos, videos, music, etc.. So when they stop working, it can be a significant problem.

The steps outlined in this article should be taken in the order listed. Remember to restart your computer between each step so that changes have a chance to take effect. The links to the blogs referenced in each stage are highly detailed and will open in new browser tabs. That way, you don't have to worry about trying to get back to this article.

Reinstall the Start menu apps

This step is one of the most straightforward procedures and should fix the Start menu apps most of the time. All you have to do is copy a string of text and paste it into an Administrative PowerShell console.

There are several ways to open an Administrative PowerShell. Here are a few of the most popular

  1. Open an Administrative PowerShell using one of the following procedures.
    • Bring up the Start menu by left-clicking on the Start Windows logo button.
    • Scroll down to the Windows PowerShell folder and left-click on it.
    • Right-click on Windows PowerShell and select Run as Administrator on the context menu that appears.
    or
    • Bring up the Power User menu by right-clicking on the Start Windows logo button.
    • Left-click on the Windows PowerShell (Admin) link.
    or
    • In the search box to the right of the Start Windows logo button type PowerShell.
    • In the right-hand column of the search results, left-click on Run as Administrator directly below Windows PowerShell.
  2. You will get a prompt stating Do you want to allow this app to make changes to your device? Left-click on Yes.
  3. Copy and paste the following text into the PowerShell window.
    Get-AppXPackage -AllUsers | Foreach {Add-AppxPackage -DisableDevelopmentMode -Register "$($_.InstallLocation)\AppXManifest.xml"}
  4. When the script is done running, close the PowerShell window by typing exit and press enter.
  5. Restart your computer.

Don't worry if a couple of errors are generated while running the PowerShell command. It happens even on a clean Windows 10 installation. If numerous errors are generated, then you may need to proceed with the following steps.

I once had a system that the Start menu apps would not reinstall because the Windows Security Service would not start. I had to repair it before I could get the Start menu apps working again. Remember that once you complete any of the following procedures, restart your computer and rerun the PowerShell command.

Check the drive for errors

There is a possibility that the Start menu apps are not functioning correctly because there are errors on your C:\ drive. Running a quick standard disk check may be just the thing your computer needs to get the Start menu apps running again.

And even if it doesn't fix the problem with the apps, it is always an excellent procedure to do before the next step. Here's how to run a standard drive check in Windows 10.

  1. Open File Explorer using one of the following:
    • Left-click on the File Explorer icon (manilla folder) on the Taskbar.
    • Press the Windows logo key Windows logo + E at the same time.
    • Use the Power User menu by right-clicking on the Start Windows logo button and selecting File Explorer.
  2. In the left-side column left-click on This PC.
  3. In the right-side column right-click on the drive you want to check and select Properties.
  4. Left-click on the Tools tab.
  5. Under Error checking left-click on Check.
  6. Left-click on Scan drive.

If you get an error when trying to run a standard drive check, you may have to perform an advanced check. Here are all of the details on how to do it.

How to check your drive for errors in Windows 10

Check system files for corrupt or missing files

Now some of the files the Start menu apps require to operate correctly may be missing or gotten corrupted. Windows 10 has a utility called System File Checker (SFC) that can detect and repair problems with files required by Windows 10 for properly operation.

Let me forewarn you that you may have to run SFC more than once to fix some of Windows 10 files. You may even have to start your computer in safe mode to get SFC to repair Windows 10. Here's how to run a basic SFC scan:

  1. Open an Administrator Command Prompt using one of the following.
    1. Left-click on the Start Windows logo button.
    2. Scroll down the program list and then left-click on the Windows System folder to expand.
    3. Right-click on Command Prompt.
    4. On the context menu that appears, hover your cursor over More and then left-click on Run as administrator. If you're prompted for an administrator password or confirmation, type the password or provide confirmation.
    or
    1. In the search box next to the Start Windows logo button, type Command Prompt.
    2. In the list of results, the Command Prompt should be highlighted.
    3. In the right-hand column under Command Prompt, there is an options menu. Left-click on Run as administrator. If you're prompted for an administrator password or confirmation, type the password or provide confirmation.
  2. Type sfc /scannow into the Admin Command Prompt and press enter.

And in the worst-case scenario, you may have to replace a corrupt file or two manually. Luckily there is a way to determine what files SFC repairs and what ones it cannot. The following article has all of the details on how to go about using SFC to its fullest potential.

Check Windows 10 system files with System File Checker

Perform an in-place upgrade of Windows 10

The next step to getting the Start menu apps to working again involves doing an in-place upgrade of Windows 10. Even though it sounds kind of scary, it is relatively simple.

When performing an in-place upgrade, your documents, pictures, and videos stay perfectly safe. And you can keep all of the installed programs too. The only downside is the default programs for specific file types revert to Windows 10 defaults. To me, that is no biggie. The following article gives all of the details on how to do an in-place upgrade.

How to repair Windows 10 by doing an in-place upgrade

Reset Windows 10

This step is the completely last resort to fixing the Windows 10 Start menu apps. I defiantly don't recommend it, but I do have to suggest it (reluctantly) as an option. With resetting Windows 10, you can keep all of your documents, pictures, and videos. But all of the programs that did not come with Windows 10 will be gone. The following article gives all the details on how to reset Windows 10.

How to reset Windows 10

How to repair Windows 10 by doing an in-place upgrade

Updated May 14, 2020

Are you getting lots of errors when you log into Windows 10? Are you not able to get the Start menu or File Explorer to open? If so, it may be time to repair Windows 10 by doing an in-place upgrade.

Sometimes repairing Windows 10 can be a challenging endeavor. One time I had a Windows 10 system that the right-click mouse function would only work in certain situations.

Another time, I had a Windows 10 system that File Explorer and the Start menu would not work. This was one of those times when you think that you are going to just have to wipe the drive and do a clean installation of Windows 10.

But in both cases, I was able to repair Windows 10 while keeping all of the user's documents, settings, and installed programs. I just performed an in-place upgrade of Windows 10.

Remember that if you start the in-place upgrade by booting your computer up on the Windows 10 installation media, you will only get the option of saving your documents. To also preserve the installed programs, you need to start the in-place upgrade from inside of Windows 10.

Now performing an in-place upgrade is not hard. The only thing you need to do is make the Windows 10 installation media. If you can access the Internet and download the Windows 10 Media Creation Tool, great, if not, you will need to use another computer to make the Windows 10 installation media.

You do not have to be upgrading to a newer version of Windows 10 (1809 to 1903, 1903 to 1909) for this to work. You can perform an upgrade to the same version (1909 to 1909).

Now you never want to use an older version of the Windows 10 media, like the one you created a couple of years ago, to do an in-place upgrade. You will always want to download the latest version directly from Microsoft using the Windows 10 Media Creation Tool.

To make the media, you will need either a blank DVD or a USB flash drive that is at least 8GB in size. Remember that if you use a USB flash drive, it will be reformatted and everything on it will be erased. So, if you have used the USB drive for anything else, you may want to copy the data off of it before using it for the Windows 10 installation media.

Once you get the Windows 10 Media Creation Tool downloaded, all you have to do is double-click the file to run it. It is a stand-alone program, and it does not require any installation.

The first screen that comes up is the legal stuff, just click on Accept. On the next screen, you will have to choose what you want to do.
Windows 10 installer what do you want to do screen
Select Create installation media for another PC and click on Next.

On the next screen, you will select the language, architecture, and edition.
Windows 10 installer select language and edition screen
Since you are creating the media for another computer, make sure the Use the recommended options for this PC checkbox is deselected. The majority of users in the US will select the following settings:

  • Language: English (If you use a different language, select it from the pull-down menu)
  • Edition: Windows 10
  • Architecture: 64-bit (x64)

When you are finished selecting the language, architecture, and edition, click on Next. The next screen will ask you what media do you want to use.
Windows 10 installer choose which media to use screen
If you select the USB flash drive option, make sure you have the USB flash drive inserted into a USB port on the computer.

If you want to make a DVD, you will need to choose the ISO file option and then burn it onto a blank DVD. Here is how to go about burning the ISO file to a DVD.

Once you have the media created, either a DVD or USB flash drive, you will need to insert it in the computer that you want to repair.
Windows 10 setup program in File Explorer
Then just open File Explorer, navigate to the DVD or USB flash drive, and right-click on the setup.exe program and select Run as administrator.
Windows 10 installation start up screen
The Windows 10 installer will then startup.

You will be prompted to download Windows 10 updates, drivers, and optional features. Since you are doing an in-place upgrade, I recommend waiting until the installation is finished before doing any updates.

The next screen you will get is the license agreement. Just click Accept in the lower right-hand corner and continue with the in-place upgrade. Finally, you will get to the screen that asks what you want to keep. Make sure that Keep personal files and apps are selected and then select Install in the lower right-hand corner.

The in-place upgrade will take some time, and your computer could restart a few times before it is complete. When it is done, your version of Windows 10 should be completely repaired and good as new.

Now in the examples I talked about earlier, I could not get either the right-click function to work or could not get the Start menu or File Explorer to open at all. But there is another way of starting the in-place upgrade using Task Manager.

How to start a program using Task Manager

Sometimes the only way to run a program is to use Task Manager. It is a simple, down, and dirty way of running a program with administrative privileges. And we want to use admin privileges to run the setup.exe program.

  1. Press the Ctrl + Alt + Delete keys all at the same time (the 3-finger salute).
    The Windows 10 Ctrl Alt Delete screen
    You will get a screen that has several selections on it. Click on Task Manager.
  2. The Task Manager program will appear next.
    The basic Windows 10 Task Manager screen
    If it shows says There are no running apps, click on the More details arrow in the bottom left-hand corner. This will bring up all of the running processes.
  3. Click on the File drop-down menu in the upper left-hand corner of Task Manager
    The advanced Windows 10 Task Manager screen with Run new task
    and select Run new task.
  4. The Create a new task dialog box will appear.
    The Windows 10 Create new task dialog box
    Click on the Browse .. button in the lower right-hand corner.
  5. Using the Browse dialog box, navigate to the drive with the Windows 10 installation files (either DVD or USB flash drive),
    The Windows 10 Task Manager Browse screen
    select setup.exe and then click Open.
  6. This will bring you back to the Create new task dialog box, and the path to the setup.exe program will be in the Open field.
    The Windows 10 Create new task dialog box with file path
    Make sure that the Create this task with administrative privileges checkbox is selected. Then click on OK.
  7. The Windows 10 installer will now start. Just follow the steps outlined previously in this article for the rest of the in-place upgrade.

Free computer diagnostics

Repairing a PC can sometimes be expensive, and that is why we offer free basic in-shop diagnostics. Give one of our professional and experienced technicians a call at (602) 795-1111, and let's see what we can do for you.

Check out our reviews

Geeks In Phoenix LLC, BBB Business Review

Customer service is #1

Here at Geeks in Phoenix, we take pride in providing excellent customer service. We aim to give the highest quality of service  from computer repair, virus removal, and data recovery.

Bring your computer to us and save

Repairing a computer can be time-consuming. That is why we base our in-shop service on the time we work on your computer, not the time it takes for your computer to work! From running memory checking software to scanning for viruses, these are processes that can take some time.

Contact us

If you have any questions, please feel free to give us a call at (602) 795-1111  and talk with one of our Geeks. Or you can send us a message from our contact page contact page , and one of our Geeks will get back to you as soon as possible. Or you can stop by and see us. Here are our hours and location.

Like Geeks in Phoenix on Facebook

Follow Geeks in Phoenix on Twitter

Watch Geeks in Phoenix on YouTube