When it comes to repairing Windows-based computers, I always do one thing: check for corrupt system files. Corrupt system files can cause all sorts of problems, so here is how to check and repair system files in Windows 11.

Repairing system files is not complex, but it can be time-consuming. Going through all of the steps outlined in this article can take several hours. Once you start a scan, you will have to allow it to complete, so be prepared to watch your computer work. And all of the links included in this article will open in a new window.
We first need to check the drive's file structure that the operating system is installed on. It is usually drive C:. For this, we will use the disk error checking program built into Windows 11.
There are a couple of different ways to run it (standard and advanced), but the most thorough way is by using the advanced method (see link below). It may take some time to run, but it is the most thorough error checking you can perform.
How to check your drive for errors in Windows 11
Now that we have checked the drive for errors, we must check for corrupted system files. For this, we will use the built-in System File Checker (SFC). Like most of the programs in this article, this program has to be run from an Administrative Command Prompt.
How to open a Command Prompt with Administrator privileges in Windows 11
SFC has multiple syntaxes and parameters you can use with it. Here are all of the syntaxes and parameters with examples of their use.
SFC [/SCANNOW] [/VERIFYONLY] [/SCANFILE=<file>] [/VERIFYFILE=<file>] [/OFFWINDIR=<offline windows directory> /OFFBOOTDIR=<offline boot directory> [/OFFLOGFILE=<log file path>]]
- /SCANNOW - Scans integrity of all protected system files and repairs files with problems when possible.
- /VERIFYONLY - Scans integrity of all protected system files. No repair operation is performed.
- /SCANFILE - Scans integrity of the referenced file, repairs file if problems are identified. Specify full path <file>.
- /VERIFYFILE - Verifies the integrity of the file with full path <file>. No repair operation is performed.
- /OFFBOOTDIR - For offline repair, specify the location of the offline boot directory.
- /OFFWINDIR - For offline repair, specify the location of the offline windows directory.
- /OFFLOGFILE - For offline repair, optionally enable logging by specifying a log file path.
Examples:
- SFC /SCANNOW
- SFC /VERIFYFILE=c:\windows\system32\kernel32.dll
- SFC /SCANFILE=d:\windows\system32\kernel32.dll /OFFBOOTDIR=d:\ /OFFWINDIR=d:\windows
- SFC /SCANFILE=d:\windows\system32\kernel32.dll /OFFBOOTDIR=d:\ /OFFWINDIR=d:\windows /OFFLOGFILE=c:\log.txt
- SFC /VERIFYONLY

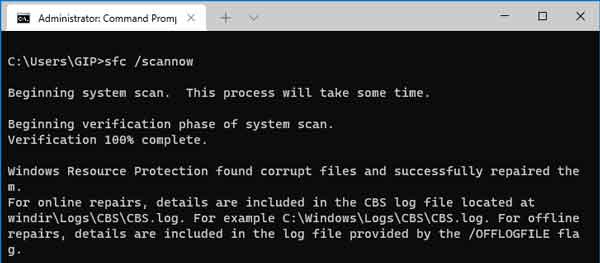
We want to check all of the Windows 11 protected system files, so type the following into an Administrative Command Prompt and press Enter.
SFC /SCANNOW

Now four (4) possible results can appear when SFC is done scanning. They are:
Windows Resource Protection did not find any integrity violations.
All system files are acceptable, and you are good to go.
Windows Resource Protection could not perform the requested operation.
There may be another program preventing SFC from running. In this case, boot the system up into safe mode and run SFC from there.
Windows Resource Protection found corrupt files and successfully repaired them.
All system files are now correct, and you're ready to go. Just restart your computer to finalize the repairs. If you want to view the repair details, type the following into an Administrative Command Prompt and press Enter.
findstr /c:"[SR]" %windir%\Logs\CBS\CBS.log >"%userprofile%\Desktop\sfcdetails.txt"
It will create a text file on your desktop named sfcdetails.txt that has all of the details of the repaired files.
Windows Resource Protection found corrupt files but was unable to fix some of them.
If you received this message, you will need to repair the hidden Windows image. To do this, we will need to run the Deployment Image Servicing and Management (DISM) program.

To restore the health of the Windows image, type the following into an Administrative Command Prompt and press Enter.
DISM /Online /Cleanup-image /Restorehealth
Once DISM finishes, run SFC /SCANNOW again. This time no integrity violations should be found. If, after several attemps at automatically repairing the corrupt system file(s) fails, you may have to fix them manually. To view the details of the files that could not be automatically repaired, type the following into an Administrative Command Prompt and press Enter.
findstr /c:"[SR]" %windir%\Logs\CBS\CBS.log >"%userprofile%\Desktop\sfcdetails.txt"
It will create a text file on your desktop named sfcdetails.txt. You will need to search through it and find what file(s) could not be repaired
How to manually repair corrupt system files
Note: To replace a corrupt system file, you must have a known good copy of the file(s) in question. A good file source is another computer or virtual machine running Windows 11. Since I do computer repair for a living, I have all of the versions of Windows that are still supported by Microsoft running inside virtual machines.
The first thing to do is note the location (path) and name of the file(s) that need to be replaced from the sfcdetails.txt file. Once you have another copy of the corrupt file(s), you will need to take administrative ownership of the file(s). To do this, modify the following command with the path\filename of the file you want to replace and then type it into an Administrative Command Prompt and press Enter.
takeown /f path\filename
Example: takeown /f C:\Windows\FileToBeReplaced.dll
Next, you will have to grant administrators full access to the file(s) being replaced. To do this, modify the following command with the path\filename of the file you want to replace and then type it into an Administrative Command Prompt and press Enter.
icacls path\filename /grant administrators:F
Example: icacls C:\Windows\FileToBeReplaced.dll /grant administrators:F
The third thing to do is copy the new file(s) and replace the corrupt one(s).To do this, modify the following command with the path\filename of the file you want to replace and then type it into an Administrative Command Prompt and press Enter.
copy path\filename path\filename
Example: copy C:\Temp\FileToBeReplaced.dll C:\Windows\FileToBeReplaced.dll