Are you tired of the default Start menu in Windows 11? Do you feel like it's cluttered with unnecessary apps and features? If so, you're not alone. Many users find the Start menu overwhelming and distracting, ultimately impacting their productivity. Fortunately, there's a solution - personalizing your Start menu.

By customizing your Start menu, you can maximize your productivity and unleash the full potential of your Windows 11 experience. You can create a unique and effective Start menu that caters to your specific needs and preferences, making your computing experience more enjoyable overall.
To get started, you'll need to explore the various customization options available in Windows 11. From rearranging your app tiles to pinning your favorite programs, there are plenty of ways to make your Start menu work for you. By taking the time to personalize your Start menu, you can streamline your workflow and access the apps and tools you need with just a few clicks.
Consider customizing your Start menu today to improve your Windows 11 experience and maximize productivity. With time and effort, you can create a Start menu tailored to your unique needs and preferences, making your computing experience more enjoyable and efficient. Let's get started.
All the changes outlined in this article are done inside the Settings app. You can bring up the Settings app by:
- Left-clicking on the Start button
 to bring up the Start menu.
- In the list of pinned apps on the Start menu, left-click on Settings.
or
- Right-click on the Start button
 to bring up the Power User menu.
- In the list of programs that appear, left-click on Settings.
or
- Press the Windows logo key
 + I
+ I
Once you open the Settings app, left-click on Personalization in the left-hand column. This will display all of the Personalization categories in the right-hand column.
These customizations are in no particular order. Let's start with the alignment of the Start menu on the Taskbar.
Changing the location of the Start menu on the Taskbar
Settings > Personalization > Taskbar > Taskbar behaviors
Windows 10 only allowed the Start menu to be located in the corner of the Taskbar, although you could place the Taskbar along any of the screen edges (left, right, top, or bottom). With Windows 11, you currently only have the option of the bottom of the screen.
But you can change the Start button's alignment (left or center). Inside of Taskbar behaviors, you can change the alignment between left and center using the pull-down menu.
Changing the accent color of the Start menu
Settings > Personalization > Colors
This option can be changed inside the Colors category. The only way you can change the Start menu accent color is by selecting Dark or Custom mode under Choose your mode. If you choose Dark mode, you can set the accent color for the Start menu and the Taskbar. If you choose Custom mode, you must select Dark mode for Windows to be able to set the accent color.
Changing the Start menu options
Settings > Personalization > Start

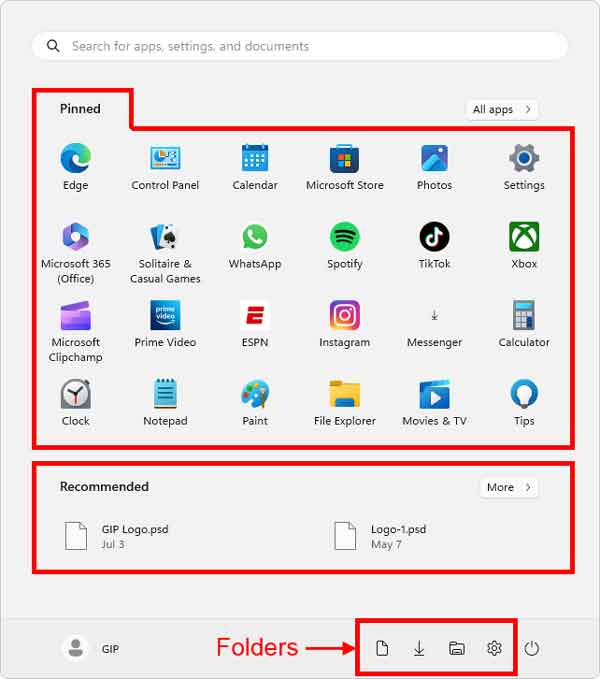
There are three (3) areas that you can customize on the Start menu; Pinned (programs /apps), Recommended (recently accessed files), and Folders (Settings, File Explorer, Documents, Downloads, Music, Pictures, Videos, Network, and Personal Folder).
The first option is the layout of the Start menu. You have three (3) choices; More pins, Default (an even mix of pins and recommendations), and More recommendations.
The next set of options you can toggle on or off. They are:
- Show recently added apps
- Show recently used apps
- Show recently opened items in Start, Jump Lists, and File Explorer
- Show recommendations for tips, shortcuts, new apps, and more
The next option is the Folders category. Here, you can select which folders appear on the Start menu next to the Power button. You can choose any or all of the following folders: Settings, File Explorer, Documents, Downloads, Music, Pictures, Videos, Network, and Personal Folder.
Changing the Pinned apps on the Start menu
To add a program or folder to the Pinned apps area, locate the folder or program and right-click on it. From the context menu that appears, select Pin to Start.
To remove a program or folder from the Pinned apps area, right-click on it and select Unpin from Start.
To rearrange the Pinned apps, press and hold the left mouse button on the app you want to move and relocate it.
Changing the Recommended files
The only way to add a file to the Recommended area is to open a file with the associated program, then save it.
To remove a file from the Recommended area, right-click on it and select Remove from the list.
ed8d5d05-58b0-435f-b572-9722090c1a76|0|.0|96d5b379-7e1d-4dac-a6ba-1e50db561b04