Are you running out of free space on the drive in your computer? Or are you thinking about getting a faster drive for it? If so, cloning the drive in your computer might be just the answer, and here is how to do it.

Note: Drive cloning is a procedure that computer technicians perform regularly. If you do not feel comfortable doing any of the following procedures, please contact a local computer service company like Geeks in Phoenix.
When installing a new drive in your computer, you have two (2) options; you can perform a fresh installation of the operating system and all the programs. Or you can clone the current drive to the new one and preserve the installed operating system and programs.
Since many people do not remember how they installed their programs or where the installation media/software keys may be, cloning their existing drive is the best option. The complexity of cloning a drive depends on the type of drive, the form factor, and the current and new drive interface.
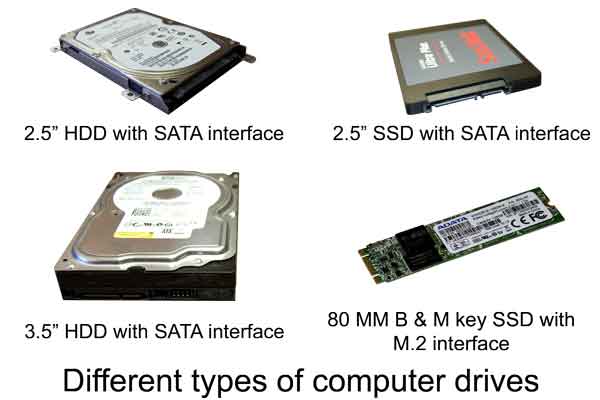
There are several types of drives; the most popular are SSD (Solid State Drive), HDD (Hard Disk Drive), and SSHD (Solid State Hybrid Drive). There are also several different drive interfaces; the most popular are SATA (7 pin connection cable) and M.2 (keyed socket). HDDs and SSHDs use a SATA interface; SSDs can use either SATA or M.2.

There are several different form factors (physical size) of drives; HDDs and SSHDs come in 3.5" and 2.5" (width), SSDs come in 2.5" (width) when using a SATA interface, and 30 to 110 MM (length) when using an M.2 interface. Drives that come in 2.5" form factor can also have different heights (thicker); 9.5 MM is standard, and 7 MM is used in ultra-thin laptops.
| |
Drive types |
| |
SSD |
HDD |
SSHD |
Form Factor |
|
|
|
3.5" |
|
X |
X |
2.5" |
X |
X |
X |
M.2 |
X |
|
|
Interface |
|
|
|
SATA |
X |
X |
X |
M.2 |
X |
|
|
If you are upgrading a laptop drive (2.5"), check with the manufacturer on what size is recommended. If you are upgrading an M.2 drive, check with the manufacturer (system/motherboard) on what interface (SATA 3, AHCI, or NVMe), key notch (B, M, or B & M) and length is supported.
Now the first thing you need to do is find out the model number of your current drive. Once you have the model number, you can search on Google and get all of its specifications. You can find the model number in Computer Management.
How to open Computer Management
- Left-click on the Start
 menu
menu
- Scroll down the list of programs and left-click on Windows Administrative Tools
- Left-click on Computer Management
or
- Right-click on the Start
 menu to bring up the Power Users menu
- Left-click on Computer Management
Once you have the Computer Management console open, left-click on Disk Management and locate the disk that has the partition with the drive letter C:. Right-click the disk number (usually Disk 0) select Properties from the context menu. On the General tab, you will find the drive model number.
Once you have your existing drive specifications, it is time to decide on a replacement drive. Are you going to replace it with one that has the same form factor and interface or not. Your decision will determine how you clone your drive, and there are two (2) ways to do it.
Now it is just a matter of getting another drive with the same data capacity as your existing drive. You can get one with a smaller capacity, but you would have to shrink the partition(s) on the drive before cloning it. You can get one with a larger capacity (recommended), but you may or may not have to manually expand the partition(s) after you are done. Some drive manufacturers (WD, Seagate, and Samsung) cloning software will automatically do that.
There are two (2) different scenarios, upgrading your existing drive to the same form factor and interface or upgrading your existing drive from SATA to M.2. Doing an upgrade that involves just SATA drives is relatively simple; M.2 drives are a bit more complicated.
If you decide to upgrade to an M.2 drive, you will need to find out what type of M.2 drive your motherboard can support before purchasing it. You need to find out the local interface (SATA3, AHCI, or NVMe), width/length, and keying. You will also need the hardware (standoff and screw) to mount it to the motherboard.
SATA drives can be connected to your computer using internal SATA and power cables (desktop) or external USB docking stations / external drive enclosures (desktop or laptop). Since M.2 drives use sockets with PCI-e buses for power and transferring data, they have to be directly connected to the motherboard.
There are M.2 to USB adapters, but they can be expensive and only support specific key notches. For cloning SATA to M.2 or M.2 to M.2, I recommend using the drive-to-image method (see below).
- Drive-to-drive. This is the method you would want to use if you are cloning your existing drive to another drive with the same interface (SATA to SATA).
- Drive-to-image. This is the method you would want to use if you are cloning your existing drive to a different interface (SATA to M.2)
Drive cloning software
A few drive manufacturers have the software you can download to clone your drive, but at least one of the drives (source or destination) has to be one of theirs. And a few of the programs you can use to create bootable media. Here are a few of the drive cloning programs available.
Western Digital - Acronis True Image
Seagate - DiskWizard
Samsung - Data Migration
Ultimate Boot CD (bootable media)
R-Drive Image
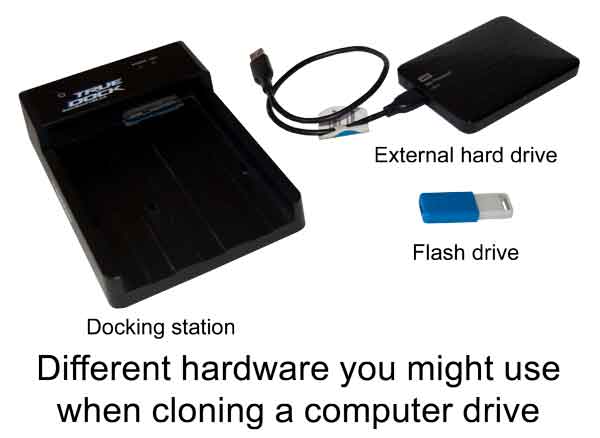
Hardware required for drive cloning
- Docking station
- External hard drive
- Flash drive for creating bootable media

Drive-to-drive cloning
This is probably the easiest way to clone a drive. The first thing you have to do is install the cloning software on the computer with the source drive you want to clone. If you decide to use the UBCD, you will need to create the bootable media.
Then connect the destination drive by either attaching using a docking station / external case (laptop or desktop) or shutting down the computer and installing it (desktop).
Once you have both drives attached to the computer, you can boot the system normally or use bootable media and start the drive cloning program. Follow the software instructions and be ready to shut down your computer as soon as the software completes cloning the drive.
You will need to remove or detach the source drive from the computer, as both of the drives will have the same boot signature. If you cloned a SATA drive to another SATA drive, connect the destination drive to the connection that the source drive was on. You should be ready to boot your computer on the new drive.
Drive-to-image cloning
This procedure does require a few more steps to complete, but it does also have more options. One of the advantages of this type of drive cloning is changing your computer's primary drive interface. The disadvantage is you may have to expand/recreate partitions manually.
The first thing you need to do is install the cloning software on your computer and then create bootable media using it. You will need the bootable media to restore the disk image or disk backup to the new drive.
The next thing you will need to do is use that same cloning program to create a drive image / drive backup of your primary (boot) drive to an external hard drive. Once that is complete, safely remove the external hard drive from your computer and shut it down.
Now that your computer is turned off, uninstall the existing drive and install the new drive. Once the new drive is in place, boot your computer using the bootable media you created and proceed to restore the disk image / disk backup to the new drive.
If the new drive is larger than the old one, the cloning software may prompt you to expand the primary partition. If it does, let the software do it. If not, you may have to expand it manually using Disk Management inside of Windows.
Windows creates a hidden recovery partition right behind the primary partition. If the cloning software does not put that hidden partition at the end of the new drive and expand the primary partition, you will have to do it manually.
I use R-Drive Image for drive cloning, and it allows me to restore a complete drive image or individual partitions. When I run into the hidden recovery partition, I usually will restore all of the partitions except for the last one, the hidden recovery partition.
Since the system does not require the hidden recovery partition to operate, I boot it up on the new drive and expand the primary partition using Disk Management to fill up almost all of the remaining free space.
I leave a little more than enough free space to restore the hidden recovery partition. I then boot the computer back up on the R-Drive bootable media and restore the hidden recovery partition into the remaining free space.
For more information on upgrading computer drives. click on the following links.
How to upgrade the hard drive in your computer
How to upgrade your computers hard disk drive to a solid state drive