Cloud-based storage is fantastic. You can access your data from any location. But what if you do not want your personal data stored on the cloud? What if you just want all of your personal data stored on your local computer only? If that is the case, here is what you can do if you do not want to use Microsoft OneDrive.

Microsoft OneDrive is an excellent cloud-based storage solution and can be extremely valuable for backing up data. However, the problem I see with my customers is that most novice Windows users don't know what it is or how they ended up using it.
The explanation is simple: When you create a new user in Windows, whether it is when you first start your new computer or add a user, Windows prompts you to log in with a Microsoft account. When that new user logs in, OneDrive is automatically enabled by default.
There are several different ways to get rid of OneDrive from your computer. You can disable it, unlink it from your computer, or completely uninstall it. But when all is said and done, you may have to manually restore your user shell folders to their original locations (more on that later).
How to unlink OneDrive from your user account
- Right-click the OneDrive icon
 in the system tray (located at the bottom right corner of the screen).
- Select Settings from the context menu that appears.
- In the Microsoft OneDrive dialog box, go to the Account tab.
- Left-click on the Unlink this PC shortcut.
- A warning message appears telling you that locally stored files will remain in place while online versions will be deleted. Left-click on the Unlink account button.
- The Set up OneDrive dialog box should appear. Left-click the X in the upper right-hand corner to close the dialog box.
Now that OneDrive is no longer syncing your data, you can either disable OneDrive from starting or uninstall it. However, you might notice that some of your user shell folders (Desktop, Documents, and Pictures) were not returned to their original locations. We will take a look at those later in this article.
How to disable OneDrive in Windows
- Right-click on the Start
 button to bring up the Power User menu.
- Left-click on Task Manager.
or
- Press CTRL + ALT + DEL all at the same time.
- From the security screen that appears, left-click on Task Manager.
or
- Right-click on an empty area of the Taskbar.
- On the context menu that appears, left-click on Task Manager.
Sometimes, the first time you run Task Manager, it will only display running apps. You have to left-click the More details arrow to view all the tabs. The location of the tabs varies from Windows 10 (across the top) to Windows 11 (down the left side).
Once the tabs are displayed, left-click on Startup (Windows 10) or Startup apps (Windows 11). From here, all you have to do is highlight OneDrive and select the Enable / Disable button. Restart your computer so the changes take effect.
How to uninstall Microsoft OneDrive
There are two (2) ways to uninstall OneDrive: the Settings app or the Control Panel.
How to uninstall Microsoft OneDrive using the Settings app
Windows 11
- Left-clicking on the Start button
 to bring up the Start menu.
- In the list of pinned apps on the Start menu, left-click on Settings.
- In the left-hand column, left-click on Apps.
- In the right-hand column, left-click on Installed apps.
- The right-hand column displays a list of all the installed apps. Find Microsoft OneDrive, left-click on the three (3) horizontal dots (...) on the right, and select Uninstall.
Windows 10
- Left-click on the Start
 menu and select Settings (the gear icon).
- Left-click on Apps.
- In the right-hand column, Apps and features will be displayed. Left-click on Microsoft OneDrive and select Uninstall.
How to uninstall Microsoft OneDrive using the Control Panel
Windows 11
- Left-click on the Start
 button to bring up the Start menu.
- In the upper right-hand corner of the Start menu, left-click on All apps.
- Scroll down the list of programs and left-click on Windows Tools.
- Double left-click on the Control Panel.
Windows 10
- Left-click on the Start
 button to bring up the Start menu.
- Scroll down the list of programs until you get to Windows System, and then left-click on it to expand it.
- Left-click on Control Panel.
By default, the Control Panel opens up in the category view but can be changed to large or small icons. A pull-down menu in the top-right corner labeled View by: allows you to change the view.
- If viewing the Control Panel by Category, left-click on Uninstall a program under Programs.
- If viewing by Large/Small Icons, left-click Programs and Features.
A list of all the programs installed will appear. Left-click on Microsoft OneDrive and select the Uninstall button at the top of the list of programs.
How to restore the location of your user shell folders back to default
Now that you have either disabled, unlinked, or uninstalled OneDrive, you must check and see where your user shell folders are located. By default, OneDrive moves your Desktop, Documents, and Pictures folders to a folder under your user profile (C:\Users\YourUserName\OneDrive).
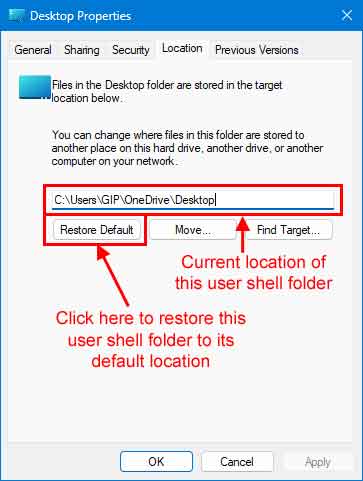
The easiest way to check is to open File Explorer by left-clicking the manilla folder icon on the Taskbar or pressing the Windows logo key  + E. Right-click on any of the Quick access links and left-click on Properties from the context menu that appears. Left-click on the Location tab and check where that folder is located.
If it points to the OneDrive folder inside your user profile (C:\Users\YourUserName\OneDrive), you have two choices: You can leave them right where they are or change them back to default.

While checking the properties of your user shell folders, you can also restore them to their default location(s). Just left-click the Restore Default button in the lower left-hand corner of the folder properties.
You may get a dialog box pop-up that tells you that the folder you are trying to move does not exist in the new location and asks if you want to create it. Just left-click on Yes and proceed to restore the folder its original location.
At this point your user shell folders should be back in their original default location(s). But if you encounter an error when trying to restore your user shell folders, something similar to Can't move the folder because there is a folder in the same location that can't be redirected. Access is denied. then you will need to modify the Registry.
The truth about user shell folders is that they are just entries in the Registry and can be modified using the Registry Editor. But remember that editing the registry incorrectly can cause your computer to not operate correctly and possibly not even boot up, so be very careful when editing the registry.
If you do not feel comfortable editing the registry, don't hesitate to contact a local computer repair shop, like Geeks in Phoenix, for assistance. The first thing you need to do is open the Registry Editor.
Remember that changing the location of user shell folders in the registry does not actually move your files back to that location. You will have to manually move them from the OneDrive folder to the location you specify in the registry.
How to restore the location of your user shell folders using the Registry Editor
- Bring up the Run dialog box by either:
Pressing the Windows logo key  + R
+ R
or
Right-click on the Windows logo  on the Start Menu or press the Windows logo key
  + X and then select Run
- In the Run dialog box that appears, type regedit and select OK. If you're prompted for an administrator password or confirmation, type the password or provide confirmation.
Once you open the Registry Editor, let's backup the registry first.
- With the Registry Editor open, highlight Computer in the left-hand column to backup the complete registry.
- Left-click on the File pull-down menu and left-click on Export.
- Select the location and a descriptive file name for the backup file, then left-click on Save.
Now, let's change the location of your user shell folders in the Registry.
- Verify that the folders you want to redirect to (Desktop, Documents, Pictures, etc.) currently exist inside your user profile folder (C:\Users\YourUserName). If they do not, then you will need to create them before proceeding.
- With the Registry Editor open, navigate to the following key:
HKEY_CURRENT_USER\Software\Microsoft\Windows\CurrentVersion\Explorer\User Shell Folders

- In the right-hand column, right-click on the Name of the value you want to change and select Modify... from the context menu.
- Enter either the default value for that folder from the table below or the path to the actual folder (C:\Users\YourUserName\Documents). Make sure the actual folder exists before changing the folder key.
- Log off or restart your computer for the registry change(s) to take effect.
Default user shell folder registry values
| Registry key name |
Folder |
Data (default value) |
| {374DE290-123F-4565-9164-39C4925E467B} |
Downloads |
%USERPROFILE%\Downloads |
| Desktop |
Desktop |
%USERPROFILE%\Desktop |
| Favorites |
Favorites |
%USERPROFILE%\Favorites |
| My Music |
Music |
%USERPROFILE%\Music |
| My Pictures |
Pictures |
%USERPROFILE%\Pictures |
| My Video |
Videos |
%USERPROFILE%\Videos |
| Personal |
Documents |
%USERPROFILE%\Documents |
71ed7da3-d361-4160-9417-b9509cd30077|0|.0|96d5b379-7e1d-4dac-a6ba-1e50db561b04