Geeks in Phoenix

Geek Blog


How to manually change the default location of user files in Windows

Are you having problems changing the location of your user files? Did you uninstall OneDrive, and now your personal folders are all screwed up. Here is how to manually change the default location of user files in Windows.

How to manually change the default location of user files in Windows

Being able to change the location of user files has to be one of the coolest features of Windows when it works. But there may be a time when you encounter an error when trying to move a folder location. The most common error is 'Can't move the folder because there is a folder in the same location that can't be redirected. Access is denied'. This error relates to the folder redirection done when OneDrive is used and often appears when you uninstall OneDrive.

Note: The following procedures require editing the registry. Incorrectly editing the registry can cause system instability and even failure to boot. If you do not feel comfortable editing the registry, please get in touch with a local computer technician for assistance.

Yes, truth be told, the special user folders are merely just registry entries and can be easily changed. But it is highly recommended to back up the registry first. So I want to show you how to back up the registry, change the location of your user files, and restore the registry if necessary.

How to open the Registry Editor in Windows

  1. Bring up the Run dialog box by either:
    1. Pressing the Windows logo key Windows logo key + R
    2. Right-click on the Windows logo Windows logo key on the Start Menu or press the Windows logo key Windows logo key + X and then select Run
  2. In the Run dialog box that appears, type regedit and select OK. If you're prompted for an administrator password or confirmation, type the password or provide confirmation.

How to backup the registry

  1. With the Registry Editor open:
    1. Highlight Computer in the left-hand column to backup the complete registry.
    2. Highlight the key or value you want to backup.
  2. Left-click on the File pull-down menu and left-click on Export.
  3. Select the location and a descriptive file name for the backup file, then left-click on Save.

How to change the default user files location in the registry

  1. With the Registry Editor open:
  2. Navigate to the following key: HKEY_CURRENT_USER\Software\Microsoft\Windows\CurrentVersion\Explorer\User Shell Folders
    The user shell folders registry keys in Windows 11
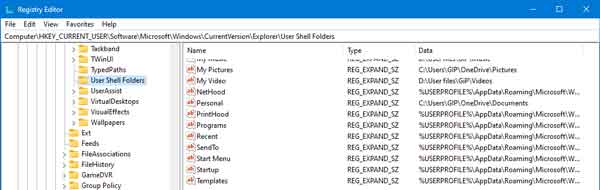
  3. In the right-hand column, right-click on the Name of the key you want to change and select Modify... from the context menu.
  4. Enter either the default settings for that folder from the table below or the path to the actual folder (C:\Example\Docs). Make sure the actual folder exists before changing the folder key.
  5. Log off or restart your computer for the registry change to take effect.

Default user shell folder settings

Registry key name Folder Data (default value)
{374DE290-123F-4565-9164-39C4925E467B} Downloads %USERPROFILE%\Downloads
Desktop Desktop %USERPROFILE%\Desktop
Favorites Favorites %USERPROFILE%\Favorites
My Music Music %USERPROFILE%\Music
My Pictures Pictures %USERPROFILE%\Pictures
My Video Videos %USERPROFILE%\Videos
Personal Documents %USERPROFILE%\Documents

How to restore the registry

  1. With the Registry Editor open:
  2. Left-click on the File pull-down menu and left-click on Import.
  3. Navigate to the location of the REG file you want to import and left-click on it.
  4. Left-click on the Open button. You should get a confirmation screen telling you successfully imported the file.

How to change the location of personal folders in Windows 11

With more and more computers coming with two (2) drives, managing the free space can be daunting. And the biggest space hog on your computer is your personal folders. So here is how to change the default location of your personal folders in Windows 11.

How to change the location of personal folders in Windows 11

Most computers that have two (2) drives will have one Solid State Drive (SSD) for the operating system and program files and one Hard Disk Drive (HDD) for data. And by default, Windows 11 saves everything to the same drive as the operating system.

But after a while, your personal folders can get quite large, with all of the music, pictures, and videos you save to your computer. And with Windows 11 saving all of these files on the same drive as the OS and program files, the possibility of running out of free space is quite real.

And if that drive is an SSD, your personal folders are taking up valuable real estate that could be used for other uses, like more programs. So why not move your personal folders to another drive?

Now relocating your personal folders is relatively easy, but there are a few guidelines you want to be aware of. When it comes down to it, the location of your personal folders is set inside of the registry. I include the instructions on restoring the locations of your personal folders via the registry later in this article.

Note: You can remap your personal folders to any drive or folder that has a drive letter assigned to it in File Explorer. It is recommended only to use drives that are built into your computer, not external and network drives. Remember that if you lose connection with an external or network drive, you will also lose connection to your personal folders.

How to change the personal folder location in Windows 11

  1. Open File Explorer using one of the following:
    • Left-click on the File Explorer icon (manilla folder) on the Taskbar.
    • Press the Windows logo key Windows logo + E at the same time.
    • Use the Power User menu by right-clicking on the Start Windows logo button and selecting File Explorer.
  2. In the left-side column, left-click on This PC.
  3. In the right-side column, double left-click on the drive you want to use for your personal folders. The contents of that drive will appear in the right-hand column.
  4. Right-click on any blank space in the right-hand column, and a context menu will appear..
  5. From that context menu, select New > Folder. Give the new folder a unique name, like User files. If there are multiple users on this computer, you will want to create sub-folders for each user.
  6. Double left-click on the new user folder you just created. You now need to make six (6) sub-folders inside this folder. Named them: Desktop, Documents, Downloads, Music, Pictures, and Videos.
  7. Now navigate to C:\Users\your user name. There you will find all of your personal folders.
  8. Right-click on the Desktop folder and select Properties from the context menu that appears.
  9. Left-click on the Location tab and left-click on the Move... button.
  10. From the Select a Destination dialog box that appears, navigate to the new location for the Desktop folder you just created in Step 6. Once selected, left-click on Select Folder.
  11. On the Desktop Properties dialog box, left-click on Apply. You will be prompted to move the contents of this folder from the old location to the new one. Left-click on Yes and let Windows proceed to move this folder.
  12. Repeat steps 7- 10 for the remaining personal folders (Documents, Downloads, Music, Pictures, and Videos).

To restore the default location of your personal folders, just navigate to the personal folder you want to restore and right-click on it. From the context menu that appears, select Properties and then Location. Left-click on the Restore Default button and follow the prompts. If you receive an error when trying to restore the default location of any personal folder, you can manually change the location by editing the registry.

Note: Editing the registry incorrectly can render your computer unusable! If you do not feel comfortable editing your computer's registry, please contact a local computer repair technician for assistance.

How to open the Registry Editor in Windows 11

  1. Left-click on the Start button Windows logo to bring up the Start menu.
  2. In the upper right-hand corner of the Start menu, left-click on All apps.
  3. Scroll down the list of programs and left-click on Windows Tools.
  4. Double left-click on Registry Editor. If prompted for an administrator password or confirmation, type the password or provide confirmation.

or

  1. Left-click on the magnifying glass to the right of the Start button to bring up the Search dialog box.
  2. Type Registry Editor into the Search box and left-click on the app Registry Editor. If prompted for an administrator password or confirmation, type the password or provide confirmation.

or

  1. Press the Windows logo key Windows logo key + R to bring up a Run dialog box.
  2. In the Open field, type regedit and left-click on OK. If prompted for an administrator password or confirmation, type the password or provide confirmation.

When you have the Registry Editor open, navigate to the following key:

HKEY_CURRENT_USER\Software\Microsoft\Windows\CurrentVersion\Explorer\User Shell Folders

Here is a list of the six (6) personal folders, the registry key, and the default value. Change only the keys for the folders you are having problems with. Once you are done editing the registry, log out or restart your computer for the changes to take effect. For a complete list of user folder keys, check out how to manually change the user files location in the registry.

Folder Registry key Default value
Desktop Desktop %USERPROFILE%\Desktop
Documents Personal %USERPROFILE%\Documents
Downloads {374DE290-123F-4565-9164-39C4925E467B} %USERPROFILE%\Downloads
Music My Music %USERPROFILE%\Music
Pictures My Pictures %USERPROFILE%\Pictures
Videos My Video %USERPROFILE%\Videos

How to change the default location of user files in Windows 10

User files (documents, music, photos, etc.) can take up a lot of space on your computer. But if you have a second drive inside your computer, you can quickly move your user folders to it. Here's how to change the default location of user files in Windows 10.

Nowadays, a few computers are coming with two drives, a Solid State Drive (SSD) and a Hard Disk Drive (HDD). Since SSD's are generally smaller in size and faster than HDD's, they usually are used just for the operating system and program files. User files should always be moved to the HDD to conserve space on the SSD.

Now there are seven (7) user file folders that you can be relocate: 3D Objects, Desktop, Documents, Downloads, Music, Pictures, and Videos. Before you change the location of the user file/folders, you will need to create new folders for your files.
Recently created new user folders inside of Windows 10
I usually create a folder called User Files in the root of the D: drive and then create the individual folders for each user; for example, D:\User Files\username\Desktop, D:\User Files\username\Documents, etc.

How to change the default location of user files in Windows 10

  1. Open File Explorer by either left-clicking on the File Explorer icon on the Taskbar, left-clicking on the Start button and selecting File Explorer, right-clicking on the Start button and selecting File Explorer from the Power Users menu or by pressing the Windows logo key Windows logo key + E.
  2. In the left-hand column, expand This PC so that the following folders are displayed: 3D Objects, Desktop, Documents, Downloads, Music, Pictures, and Videos.
    The context menu for user folders inside of Windows 10
  3. Right-click on the folder you want to move and from the context menu that appears, left-click on Properties.
  4. On the dialog box that appears, left-click on the Location tab.
    The properties dialog box for a user folder inside of Windows 10
  5. Left-click on the Move button.
    Select the new location of a user folder inside of Windows 10
  6. Navigate to the new location for the folder. Once you have selected the folder you want to use, left-click on the Select Folder button.
  7. Left-click on the Apply button in the lower right-hand corner.
  8. In the confirmation dialog box that appears, left-click on Yes.
  9. Left-click on the OK button in the lower left-hand corner.

How to restore the default location of user files in Windows 10

  1. Open File Explorer by either left-clicking on the File Explorer icon on the Taskbar, left-clicking on the Start button and selecting File Explorer, right-clicking on the Start button and selecting File Explorer from the Power Users menu or by pressing the Windows logo key Windows logo key + E.
  2. In the left-hand column, expand This PC so that the following folders are displayed: 3D Objects, Desktop, Documents, Downloads, Music, Pictures, and Videos.
  3. Right-click on the folder you want to move and from the context menu that appears, left-click on Properties.
  4. On the dialog box that appears, left-click on the Location tab.
  5. Left-click on the Restore Default button.
  6. Left-click on the Apply button in the lower right-hand corner.
  7. In the Create Folder dialog box that appears, left-click on Yes.
  8. In the confirmation dialog box that appears, left-click on Yes.
  9. Left-click on the OK button in the lower left-hand corner.

If encounter any problems changing the default user files location, you may need to manually change the user files location in the registry.

Modifying the default locations of user files and library properties in Windows 8

Did you know that Windows 8 has some great ways of managing your user files? From adding additional folder locations in the Libraries to ultimately moving your user documents to another location. You can do all of these and more. Here's how to modify the default locations of user files and library properties in Windows 8.

Moving your personal folders has become more commonplace when you have two (2) or more disk drives in a computer. By moving the user files to another drive, you're freeing up space on the operating system's drive. This can be extremely beneficial if your operating system is installed on a Solid State Drive (SSD). When you move a folder to a new location, you change where the folder and files are stored. However, you'll still access the folder the same way you did before you moved it.

Also, instead of moving a folder, you might want to consider including another folder in one of your libraries. For example, if you have a large number of pictures, you can store those pictures in a location other than your primary hard drive and then include that location in your Pictures library. For more information, see below.

How to change the location of user files in Windows 8

There are six (6) user folders in Windows 8, which you can change their locations. They are Desktop, Documents, Downloads, Music, Pictures, and Videos. You will need to create folders with the same name in the new location before moving any of them.

How to move a user folder to a new location

  1. From the desktop, left-click on the File Explorer icon on the Taskbar or press the Windows logo key Windows logo key + E.
  2. Navigate to This PC and expand it. If you don't see the Navigation pane go to the View tab, pull down the Navigation pane toolbar, and place a checkmark next to the Navigation pane.
  3. Right-click the folder that you want to move, and then click Properties.
  4. Click the Location tab, and then click Move.
  5. Browse to the location where you want to move this folder. You can select another location on this computer, another drive attached to this computer, or another computer on the network. To find a network location, type two backslashes (\\) into the address bar followed by the name of the location where you want to redirect the folder (for example, \\mylaptop), and then press Enter.
  6. Click the folder where you want to store the files, click Select Folder, and then click OK.
  7. In the dialog that appears, click Yes to move all the files to the new location.

To restore a folder to its original location

  1. From the desktop, left-click on the File Explorer icon on the Taskbar or press the Windows logo key Windows logo key + E.
  2. Navigate to This PC and expand it. If you don't see the Navigation pane go to the View tab, pull down the Navigation pane toolbar, and place a checkmark next to the Navigation pane.
  3. Right-click the folder that you previously redirected and want to restore to its original location, and then click Properties.
  4. Click the Location tab, click Restore Default, and then click OK.
  5. Click Yes to recreate the original folder, and then click Yes again to move all the files back to the original folder.

Note:
If you don't see the Location tab in a folder's Properties dialog, then the folder can't be moved. If you see the Location tab but can't edit the folder path, you don't have permission to move it.

How to modify library properties in Windows 8

We are all familiar with files and folders, but when Windows 7 came out, we got another way to manage them, Libraries. Libraries are where you go to manage your documents, music, pictures, and other files. You can browse your files the same way you would in a folder or view your files arranged by properties like date, type, and author.

In some ways, a library is similar to a folder. For example, when you open a library, you'll see one or more files. However, unlike a folder, a library gathers files that are stored in several locations. This is a subtle but significant difference. Libraries don't hold your folders/files. They monitor folders that contain your files, and let you access and arrange the items in different ways. For instance, if you have music files in folders on your hard disk and an external drive you can access all of your music files at once using the Music library.

Windows 8 has four default libraries: Documents, Music, Pictures, and Videos. You can also create new libraries. If you don't see the Libraries in File Explorer, go to the View tab, pull down the Navigation pane toolbar and place a checkmark next to Show Libraries.

Here are some ways you can modify an existing library:

  • Include or remove a folder. Libraries gather content from included folders or library locations. You can include up to 50 folders in one library.
  • Change the default save location. The default save location determines where an item is stored when copied, moved, or saved to the library.
  • Change the type of file a library is optimized for. Each library can be optimized for a particular file type (such as music or pictures). Optimizing a library for a specific file type changes the available options for arranging your files.

How to add a folder to a library

  1. From the desktop, left-click on the File Explorer icon on the Taskbar or press the Windows logo key Windows logo key + E.
  2. Open the library you'd like to change.
  3. On the ribbon on top select Manage library.
  4. In the Library Locations dialog box, click on Add, navigate to the folder you want to add to the library, and click on Include folder.
  5. Click OK.

How to change a library's default save location

A library's default save location determines where an item will be stored when copied, moved, or saved.

  1. From the desktop, left-click on the File Explorer icon on the Taskbar or press the Windows logo key Windows logo key + E.
  2. Right-click on the library you'd like to change and click Properties.
  3. Select the library location that you want as default and click on Set save location.
  4. Click OK.

How to change the type of files a library is optimized for

Each library can be optimized for a particular file type (such as music or pictures). Optimizing a library for a specific file type changes the available options for arranging the files in that library..

  1. From the desktop, left-click on the File Explorer icon on the Taskbar or press the Windows logo key Windows logo key + E.
  2. Right-click on the library you'd like to change, and then click Properties.
  3. In the Optimize this library for list, select a file type and then click OK.

Modifying the default locations of user files and library properties in Windows 7

This article will show how to change the default locations of user files and modify the library properties in Windows 7. In a recent article, I showed the default locations for user files in Windows 7. But did you know you can modify them?

You can change the location of the folders in your personal folder (such as My Documents and My Pictures) by redirecting them. For example, if you have a large number of files in your My Documents folder, you might want to store the files on a different hard drive or on a network to free up space on your primary hard drive.

When you redirect a folder to a new location, you change where the folder and files are stored in the folder. However, you'll still be able to access the folder the same way you did before you redirected it.

Geek Tip:

  • Instead of redirecting a folder, you might want to consider including a folder in one of your libraries. For example, if you have a large number of pictures, you can store those pictures in a location other than your primary hard drive, then include that location in your Pictures library. For more information, see below.

To redirect a folder to a new location

  1. From the desktop, left-click on the File Explorer icon on the Taskbar or press the Windows logo key Windows logo key + E.
  2. Navigate to C:\Users\your user name\
  3. Right-click the folder that you want to redirect, and then click Properties.
  4. Click the Location tab, and then click Move.
  5. Browse to the location where you want to redirect this folder. You can select another location on this computer, another drive attached to this computer, or another computer on the network. To find a network location, type two backslashes (\\) into the address bar followed by the name of the location where you want to redirect the folder (for example, \\mylaptop), and then press Enter.
  6. Click the folder where you want to store the files, click Select Folder, and then click OK.
  7. In the dialog that appears, click Yes to move all the files to the new location.

To restore a folder to its original location

  1. From the desktop, left-click on the File Explorer icon on the Taskbar or press the Windows logo key Windows logo key + E.
  2. Navigate to C:\Users\your user name\
  3. Right-click the folder that you previously redirected and want to restore to its original location, and then click Properties.
  4. Click the Location tab, click Restore Default, and then click OK.
  5. Click Yes to recreate the original folder, and then click Yes again to move all the files back to the original folder.

Note:

  • If you don't see the Location tab in a folder's Properties dialog, then the folder can't be redirected. If you see the Location tab but can't edit the folder path, you don't have permission to redirect it.

We are all familiar with files and folders, but with the release of Windows 7, we now have another way to manage them, Libraries. Libraries are where you go to manage your documents, music, pictures, and other files. You can browse your files the same way you would in a folder, or you can view your files arranged by properties like date, type, and author.

In some ways, a library is similar to a folder. For example, when you open a library, you'll see one or more files. However, unlike a folder, a library gathers files that are stored in several locations. This is a subtle but significant difference. Libraries don't hold your items. They monitor folders that contain your items and let you access and arrange the items in different ways. For instance, if you have music files in folders on your hard disk and an external drive you can access all of your music files at once using the Music library.

Windows 7 has four default libraries: Documents, Music, Pictures, and Videos. You can also create new libraries.

Here are some ways you can modify an existing library:

  • Include or remove a folder. Libraries gather content from included folders or library locations. You can include up to 50 folders in one library.
  • Change the default save location. The default save location determines where an item is stored when copied, moved, or saved to the library.
  • Change the type of file a library is optimized for. Each library can be optimized for a specific file type (such as music or pictures). Optimizing a library for a specific file type changes the available options for arranging your files.

To change a library's default save location

A library's default save location determines where an item will be stored when it's copied, moved, or saved to the library.

  1. From the desktop, left-click on the File Explorer icon on the Taskbar or press the Windows logo key Windows logo key + E.
  2. Open the library you'd like to change.
  3. In the library pane (above the file list), next to Includes, click Locations.
  4. In the Library Locations dialog box, right-click a library location that's not currently the default save location, click Set as default save location, and click OK.

To change the type of file a library is optimized for

Each library can be optimized for a specific file type (such as music or pictures). Optimizing a library for a specific file type changes the available options for arranging the files in that library.

  1. From the desktop, left-click on the File Explorer icon on the Taskbar or press the Windows logo key Windows logo key + E.
  2. Right-click the library you'd like to change, and then click Properties.
  3. In the Optimize this library for list, click a file type and then click OK.

Free computer diagnostics

Repairing a PC can sometimes be expensive, and that is why we offer free basic in-shop diagnostics. Give one of our professional and experienced technicians a call at (602) 795-1111, and let's see what we can do for you.

Check out our reviews

Geeks In Phoenix LLC, BBB Business Review

Customer service is #1

Here at Geeks in Phoenix, we take pride in providing excellent customer service. We aim to give the highest quality of service  from computer repair, virus removal, and data recovery.

Bring your computer to us and save

Repairing a computer can be time-consuming. That is why we base our in-shop service on the time we work on your computer, not the time it takes for your computer to work! From running memory checking software to scanning for viruses, these are processes that can take some time.

Contact us

If you have any questions, please feel free to give us a call at (602) 795-1111  and talk with one of our Geeks. Or you can send us a message from our contact page contact page , and one of our Geeks will get back to you as soon as possible. Or you can stop by and see us. Here are our hours and location.

Like Geeks in Phoenix on Facebook

Follow Geeks in Phoenix on Twitter

Watch Geeks in Phoenix on YouTube