Are you having problems changing the location of your user files? Did you uninstall OneDrive, and now your personal folders are all screwed up. Here is how to manually change the default location of user files in Windows.

Being able to change the location of user files has to be one of the coolest features of Windows when it works. But there may be a time when you encounter an error when trying to move a folder location. The most common error is 'Can't move the folder because there is a folder in the same location that can't be redirected. Access is denied'. This error relates to the folder redirection done when OneDrive is used and often appears when you uninstall OneDrive.
Note: The following procedures require editing the registry. Incorrectly editing the registry can cause system instability and even failure to boot. If you do not feel comfortable editing the registry, please get in touch with a local computer technician for assistance.
Yes, truth be told, the special user folders are merely just registry entries and can be easily changed. But it is highly recommended to back up the registry first. So I want to show you how to back up the registry, change the location of your user files, and restore the registry if necessary.
How to open the Registry Editor in Windows
- Bring up the Run dialog box by either:
- Pressing the Windows logo key
 + R
+ R
- Right-click on the Windows logo
 on the Start Menu or press the Windows logo key
  + X and then select Run
- In the Run dialog box that appears, type regedit and select OK. If you're prompted for an administrator password or confirmation, type the password or provide confirmation.
How to backup the registry
- With the Registry Editor open:
- Highlight Computer in the left-hand column to backup the complete registry.
- Highlight the key or value you want to backup.
- Left-click on the File pull-down menu and left-click on Export.
- Select the location and a descriptive file name for the backup file, then left-click on Save.
How to change the default user files location in the registry
- With the Registry Editor open:
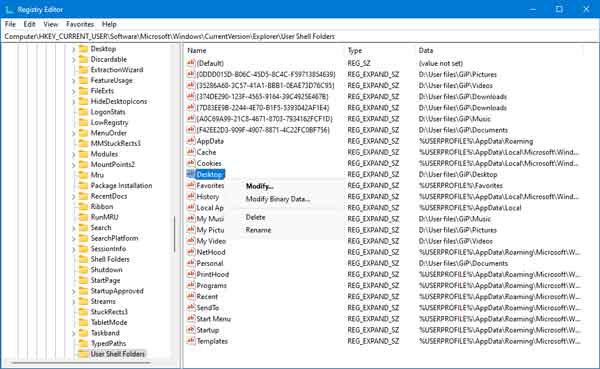
- Navigate to the following key:
HKEY_CURRENT_USER\Software\Microsoft\Windows\CurrentVersion\Explorer\User Shell Folders

- In the right-hand column, right-click on the Name of the key you want to change and select Modify... from the context menu.
- Enter either the default settings for that folder from the table below or the path to the actual folder (C:\Example\Docs). Make sure the actual folder exists before changing the folder key.
- Log off or restart your computer for the registry change to take effect.
Default user shell folder settings
| Registry key name |
Folder |
Data (default value) |
| {374DE290-123F-4565-9164-39C4925E467B} |
Downloads |
%USERPROFILE%\Downloads |
| Desktop |
Desktop |
%USERPROFILE%\Desktop |
| Favorites |
Favorites |
%USERPROFILE%\Favorites |
| My Music |
Music |
%USERPROFILE%\Music |
| My Pictures |
Pictures |
%USERPROFILE%\Pictures |
| My Video |
Videos |
%USERPROFILE%\Videos |
| Personal |
Documents |
%USERPROFILE%\Documents |
How to restore the registry
- With the Registry Editor open:
- Left-click on the File pull-down menu and left-click on Import.
- Navigate to the location of the REG file you want to import and left-click on it.
- Left-click on the Open button. You should get a confirmation screen telling you successfully imported the file.
7a7e6c6e-fa37-4db0-9d2e-a2845d4b4b66|1|5.0|96d5b379-7e1d-4dac-a6ba-1e50db561b04