User files (documents, music, photos, etc.) can take up a lot of space on your computer. But if you have a second drive inside your computer, you can quickly move your user folders to it. Here's how to change the default location of user files in Windows 10.
Nowadays, a few computers are coming with two drives, a Solid State Drive (SSD) and a Hard Disk Drive (HDD). Since SSD's are generally smaller in size and faster than HDD's, they usually are used just for the operating system and program files. User files should always be moved to the HDD to conserve space on the SSD.
Now there are seven (7) user file folders that you can be relocate: 3D Objects, Desktop, Documents, Downloads, Music, Pictures, and Videos. Before you change the location of the user file/folders, you will need to create new folders for your files.

I usually create a folder called User Files in the root of the D: drive and then create the individual folders for each user; for example, D:\User Files\username\Desktop, D:\User Files\username\Documents, etc.
How to change the default location of user files in Windows 10
- Open File Explorer by either left-clicking on the File Explorer icon on the Taskbar, left-clicking on the Start button and selecting File Explorer, right-clicking on the Start button and selecting File Explorer from the Power Users menu or by pressing the Windows logo key
 + E.
+ E.
- In the left-hand column, expand This PC so that the following folders are displayed: 3D Objects, Desktop, Documents, Downloads, Music, Pictures, and Videos.

- Right-click on the folder you want to move and from the context menu that appears, left-click on Properties.
- On the dialog box that appears, left-click on the Location tab.
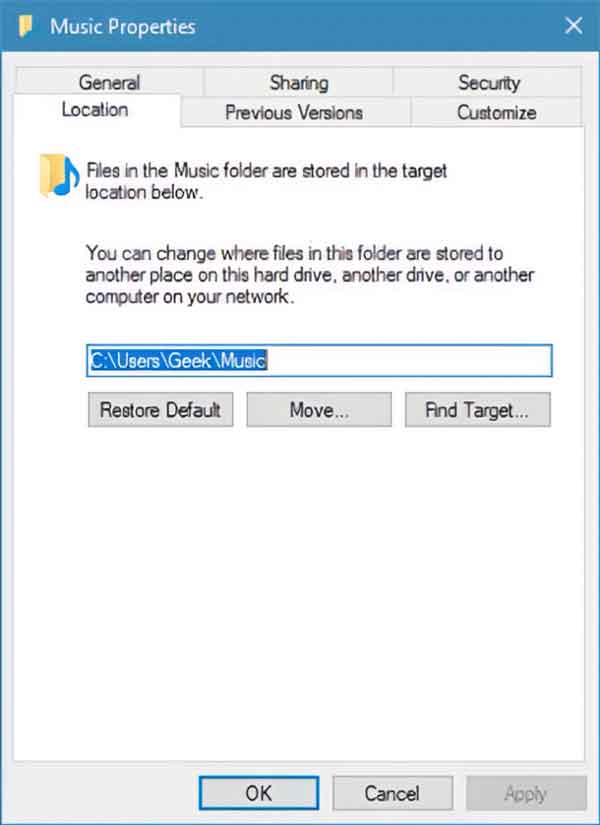
- Left-click on the Move button.
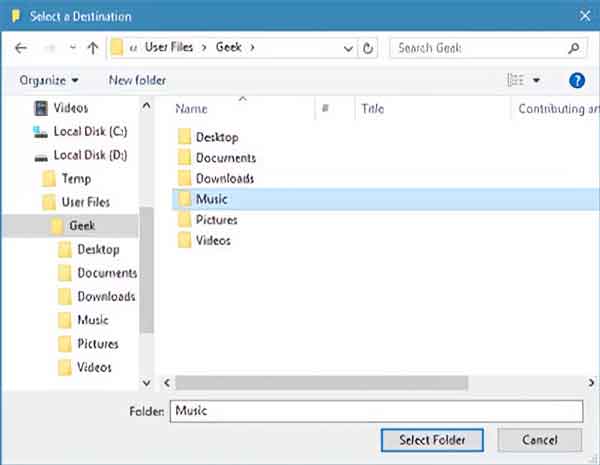
- Navigate to the new location for the folder. Once you have selected the folder you want to use, left-click on the Select Folder button.
- Left-click on the Apply button in the lower right-hand corner.
- In the confirmation dialog box that appears, left-click on Yes.
- Left-click on the OK button in the lower left-hand corner.
How to restore the default location of user files in Windows 10
- Open File Explorer by either left-clicking on the File Explorer icon on the Taskbar, left-clicking on the Start button and selecting File Explorer, right-clicking on the Start button and selecting File Explorer from the Power Users menu or by pressing the Windows logo key + E.
- In the left-hand column, expand This PC so that the following folders are displayed: 3D Objects, Desktop, Documents, Downloads, Music, Pictures, and Videos.
- Right-click on the folder you want to move and from the context menu that appears, left-click on Properties.
- On the dialog box that appears, left-click on the Location tab.
- Left-click on the Restore Default button.
- Left-click on the Apply button in the lower right-hand corner.
- In the Create Folder dialog box that appears, left-click on Yes.
- In the confirmation dialog box that appears, left-click on Yes.
- Left-click on the OK button in the lower left-hand corner.
If encounter any problems changing the default user files location, you may need to manually change the user files location in the registry.
225ca382-8761-4deb-9976-287f7b267cbf|1|5.0|96d5b379-7e1d-4dac-a6ba-1e50db561b04