Geeks in Phoenix

Geek Blog


My personal upgrade to Windows 10

Updated February 18, 2025

Upgrading your computer to Windows 10 is a pretty simple task. But there are occasions when upgrading can be a massive headache. Then, there is my Windows 10 upgrade. Here's my personal experience upgrading to Windows 10.
My personal upgrade to Windows 10

I knew right from the start that upgrading my personal computer to Windows 10 would be a lot of work. But it was something that needed to happen. When I built this system in January of 2013, it was because the original motherboard failed. So, I picked up a new motherboard, processor, and memory and reloaded all the software.

Little did I know that the biggest problem with my Windows 10 upgrade started when I installed all of the software in 2013. I installed Windows 8 instead of Windows 7, which I had previously. All worked well until Windows 8.1 was released. One of my major programs, QuickBooks Pro 2010, didn't support Windows 8.1. If I upgraded to Windows 8.1, I would have to upgrade to QuickBooks Pro 2013. It seemed like a waste of time and money, so I decided to wait.

Now, let's fast forward three years or so to February 2016, when Microsoft ended support for Windows 8 (not Windows 8.1). I decided it was time to move to Windows 10. I installed a new 1TB hard drive alongside my 1TB Windows 8 drive. I was temporarily switching the boot drive in the motherboard BIOS (Basic Input Output System) until I got the Windows 10 drive set up. That's when I remembered that my version of QuickBooks Pro 2010 would not install on Windows 10.

So, just for fun, I tried to install QuickBooks Pro 2010 inside a Windows 10 Virtual Machine (VM) running on the Windows 8 drive. The installer just wouldn't run. I tried everything, including compatibility mode, nothing worked. So I decided to run QuickBooks Pro 2010 inside a Windows 7 VM. I got the Windows 7 VM all set up and running. Things got busy at work, and I had put my upgrade to Windows 10 on hold. So I disconnected the drive with Windows 10 and kept using Windows 8.

My Windows 10 upgrade got back on track last month when Intuit offered to upgrade my version of QuickBooks. There is a security issue with older QuickBook versions, and Intuit offered me the latest version for 70% off. That was just the thing to get my Windows 10 upgrade going again. I would have lost the integration with Microsoft Word (printing envelopes) and Outlook (contacts, e-mail) running QuickBooks inside of a VM. That was something I didn't want to lose.

My original plan was back on. I already had a clean installation of Windows 10 and need to finish installing all of the programs. Yes, it is a lot of work, but a Windows 8 to Windows 10 upgrade isn't possible. Besides the new version of QuickBooks, I had several other software upgrades that I'd been waiting to do. It seemed like the perfect time to do them all.

My idea was to recreate the three (3) partitions and drive letters (C:, D: and E:) from the original 1TB drive using both of the 1TB drives. The C: and D: drive partitions would be on the first (boot) drive, and the E: drive partition would take up the whole second drive. Setting up the disks this way would double my storage space.

Now, when I originally started this upgrade in February, I disconnected the old 1TB and performed a clean install of Windows 10 on the new 1TB drive. Once I had Windows 10 installed and drivers updated, I shut down my computer and reattached the old 1TB drive. During this time, I also changed the port that the drives connected to on the motherboard (I wanted the boot drive on port 0).

Now I've done this type of upgrade many times before. The only problem I was having was the motherboard BIOS was having issues with the boot records on the two drives. It didn't help that the disks were from the same manufacturer (Western Digital) and the same size (1TB). The new one was a 'Black' drive, and the old one was a 'Blue' drive. They have the same specs, but the 'Black' drive has a five (5) year warranty, whereas the 'Blue' drive has only a two (2) year warranty.

It was time to make the changeover. I booted up to Windows 8 one last time and did a software inventory using Belarc Advisor. When it was complete, I printed out a copy for my use. Belarc Advisor gives a full list of all the software installed on your computer. Since I was doing a clean install of Windows 10, I would use the audit for reinstalling the software.

Then I went into the BIOS and changed the boot order so the Windows 10 drive booted automatically. Once Windows 10 was back up and running, I needed to get my files off of the old drive. I had already created the new C: and D: drives/partitions on the new drive, so I just copied over the contents of the old D: drive (which was now H:) to the new D: drive. The contents of the third partition (E:) on the old drive would have to go onto an external drive temporarily.
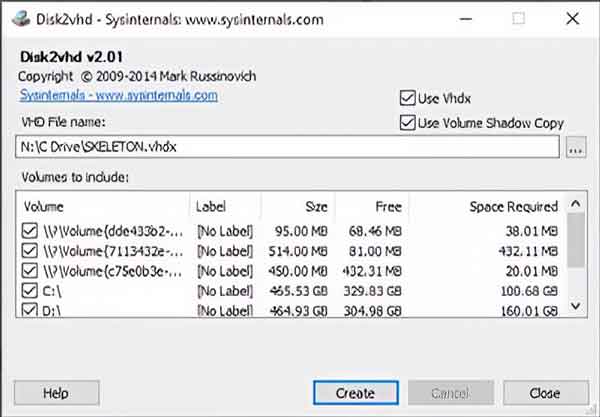
A screen shot of the Disk2vhd user interface
A screenshot of the Disk2vhd user interface

At this point, I have two of the original three partitions/drives recreated (C: and D:). It was time to take care of the original C: drive. To be on the safe side, I decided to create an image of it. I downloaded the latest version of Disk2vhd from Microsoft (it's part of the Sysinternals Suite) and proceeded to create an image of the C: drive. When it was complete, I copied the image over to an external drive along with a copy of the AppData folder from my old profile.

It was now time to delete all of the original partitions on the old 1TB drive and reformat it into just one partition/drive (E:). Reformatting the drive erased all of the partitions and the original Master Boot Record (MBR). That solved the problem with the motherboard not knowing what MBR to use at startup. Now that the E: drive was back in place, I copied all of the files I had put on the external drive.
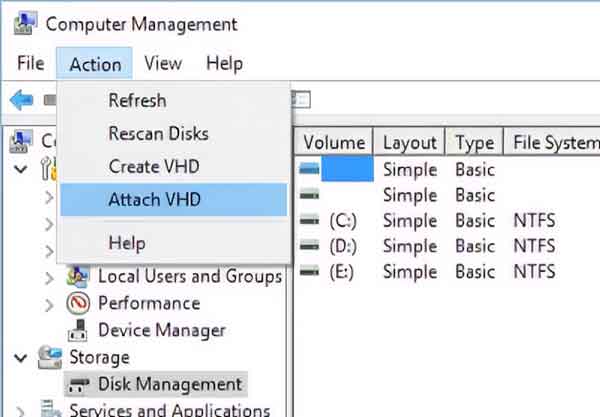
Attaching a VHD file inside of Disk Management

Everything from here on out was downhill. The only issue I had was a disk collision warning when I first attached the VHD in Windows 10. Windows 10 wrote a new disk signature to the VHD file, and everything was good. Now all I had to do was reinstall all of my software.

Manage your Windows computer with the Microsoft Management Console

Updated October 5, 2022

Have you ever had a problem finding some of Windows' built-in administrative tools? Don't you wish you could have them in one easy-to-find location? You can do just that and more with the Microsoft Management Console.

Manage your Windows computer with the Microsoft Management Console

The Microsoft Management Console (MMC) is a program you can use to create and save collections of administrative tools called Consoles. Consoles contain items such as snap-ins, extension snap-ins, monitor controls, tasks, wizards, and documentation required to manage many of the hardware, software, and networking components of your Windows system.

Microsoft Management Console inside of Windows 11
The Microsoft Management Console inside of Windows 11

Here is a list of some of the more useful MMC Snapins:

  • Computer Management
  • Device Manager
  • Disk Management
  • Event Viewer
  • Link to Web Address
  • Performance Monitor
  • Print Management
  • Services
  • Shared Folders
  • Task Scheduler
  • Windows Defender Firewall

Using the Run dialog box to start the Microsoft Management Console

All versions of Windows:
On the keyboard, press the Windows logo key Windows logo key + R

Windows 8.1, Windows 10, and Windows 11:
Right-click on the Windows logo Windows logo key on the Start Menu or press the Windows logo key Windows logo key + X and then select Run

For all the different ways you can bring up the Run dialog box, check out How to get to and use the Run dialog box in Windows.

In the Run dialog box that appears, type mmc and select OK. If you're prompted for an administrator password or confirmation, type the password or provide confirmation. When the Microsoft Management Console appears, it is time to add some content.

How to add or remove Microsoft Management Console snap-ins

  1. Left-click on the File pull-down menu and select Add/Remove Snap-in
  2. In the list of snap-ins that appear, left-click the snap-in you want to add to your console and then left-click on the Add button
  3. If prompted, select either Local computer or Another computer. If you choose Another computer, you will have to browse your network for that computer. Be sure to select the checkbox for Allow the select computer to be changed when launching from the command line.
  4. Then left-click on Finish. This will bring you back to the Add/Remove Snapin screen. When you finish adding snap-ins, left-click on the OK button in the screen's lower right-hand corner.

How to add, edit, or remove a Microsoft Management Console Taskpad View

  1. Open a previously saved console, right-click on the console name and left-click either New Taskpad View, Edit Taskpad View, or Delete Taskpad View from the dialog menu that appears. If you do not have any Taskpad Views already inside the console, the only option that will appear is New Taskpad View.
  2. If you are creating a new Taskpad View, the New Taskpad View Wizard will appear. Just follow the prompts and choose the Taskpad default settings. If you don't like how it looks, you can always go back and edit the layout later. If you select a Taskpad View, the general settings and associated tasks will appear.
  3. When you finish creating a new Taskpad View, you can create a new task to go inside it. If you edit an existing Taskpad View, you can go to the Tasks tab and select the current Tasks.
  4. When adding new tasks, the New Task Wizard will appear. Just follow the prompts and select the command type you want to use. You can run a command from a menu, run a script or program, open a web page, or open a tree item from your MMC favorite list.

When you are finished setting up your console, don't forget to save it in a place where you can quickly access it, like your Desktop.

Using special font characters in Windows with Character Map

Updated October 23, 2022

Have you ever wanted to insert a letter or symbol into a Windows document that you could not find on your keyboard? Maybe a copyright, trademark, or tolerance symbol? You can do just that and more with Windows built-in Character Map.

Believe it or not, but Windows fonts can have more characters than your keyboard has keys. Most Windows fonts do have more characters than your keyboard can create. And that doesn't even include the unique font characters you can create with Private Character Editor. So how do you access and insert these characters? By using Character Map.

Character Map inside of Windows 11

Character Map is one of those hidden gems inside Windows, that once you find it, you wonder how you lived without it. I remember first using Character Map inside Windows 3.1 and was amazed at what font characters I could insert into a Microsoft Word document. And the cool thing is you can add them to almost any Windows program (HTML editors excluded).

Character Map inside of Windows 3.11

How to start up Character Map

You can start Character Map in two different ways: Windows built-in shortcut or from the Run dialog box.

Character Map in Windows 11

  1. Left-click on the Start menu
  2. Left-click on All Apps
  3. Scroll down and left-click on Windows Tools
  4. Left-click on Character Map

Character Map in Windows 10

  1. Left-click on the Start menu
  2. Left-click on All Apps
  3. Scroll down and left-click on Windows Accessories to expand it
  4. Left-click on Character Map

Character map in Windows 8 and Windows 8.1

  1. Swipe in from the right side of the screen or press the Windows logo key Windows logo key + C to bring up the Charm bar
  2. Left-click on Search button in Charm Bar.
  3. Left-click on Apps in Search.
  4. Type Character Map in the Search field on the Search pane
  5. In the results on the left-hand side, left-click on Character Map.

Character Map in Windows 7 and Windows Vista

  1. Left-click on the Start menu
  2. Left-click on All Programs
  3. Scroll down and left-click on Accessories to expand it
  4. Left-click on System Tools to expand it
  5. Left-click on Character Map

Using the Run dialog box to start Character Map

All versions of Windows:
On the keyboard, press the Windows logo key Windows logo key + R

Windows 8, Windows 8.1, Windows 10, and Windows 11:
Right-click on the Windows logo Windows logo key on the Start Menu or press the Windows logo key Windows logo key + X and then select Run

In the Run dialog box that appears, type charmap and select OK.

How to insert a special character into a document

  1. Left-click the Font pull-down menu and left-click the name of the font you want to use.
  2. Left-click on the special character you want to insert into the document.
  3. Left-click Select and then left-click Copy.
  4. Open/switch to your document and left-click the location in the document where you want the special character to appear.
  5. Left-click the program's Edit menu or right-click the location where you want the character to appear and select Paste.
  • Many programs allow you to drag and drop special characters into documents. To do this, click the character you want to copy. When the character appears enlarged, drag and drop it into the open document.
  • If you do not delete previously copied characters in the Characters to copy box, they are copied along with any new characters you select.
  • If a private character does not appear correctly in a document, select the character in the document, and change its font to match the font you chose in Character Map.

Create your own Windows font character with Private Character Editor

Updated October 23, 2022

Do you have a company logo or a simple graphic that you would like to use often in a Windows program, like Microsoft Word or Excel? Maybe your line of work has special characters you would like to use but cannot find inside any of the installed Windows fonts? If so, you may want to create your own with Private Character Editor.

Using Private Character Editor (PCE), you can create up to 6,400 unique characters (such as special letters and logos) for use in your font library. PCE contains essential tools (pencil, brush, line, rectangle, and circle) for creating and editing characters and more advanced options.

The Private Character Editor inside of Windows 11

There are some pros and cons to creating your characters. Pro: you can insert your unique character into any text line and change its size and color. Con: your special character can only be one color (font color) and is low-resolution. If you're looking for multiple colors and high resolution, you need to use a graphic instead. But if you are looking for a way to insert a single-color logo or unique character into a text line, this might be the answer.

My custom Windows logo character inserted into a WordPad document

Now starting PCE can be kind of hard the first time since there is no shortcut to the program. But once you know where it is and how to start it, you're ready to rock and roll. The program name for PCE is eudcedit.exe, and it's located in the Windows\system32 directory. The easiest way to start it up is by using the Run dialog box.

How to open the Run dialog box

All versions of Windows:
On the keyboard, press the Windows logo key Windows logo key + R

Windows 8.1, Windows 10, and Windows 11:
Right-click on the Windows logo Windows logo key on the Start Menu or press the Windows logo key Windows logo key + X and then select Run

For all of the ways to open a Run dialog box, check out How to get to and use the Run dialog box in Windows.

In the Run dialog box that appears, type eudcedit and select OK.

Things to keep in mind when creating special characters using Private Character Editor.

  • You can choose to link your private characters to all the fonts in your font library (so that any font you've selected can display your private characters). Or you can choose to link your private characters only to specific fonts (so that only the specified font can show your private characters).
  • Using the Select Code dialog box, you can view your entire set of private characters. The Select Code dialog box displays miniature views of all your private characters with their corresponding hexadecimal values.
  • If you want to create a new private character using an existing character as your model, you can copy the current character to the Edit grid and then modify it to suit your needs. Or you can display the existing character in a Reference window alongside your Edit grid for use as a visual reference. You can use any character from any font that is installed on your computer.
  • By default, PCE creates characters using the Unicode character set. If you have installed one of the Asian input languages (such as Chinese, Japanese, or Korean), you can also use PCE with the Windows character set.

Once you have created your unique character, you will need to use the Character Map application to copy it to the clipboard, so you can paste it into your Windows program (see video below). You will first need to open the Character Map using one of the ways listed in the following article.

Using special font characters in Windows with Character Map

Once you have Character Map open, you will find your custom character at the top of the Font list under All Fonts (Private Characters).
List of Private Characters inside of Character Map
Insert your custom character as you would any other one.

  1. Left-click the Font pull-down menu and select All Fonts (Private Characters).
  2. Left-click on the special character you want to insert into the document.
  3. Left-click Select and then left-click Copy.
  4. Open/switch to your document and left-click the location in the document where you want the special character to appear.
  5. Left-click the program's Edit menu or right-click the location where you want the character to appear and select Paste.

Use the Character Map program to insert your special character
Once your unique character is inserted, you can change its format (color, size, bold, italic, etc.) any way you like.

How to clean up and reset the Internet Explorer

In repairing computers for a living, the one thing I find myself doing continually is cleaning up and resetting web browsers. Removing adware, malware and viruses can screw up the Internet Explorer. So here is how to clean up and reset the Internet Explorer.

How to clean up and reset the Internet Explorer

Internet Explorer (IE) has been included in every version of Windows since Windows 98. Microsoft has made cleaning IE reasonably straightforward, but there can be some tricky items. All of IE's settings are accessible from either inside of IE or the Control Panel. The best way is to go through the Control Panel because that is when IE is not technically running. If you use Outlook or Windows Mail, you will need to close these programs too before attempting to clean up IE, as they use IE to rendered HTML formatted e-mails.

When it comes to resetting the IE, you have to first get into the Control Panel. The easiest way to do it with Windows Vista and Windows 7 is to type Control Panel into the search box above the Start button and select Control Panel from the search results. The easiest and fastest way in Windows 8 is to use the Power Users menu (Windows logo key Windows logo key + X) and then select Control Panel. In Windows 10, use the search box next to the Start Windows logo button, type Control Panel, and click on it from the results. Once you have the Control Panel up, select Network and Internet then Internet Options (if viewing by category) or just Internet Options (if viewing by icons).

The Internet Properties General tab inside of Windows 10

The Internet Options haven't changed much over the years, so the tabs on the Internet Properties will look similar in Windows Vista as they do in Windows 10. When you first open Internet Properties, the General tab appears by default. You can go down to Browsing history and delete everything from temporary Internet files and cookies to form data and passwords. Remember that you cannot get it back once you delete something like passwords, so choose carefully.

The Internet Properties Programs tab inside of Windows 10

Once you're done with the General tab, go over to the Programs tab and select Manage add-ons. Here is where you enable, disable and sometimes delete add-ons that have been installed into the IE. There are times when all you can do is disable an add-on, so that is when you'll need a third-party program like CCleaner from Piriform. CCleaner can clean up all of the major browsers, but the only one I've had issues with getting rid of third-party applications is IE.

The Internet Properties Advanced tab inside of Windows 10

The last tab in Internet Properties is Advanced, and it is the most powerful. It has only two buttons, Restore advanced settings and Reset. The first one you click is Restore advanced settings, then click on Apply in the lower right-hand corner. Then to completely reset IE click on Reset. You will get a screen warning you that you are about to reset IE back to its original default settings. Windows 7, Windows 8, and Windows 10 users will also have the option of deleting personal settings. Remember that these cannot be undone, so choose carefully. If in doubt, leave the personal files checkbox empty. You can always come back and remove them if need be.

Now, if after you have reset IE, you find you cannot get into some secure sites, like bank websites, go back into Internet Properties and select the Security tab, and deselect Enable Protected Mode. When you click Apply, you will get a prompt telling you that your current security setting might put you at risk. Then try the website you were having problems with. If you can now get into it, you are all set.

The Windows features menu inside of Windows 10

There is one option that is not available to IE, and that is to uninstall and reinstall. As I stated earlier in this article, IE is integrated into the operating system as a feature and is used by other programs like Outlook and Windows Mail. The only thing you can do is turn off the IE feature in the Control panel, restart your computer and turn it back on. To do this, go to the Control Panel and select Programs and Features, then Uninstall or change a program. In the left-hand column, left-click on Turn Windows features on or off.

Free computer diagnostics

Repairing a PC can sometimes be expensive, and that is why we offer free basic in-shop diagnostics. Give one of our professional and experienced technicians a call at (602) 795-1111, and let's see what we can do for you.

Check out our reviews

Geeks In Phoenix LLC, BBB Business Review

Customer service is #1

Here at Geeks in Phoenix, we take pride in providing excellent customer service. We aim to give the highest quality of service  from computer repair, virus removal, and data recovery.

Bring your computer to us and save

Repairing a computer can be time-consuming. That is why we base our in-shop service on the time we work on your computer, not the time it takes for your computer to work! From running memory checking software to scanning for viruses, these are processes that can take some time.

Contact us

If you have any questions, please feel free to give us a call at (602) 795-1111  and talk with one of our Geeks. Or you can send us a message from our contact page , and one of our Geeks will get back to you as soon as possible. Or you can stop by and see us. Here are our hours and location.

Like Geeks in Phoenix on Facebook

Follow Geeks in Phoenix on Twitter

Watch Geeks in Phoenix on YouTube