Geeks in Phoenix

Geek Blog


How to perform a repair upgrade of Windows 11

Are you having some problems with your computer and wish you could reinstall Windows 11 without losing your files and apps? Maybe you want to upgrade to the latest version of Windows 11, and Windows Update is not offering it. Here is how to perform a repair upgrade installation of Windows 11.

How to perform a repair upgrade of Windows 11

There is one thing every Windows user fears, and that is reinstalling Windows. The fear of losing your files and installed programs will deter most people until the problem becomes too bad to ignore.

But with Windows 11, you can do a repair upgrade reasonably easily. So what is a repair upgrade? It is reinstalling Windows 11 using the same version (repair) or a newer version (repair/upgrade). It is often called an in-place repair or upgrade.

Now I have repaired several Windows computers using this method, which works most of the time. I remember one laptop with issues with being unable to right-click using the touchpad or mouse, and an in-place repair installation fixed the problem.

We first need to download the latest version of Windows 11 from Microsoft (see the link below). We will be downloading an ISO file that we will use to reinstall Windows 11. An ISO file is the format for optical disks (CD, DVD, BD).

Download Windows 11

When you reach the Windows 11 download page, scroll down until you find Download Windows 11 Disk Image (ISO). You can also create an ISO file using the Create Windows 11 Installation Media, which involves a few more steps.

Once you have the ISO file downloaded, you will need to make it a virtual DVD drive. Locate the ISO file in File Explorer and right-click on it.
Mounting an ISO file as a virtual drive in Windows 11
From the context menu that appears, select Mount. If you receive a security warning, left-click on Open. It will now appear as a DVD drive inside File Explorer.

Click on the DVD drive to display the contents. In the list of files and folders, you will find a program named Setup.
Running Windows 11 Setup with administrator privileges
To ensure we are running the install with the correct privileges, right-click on Setup and select Run as administrator from the context menu that appears. This will start the repair upgrade installation.

The first window that appears is the Windows 11 Setup screen. Usually, you would click on the Next button and proceed with the installation.
The Windows 11 Setup main screen
But if you are performing a repair installation, you may want to change whether or not to download updates, drivers, and features at this time by clicking on the Change how Setup downloads updates link.
Select whether or not to download updates and drivers before installing Windows 11
I have found that delaying downloads until after the installation is complete works best for repairing Windows.

Next, you will get the EULA (End User License Agreement), click on Accept and continue. On the next screen, you can change if you keep your files and apps or remove them.
Select whether or not to save your personal files and apps
By default, both files and apps are saved. When you are ready to start the installation, click on Install.

Once the repair upgrade starts, it can take some time to finish.
The different stages of the repair upgrade of Windows 11
Grab something to drink and find something to do. Your computer will restart several times during the installation.

My digital toolbox 5

When you repair computers for a living as I do, you often get asked what software I would recommend. I do not mind recommending software I use regularly, so in this installment of My Digitial Toolbox, I want to showcase three (3) utilities that I recommend to my customers.

My Digital Toolbox 5

Allway Sync

The user interface inside of Allway Sync

I have used Allway Sync for a few years to sync files and folders between my local drive and a NAS. I have set up a few of my customers with Allway Sync with a couple syncing to cloud storage. It has a simple-to-use interface and plenty of folder/file synchronization options.

Allway Sync

Notepad++

Screenshot of Notepad++ with the black board theme

When it comes to creating and editing text-based files, Notepad++ is hands down the best utility you can find. From being able to customize the look and feel to adding more functionality with plugins, I like using Notepad++ for its syntax highlighting. For me, Notepad++ is one of the best text-based file editors you can find.

Notepad++

7-Zip

The 7-Zip File Manager

Windows has built-in compressed folder capability, but only for a couple of file types. I use 7-Zip because it can work with over 30 different archiving formats. The best feature of 7-Zip is the context menu that appears when you right-click on a file/folder.

7-Zip

How to check and repair system files in Windows 11

When it comes to repairing Windows-based computers, I always do one thing: check for corrupt system files. Corrupt system files can cause all sorts of problems, so here is how to check and repair system files in Windows 11.

How to check and repair system files in Windows 11

Repairing system files is not complex, but it can be time-consuming. Going through all of the steps outlined in this article can take several hours. Once you start a scan, you will have to allow it to complete, so be prepared to watch your computer work. And all of the links included in this article will open in a new window.

We first need to check the drive's file structure that the operating system is installed on. It is usually drive C:. For this, we will use the disk error checking program built into Windows 11.

There are a couple of different ways to run it (standard and advanced), but the most thorough way is by using the advanced method (see link below). It may take some time to run, but it is the most thorough error checking you can perform.

How to check your drive for errors in Windows 11

Now that we have checked the drive for errors, we must check for corrupted system files. For this, we will use the built-in System File Checker (SFC). Like most of the programs in this article, this program has to be run from an Administrative Command Prompt.

How to open a Command Prompt with Administrator privileges in Windows 11

SFC has multiple syntaxes and parameters you can use with it. Here are all of the syntaxes and parameters with examples of their use.

SFC [/SCANNOW] [/VERIFYONLY] [/SCANFILE=<file>] [/VERIFYFILE=<file>] [/OFFWINDIR=<offline windows directory> /OFFBOOTDIR=<offline boot directory> [/OFFLOGFILE=<log file path>]]

  • /SCANNOW - Scans integrity of all protected system files and repairs files with problems when possible.
  • /VERIFYONLY - Scans integrity of all protected system files. No repair operation is performed.
  • /SCANFILE - Scans integrity of the referenced file, repairs file if problems are identified. Specify full path <file>.
  • /VERIFYFILE - Verifies the integrity of the file with full path <file>. No repair operation is performed.
  • /OFFBOOTDIR - For offline repair, specify the location of the offline boot directory.
  • /OFFWINDIR - For offline repair, specify the location of the offline windows directory.
  • /OFFLOGFILE - For offline repair, optionally enable logging by specifying a log file path.

Examples:

  • SFC /SCANNOW
  • SFC /VERIFYFILE=c:\windows\system32\kernel32.dll
  • SFC /SCANFILE=d:\windows\system32\kernel32.dll /OFFBOOTDIR=d:\ /OFFWINDIR=d:\windows
  • SFC /SCANFILE=d:\windows\system32\kernel32.dll /OFFBOOTDIR=d:\ /OFFWINDIR=d:\windows /OFFLOGFILE=c:\log.txt
  • SFC /VERIFYONLY

System File Checker running in an Administrative Command Prompt inside of Windows 11
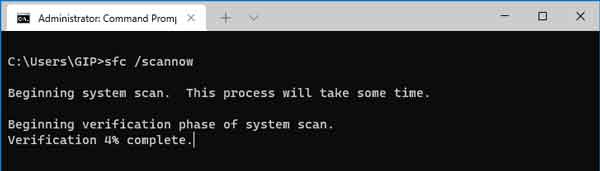
We want to check all of the Windows 11 protected system files, so type the following into an Administrative Command Prompt and press Enter.

SFC /SCANNOW

System File Checker results in an Administrative Command Prompt inside of Windows 11
Now four (4) possible results can appear when SFC is done scanning. They are:

Windows Resource Protection did not find any integrity violations.
All system files are acceptable, and you are good to go.

Windows Resource Protection could not perform the requested operation.
There may be another program preventing SFC from running. In this case, boot the system up into safe mode and run SFC from there.

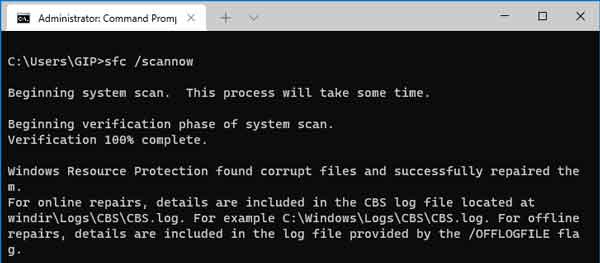
Windows Resource Protection found corrupt files and successfully repaired them.
All system files are now correct, and you're ready to go. Just restart your computer to finalize the repairs. If you want to view the repair details, type the following into an Administrative Command Prompt and press Enter.

findstr /c:"[SR]" %windir%\Logs\CBS\CBS.log >"%userprofile%\Desktop\sfcdetails.txt"

It will create a text file on your desktop named sfcdetails.txt that has all of the details of the repaired files.

Windows Resource Protection found corrupt files but was unable to fix some of them.
If you received this message, you will need to repair the hidden Windows image. To do this, we will need to run the Deployment Image Servicing and Management (DISM) program.
Deployment Image Servicing and Management running in an Administrative Command Prompt inside of Windows 11
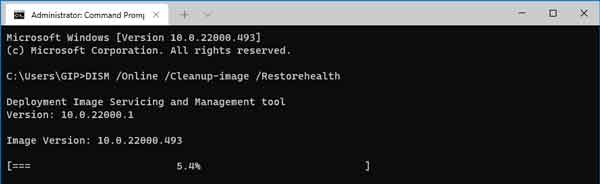
To restore the health of the Windows image, type the following into an Administrative Command Prompt and press Enter.

DISM /Online /Cleanup-image /Restorehealth

Once DISM finishes, run SFC /SCANNOW again. This time no integrity violations should be found. If, after several attemps at automatically repairing the corrupt system file(s) fails, you may have to fix them manually. To view the details of the files that could not be automatically repaired, type the following into an Administrative Command Prompt and press Enter.

findstr /c:"[SR]" %windir%\Logs\CBS\CBS.log >"%userprofile%\Desktop\sfcdetails.txt"

It will create a text file on your desktop named sfcdetails.txt. You will need to search through it and find what file(s) could not be repaired

How to manually repair corrupt system files

Note: To replace a corrupt system file, you must have a known good copy of the file(s) in question. A good file source is another computer or virtual machine running Windows 11. Since I do computer repair for a living, I have all of the versions of Windows that are still supported by Microsoft running inside virtual machines.

The first thing to do is note the location (path) and name of the file(s) that need to be replaced from the sfcdetails.txt file. Once you have another copy of the corrupt file(s), you will need to take administrative ownership of the file(s). To do this, modify the following command with the path\filename of the file you want to replace and then type it into an Administrative Command Prompt and press Enter.

takeown /f path\filename

Example: takeown /f C:\Windows\FileToBeReplaced.dll

Next, you will have to grant administrators full access to the file(s) being replaced. To do this, modify the following command with the path\filename of the file you want to replace and then type it into an Administrative Command Prompt and press Enter.

icacls path\filename /grant administrators:F

Example: icacls C:\Windows\FileToBeReplaced.dll /grant administrators:F

The third thing to do is copy the new file(s) and replace the corrupt one(s).To do this, modify the following command with the path\filename of the file you want to replace and then type it into an Administrative Command Prompt and press Enter.

copy path\filename path\filename

Example: copy C:\Temp\FileToBeReplaced.dll C:\Windows\FileToBeReplaced.dll

My digital toolbox 4

Being a computer technician, I used all sorts of different software during my day. One day I might be removing viruses and malware, the next day, I might be replacing a failed hard drive. So the software I use is always changing, so here is another installment of my digital toolbox.

My digital toolbox 4

Windows 10 media (USB and DVD versions)

Screenshot of Windows 10 media boot menu

One of the best things Microsoft did when it comes to Windows 10 is to make the installation media readily available. With the installation media, you can do all sorts of repairs and maintenance to Windows 10.

You can, of course, install or reinstall Windows 10. You can also perform an in-place upgrade from Windows 7, Windows 8.1, or even Windows 10 itself. And since the drives are bootable, you can even use the Windows 10 installation media to repair Windows 10.

Now I have in my digital toolbox several USB and DVD versions of the Windows 10 media. The Windows 10 USB drives have both 32-bit and 64-bit versions on them. I have separate DVDs for 32-bit and 64-bit versions of Windows 10.

Believe it or not, but I have the ISO file of every version of Windows 10 that has been released (32-bit and 64-bit). You never know when they might come in handy.

Since the installation media is bootable, I mainly use it for repairing Windows 10. You can access the same recovery tools on the install media as you have when Windows 10 fails to boot correctly.

Here are a few links to articles that illustrate how you can use the Windows 10 media. I have included a link to the Windows 10 Media Creation Tool too.

How to repair Windows 10 by doing an in-place upgrade

How to get a free Windows 10 upgrade for Windows 7 and Windows 8.1

How to perform a clean Windows 10 installation

The Windows 10 feature you hope you never have to use

Windows 10 Media Creation Tool

Space Sniffer

Screenshot of Space Sniffer

There are times when I need to see how the space on a drive is allocated. It is one thing to know the size of a folder or file in numbers, but seeing them graphically represented as blocks is quite different. This is where Space Sniffer comes in handy.

Space Sniffer displays the contents of a drive as blocks in a treemap. The larger the block, the larger folder or file. You can quickly find data that is taking up large amounts of space on a drive.

Now the cool thing about Space Sniffer is that it requires no installation. You can run directly from a USB drive. Just insert the USB drive and start it up.

Case in point; I once had a business that all of the workstations were getting low disk space messages. I ran Space Sniffer from a USB drive on a couple of the workstations and quickly found the problem. It turned out that the network anti-virus client was not deleting previous versions of virus definitions as it was supposed to be doing.

I also like to use Space Sniffer to quickly find Outlook databases, as it has a couple of different locations it stores its files. Microsoft Outlook is notorious for creating large files.

See what your drive contains with Space Sniffer

Synchronized browser data

Screenshot of Firefox sync settings

One of handy features of browsers nowadays is the ability to synchronize data (passwords, favorites, extensions, etc.). All of the major browsers have this feature, including Google Chrome, Mozilla Firefox, and Microsoft Edge.

Each browser has a different way of setting up synchronization; Chrome uses a Gmail account, Firefox uses a Firefox account, and Edge uses a Microsoft account.

But no matter what browser you use, you get the same content (passwords, favorites, options, etc.) across all platforms. Be it either Windows Mac, Linux, Android, or iOS. If it is on one device, it is on all devices.

Since I do a lot of research for service calls at my office, I like to save bookmarks in my desktop version of Firefox. Then when I get on-site, I can open those bookmarks in my smartphone version of Firefox.

One of my favorite things is opening a tab on my desktop Firefox from the Firefox in my workshop. That way, I can locate parts for customer's computers in the workshop and then order them in my office.

Any way you look at it, having browser data synchronized between devices is a real asset that should not be overlooked. If you are not syncing your browser data, I recommend you give it a try.

How to repair Windows 10 by doing an in-place upgrade

Updated May 14, 2020

Are you getting lots of errors when you log into Windows 10? Are you not able to get the Start menu or File Explorer to open? If so, it may be time to repair Windows 10 by doing an in-place upgrade.

Sometimes repairing Windows 10 can be a challenging endeavor. One time I had a Windows 10 system that the right-click mouse function would only work in certain situations.

Another time, I had a Windows 10 system that File Explorer and the Start menu would not work. This was one of those times when you think that you are going to just have to wipe the drive and do a clean installation of Windows 10.

But in both cases, I was able to repair Windows 10 while keeping all of the user's documents, settings, and installed programs. I just performed an in-place upgrade of Windows 10.

Remember that if you start the in-place upgrade by booting your computer up on the Windows 10 installation media, you will only get the option of saving your documents. To also preserve the installed programs, you need to start the in-place upgrade from inside of Windows 10.

Now performing an in-place upgrade is not hard. The only thing you need to do is make the Windows 10 installation media. If you can access the Internet and download the Windows 10 Media Creation Tool, great, if not, you will need to use another computer to make the Windows 10 installation media.

You do not have to be upgrading to a newer version of Windows 10 (1809 to 1903, 1903 to 1909) for this to work. You can perform an upgrade to the same version (1909 to 1909).

Now you never want to use an older version of the Windows 10 media, like the one you created a couple of years ago, to do an in-place upgrade. You will always want to download the latest version directly from Microsoft using the Windows 10 Media Creation Tool.

To make the media, you will need either a blank DVD or a USB flash drive that is at least 8GB in size. Remember that if you use a USB flash drive, it will be reformatted and everything on it will be erased. So, if you have used the USB drive for anything else, you may want to copy the data off of it before using it for the Windows 10 installation media.

Once you get the Windows 10 Media Creation Tool downloaded, all you have to do is double-click the file to run it. It is a stand-alone program, and it does not require any installation.

The first screen that comes up is the legal stuff, just click on Accept. On the next screen, you will have to choose what you want to do.
Windows 10 installer what do you want to do screen
Select Create installation media for another PC and click on Next.

On the next screen, you will select the language, architecture, and edition.
Windows 10 installer select language and edition screen
Since you are creating the media for another computer, make sure the Use the recommended options for this PC checkbox is deselected. The majority of users in the US will select the following settings:

  • Language: English (If you use a different language, select it from the pull-down menu)
  • Edition: Windows 10
  • Architecture: 64-bit (x64)

When you are finished selecting the language, architecture, and edition, click on Next. The next screen will ask you what media do you want to use.
Windows 10 installer choose which media to use screen
If you select the USB flash drive option, make sure you have the USB flash drive inserted into a USB port on the computer.

If you want to make a DVD, you will need to choose the ISO file option and then burn it onto a blank DVD. Here is how to go about burning the ISO file to a DVD.

Once you have the media created, either a DVD or USB flash drive, you will need to insert it in the computer that you want to repair.
Windows 10 setup program in File Explorer
Then just open File Explorer, navigate to the DVD or USB flash drive, and right-click on the setup.exe program and select Run as administrator.
Windows 10 installation start up screen
The Windows 10 installer will then startup.

You will be prompted to download Windows 10 updates, drivers, and optional features. Since you are doing an in-place upgrade, I recommend waiting until the installation is finished before doing any updates.

The next screen you will get is the license agreement. Just click Accept in the lower right-hand corner and continue with the in-place upgrade. Finally, you will get to the screen that asks what you want to keep. Make sure that Keep personal files and apps are selected and then select Install in the lower right-hand corner.

The in-place upgrade will take some time, and your computer could restart a few times before it is complete. When it is done, your version of Windows 10 should be completely repaired and good as new.

Now in the examples I talked about earlier, I could not get either the right-click function to work or could not get the Start menu or File Explorer to open at all. But there is another way of starting the in-place upgrade using Task Manager.

How to start a program using Task Manager

Sometimes the only way to run a program is to use Task Manager. It is a simple, down, and dirty way of running a program with administrative privileges. And we want to use admin privileges to run the setup.exe program.

  1. Press the Ctrl + Alt + Delete keys all at the same time (the 3-finger salute).
    The Windows 10 Ctrl Alt Delete screen
    You will get a screen that has several selections on it. Click on Task Manager.
  2. The Task Manager program will appear next.
    The basic Windows 10 Task Manager screen
    If it shows says There are no running apps, click on the More details arrow in the bottom left-hand corner. This will bring up all of the running processes.
  3. Click on the File drop-down menu in the upper left-hand corner of Task Manager
    The advanced Windows 10 Task Manager screen with Run new task
    and select Run new task.
  4. The Create a new task dialog box will appear.
    The Windows 10 Create new task dialog box
    Click on the Browse .. button in the lower right-hand corner.
  5. Using the Browse dialog box, navigate to the drive with the Windows 10 installation files (either DVD or USB flash drive),
    The Windows 10 Task Manager Browse screen
    select setup.exe and then click Open.
  6. This will bring you back to the Create new task dialog box, and the path to the setup.exe program will be in the Open field.
    The Windows 10 Create new task dialog box with file path
    Make sure that the Create this task with administrative privileges checkbox is selected. Then click on OK.
  7. The Windows 10 installer will now start. Just follow the steps outlined previously in this article for the rest of the in-place upgrade.

Free computer diagnostics

Repairing a PC can sometimes be expensive, and that is why we offer free basic in-shop diagnostics. Give one of our professional and experienced technicians a call at (602) 795-1111, and let's see what we can do for you.

Check out our reviews

Geeks In Phoenix LLC, BBB Business Review

Customer service is #1

Here at Geeks in Phoenix, we take pride in providing excellent customer service. We aim to give the highest quality of service  from computer repair, virus removal, and data recovery.

Bring your computer to us and save

Repairing a computer can be time-consuming. That is why we base our in-shop service on the time we work on your computer, not the time it takes for your computer to work! From running memory checking software to scanning for viruses, these are processes that can take some time.

Contact us

If you have any questions, please feel free to give us a call at (602) 795-1111  and talk with one of our Geeks. Or you can send us a message from our contact page contact page , and one of our Geeks will get back to you as soon as possible. Or you can stop by and see us. Here are our hours and location.

Like Geeks in Phoenix on Facebook

Follow Geeks in Phoenix on Twitter

Watch Geeks in Phoenix on YouTube