Updated October 25, 2022
Have you ever downloaded an ISO file and did not know what to do with it? More and more software companies are now distributing their software using ISO files. Here is what you can do with an ISO file.
Nowadays, it seems like everyone is starting to use ISO files for distributing software. ISO files are just an image of a CD or DVD. You commonly see them used to deliver bootable software.
Now really quick, ISO stands for International Organization for Standardization. They have a set standard (ISO 9660) for the file system used for optical disks (CD, DVD, BD, etc.).
Even Microsoft is now using ISO files for distributing Windows. If you download Windows 7, Windows 8.1, Windows 10, or Windows 11 from Microsoft, you will get the option of downloading an ISO file.
But once you download the ISO file, what can you do with it? If you are running Windows 7, Windows 8.1, Windows 10, or Windows 11, you have three (3) options; mount it as a virtual optical drive, burn it to a disk or create a bootable USB drive.
You can also create ISO image files. For more information, check out How to create ISO files from your software disks.
How to mount and access files in an ISO file
By default, Windows 8.1, Windows 10, and Windows 11 can mount an ISO file as a virtual optical drive. Windows 7 requires a third-party program to mount an ISO file.
Once you mount an ISO file as a virtual optical drive, you can access the files and folders inside it. Most of the time, you will use this feature to run a software installation.
For Windows 7, we are going to use the open-source optical drive emulator WinCDEmu. Just download and install it using the default settings. Once WinCDEmu is installed, mounting an ISO image is similar to Windows 8.1, Windows 10, or Windows 11.
Windows 7
- Open Windows Explorer by using one of the following:
- Left-click on the manila folder icon to the Taskbar.
or
- Press the Windows logo key
 + E at the same time.
- Navigate to the ISO image you want to open.
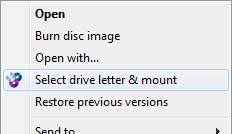
- Right-click on it and select Select drive letter and mount on the context menu that appears.
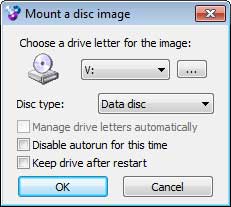
- On the WinCDEmu screen that appears, select the drive letter you want to use for the virtual optical drive and left-click on OK.
- Using Windows Explorer, navigate to the virtual drive you just mounted. You can now use it as you would with any other physically attached optical drive.
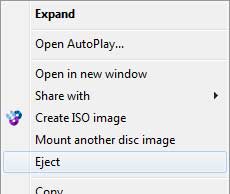
- When you finish with the virtual drive, you can remove the drive by right-clicking on it and selecting Eject on the context menu that appears.
Windows 8.1, Windows 10 and Windows 11
- Open File Explorer (name changed in Windows 8.1) by using one of the following:
- Left-click on the manila folder icon to the Taskbar.
or
- Press the Windows logo key + E at the same time.
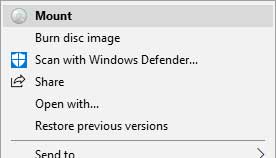
- Navigate to the ISO image you want to open.
- Right-click on it and select Mount on the context menu that appears. Windows 8.1, Windows 10, and Windows 11 automatically assign the next available drive letter.
- Using File Explorer, navigate to the virtual drive you just mounted. You can now use it as you would with any other physically attached optical drive.
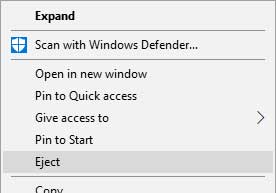
- When you finish with the virtual drive, you can remove the drive by right-clicking on it and selecting Eject on the context menu that appears.
How to burn an ISO image file to a disk
The process for burning an ISO image to disk is the same for Windows 7, Windows 8.1, Windows 10, and Windows 11. Just make sure you have the correct blank media for the disk you want to burn.
For example, if your ISO file is under 700 MB's (Megabyte), it will fit on a CD. If it is between 700 MB's (Megabyte) and 4.7 GB's (Gigabyte), then it will fit on a DVD. If it is between 4.7 and 8.5 GB's (Gigabyte), it will fit on a Double Layer DVD. Anything over 8.5 GB's (Gigabyte), and it is going to go on a BD.
For more information on Megabytes and Gigabytes, check out What is a Bit? What is a Byte?.
Windows 7, Windows 8.1, Windows 10, and Windows 11
- Open Windows Explorer (Windows 7) or File Explorer (Windows 8.1, Windows 10, and Windows 11) by using one of the following:
- Left-click on the manila folder icon to the Taskbar.
or
- Press the Windows logo key + E at the same time.
- Navigate to the ISO image you want to burn to disk.
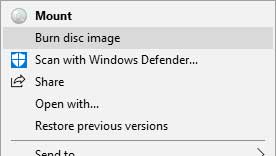
- Right-click on the ISO files and select Burn disk image on the context menu that appears.
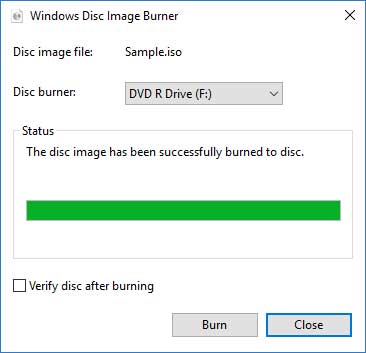
- Select the optical drive you want to use to burn the disk from the pull-down menu on the Windows Disc Image Burner screen. You also have the option to verify the disk after it is created. When you are ready, left-click on the Burn button.
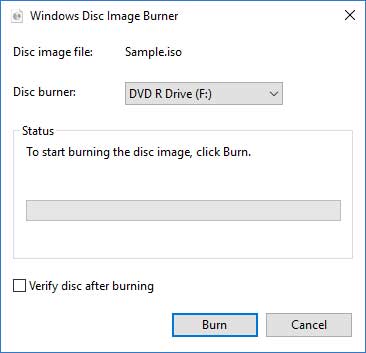
- When the optical drive is finished burning the disk, left-click on the Close button.
How to create a bootable USB drive from an ISO file
When you want to create a bootable USB drive, you will need a USB flash drive that is empty or that you do not mind if it gets erased. If you are going to use a USB flash drive that has been used before, double-check it to make sure there is nothing on it you may want to keep.
Remember to use a USB drive larger than the ISO file you want to put on it. A good rule of thumb is to use one that the capacity is more than 4GB. I prefer using 8GB or larger.
To create a bootable USB drive will require downloading and installing a separate program. There are several out on the Internet, but here are three (3) of the most popular programs.
AnyBurn
This free software allows you to create, edit, and burn CD, DVD, and BD discs. It also can create bootable USB drives from different types of image files, including ISO files. It is available for 32 and 64-bit versions of Windows, from Windows XP to Windows 11. There is even a portable version that requires no installation.
Windows USB/DVD Download Tool from Microsoft
This free tool is mainly meant for creating bootable Windows 7 USB drives from downloaded installation media. It is recommended to only install it on Windows 7, as the system requirements do not list support for Windows 8.1, Windows 10, or Windows 11.
Rufus - Create bootable USB drives the easy way
The thing about Rufus is it requires no installation, just download it, and it is ready to go. And there are a lot more options, including partition scheme, file system, and cluster size. You also have more boot options, including MS-DOS and FreeDOS.
07b0d42d-11e1-444f-9181-3c4ff7b1f228|1|5.0|96d5b379-7e1d-4dac-a6ba-1e50db561b04