Geeks in Phoenix

Geek Blog


3 crucial steps to remember before reinstalling Windows 11

There may come a point in your computer's life when you need to reinstall Windows 11. Reinstalling Windows can be a challenging endeavor, but with a few simple steps, you can make it much easier. Here are three crucial steps to remember before reinstalling Windows 11.

3 crucial steps to remember before reinstalling Windows 11

Reinstalling Windows 11 can be daunting, but it can also breathe new life into your computer. Whether you're facing performance issues, software conflicts, or want a fresh start, a reinstallation may be the solution.

However, before you proceed, it's essential to take certain precautions to ensure a smooth installation. The following procedures should be performed before reinstalling Windows 11. You should also do these items on a regular schedule, say every 6 -1 2 months.

Update your Windows 11 installation media

Windows 11 Media Creation Tool

One of the first things you need to do before reinstalling Windows 11 is to prepare or update your installation media. If you purchased Windows 11 on a USB drive, that drive contains the version of Windows 11 that was available at that specific point in time. If it has been a couple of years since you installed Windows 11, you need to update your installation media to the most current version.

Microsoft provides an easy way to download the latest version of Windows 11 through the Media Creation Tool. It’s vital to use the most up-to-date version to guarantee that you have the latest features, improvements, and security updates. Here’s how to do it:

  1. Download the Windows 11 Media Creation tool.
  2. Open File Explorer (Windows logo key Windows logo key + E) and navigate to the folder where you downloaded the tool.
  3. Right-click the Media Creation Tool, then select Run as administrator.  If you're prompted for an administrator password or confirmation, type the password or provide confirmation.
  4. Accept the End User License Agreement (EULA).
  5. Select your language and edition and then click Next.
  6. Select USB flash drive. Insert your original installation media (USB drive). If you are creating new installation media, ensure it is 8GB or more in capacity and back up any important data on it first, as the drive will be formatted. Then click Next.
  7. Make sure that the drive you want to use for the installation media is selected. Once confirmed, click on Next. The Media Creation Tool will now finish creating your installation media.

Using updated installation media can help prevent issues caused by outdated drivers and missing updates, ensuring a smoother reinstallation.

Backup installed drivers

Administrator command prompt with puputil running

Drivers are crucial for the optimal functioning of hardware components such as graphics cards, sound devices, and network adapters. Microsoft does have a fairly large database of certified drivers (WHQL (Windows Hardware Quality Labs)) built into Windows.

But there are times when Windows lacks a compatible driver. To avoid the time-consuming task of searching for and reinstalling drivers after reinstallation, it’s wise to create a backup beforehand. Here’s how you can back up your drivers:

Using the built-in command-line utility PnPUtil.exe, which Windows uses to manage device driver packages, we can export the currently installed driver package. Here's how to do it:

  1. Create the destination folder: Open File Explorer (Windows logo key Windows logo key + E), navigate to This PC, and highlight the C: drive. Right-click the drive, then select New > Folder. Name the folder DriverBackup.
  2. Open an Administrative Command Prompt: The quickest way to bring up an Admin Command Prompt is to right-click on the Start button Windows logo to open the Power User menu, then left-click on Terminal (Admin). If you're prompted for an administrator password or confirmation, type the password or provide confirmation. On the Terminal title bar, left-click on the pull-down menu and left-click on Command Prompt. For all of the ways to open an Administrator Command Prompt, check out How to open a Command Prompt with Administrator privileges in Windows 11.
  3. Type or copy and paste the following into the Administrative Command Prompt and then press Enter.
    pnputil /export-driver * C:\DriverBackup

Once done, you can copy the DriverBackup folder to an external drive or network location. By creating a backup, you will have a readily available collection of drivers when your Windows installation is complete, simplifying system restoration and minimizing downtime.

Audit the hardware and software with Belarc Advisor

Screenshot of Belarc Advisor

Before you dive into the reinstallation process, it's essential to audit your system to understand which software is currently installed and the specifics of your hardware. Belarc Advisor is a free for personal use tool that provides a comprehensive report covering system specifications, installed software, and licensing information, ensuring you don’t miss anything important during reinstallation. Here’s how to use Belarc Advisor:

  1. Download Belarc Advisor.
  2. Open File Explorer (Windows logo key Windows logo key + E) and navigate to the folder where you downloaded Belarc Advisor.
  3. Right-click Belarc Advisor, then select Run as administrator.  If you're prompted for an administrator password or confirmation, type the password or provide confirmation.
  4. Follow the prompts, and when the installation is complete, the report will open in your default browser.
  5. Print or save the report for reference.

Having a clear understanding of your current software setup and hardware configuration can help you make informed decisions during reinstallation, ensuring no crucial applications or settings are forgotten.

Reinstalling Windows 11 can significantly improve your system's performance and stability, but it requires careful preparation. By updating your installation media, backing up drivers, and auditing your hardware and software, you set the stage for a smooth, successful reinstallation. Taking these steps will not only save you time and effort but also provide peace of mind, knowing that you're well-prepared to tackle the challenges ahead. With these preparations in place, you can confidently proceed with the reinstallation of Windows 11 and enjoy a refreshed computing experience.

My personal upgrade to Windows 10

Updated February 18, 2025

Upgrading your computer to Windows 10 is a pretty simple task. But there are occasions when upgrading can be a massive headache. Then, there is my Windows 10 upgrade. Here's my personal experience upgrading to Windows 10.

My personal upgrade to Windows 10

I knew right from the start that upgrading my personal computer to Windows 10 would be a lot of work. But it was something that needed to happen. When I built this system in January of 2013, it was because the original motherboard failed. So, I picked up a new motherboard, processor, and memory and reloaded all the software.

Little did I know that the biggest problem with my Windows 10 upgrade started when I installed all of the software in 2013. I installed Windows 8 instead of Windows 7, which I had previously. All worked well until Windows 8.1 was released. One of my major programs, QuickBooks Pro 2010, didn't support Windows 8.1. If I upgraded to Windows 8.1, I would have to upgrade to QuickBooks Pro 2013. It seemed like a waste of time and money, so I decided to wait.

Now, let's fast forward three years or so to February 2016, when Microsoft ended support for Windows 8 (not Windows 8.1). I decided it was time to move to Windows 10. I installed a new 1TB hard drive alongside my 1TB Windows 8 drive. I was temporarily switching the boot drive in the motherboard BIOS (Basic Input Output System) until I got the Windows 10 drive set up. That's when I remembered that my version of QuickBooks Pro 2010 would not install on Windows 10.

So, just for fun, I tried to install QuickBooks Pro 2010 inside a Windows 10 Virtual Machine (VM) running on the Windows 8 drive. The installer just wouldn't run. I tried everything, including compatibility mode, nothing worked. So I decided to run QuickBooks Pro 2010 inside a Windows 7 VM. I got the Windows 7 VM all set up and running. Things got busy at work, and I had put my upgrade to Windows 10 on hold. So I disconnected the drive with Windows 10 and kept using Windows 8.

My Windows 10 upgrade got back on track last month when Intuit offered to upgrade my version of QuickBooks. There is a security issue with older QuickBook versions, and Intuit offered me the latest version for 70% off. That was just the thing to get my Windows 10 upgrade going again. I would have lost the integration with Microsoft Word (printing envelopes) and Outlook (contacts, e-mail) running QuickBooks inside of a VM. That was something I didn't want to lose.

My original plan was back on. I already had a clean installation of Windows 10 and need to finish installing all of the programs. Yes, it is a lot of work, but a Windows 8 to Windows 10 upgrade isn't possible. Besides the new version of QuickBooks, I had several other software upgrades that I'd been waiting to do. It seemed like the perfect time to do them all.

My idea was to recreate the three (3) partitions and drive letters (C:, D: and E:) from the original 1TB drive using both of the 1TB drives. The C: and D: drive partitions would be on the first (boot) drive, and the E: drive partition would take up the whole second drive. Setting up the disks this way would double my storage space.

Now, when I originally started this upgrade in February, I disconnected the old 1TB and performed a clean install of Windows 10 on the new 1TB drive. Once I had Windows 10 installed and drivers updated, I shut down my computer and reattached the old 1TB drive. During this time, I also changed the port that the drives connected to on the motherboard (I wanted the boot drive on port 0).

Now I've done this type of upgrade many times before. The only problem I was having was the motherboard BIOS was having issues with the boot records on the two drives. It didn't help that the disks were from the same manufacturer (Western Digital) and the same size (1TB). The new one was a 'Black' drive, and the old one was a 'Blue' drive. They have the same specs, but the 'Black' drive has a five (5) year warranty, whereas the 'Blue' drive has only a two (2) year warranty.

It was time to make the changeover. I booted up to Windows 8 one last time and did a software inventory using Belarc Advisor. When it was complete, I printed out a copy for my use. Belarc Advisor gives a full list of all the software installed on your computer. Since I was doing a clean install of Windows 10, I would use the audit for reinstalling the software.

Then I went into the BIOS and changed the boot order so the Windows 10 drive booted automatically. Once Windows 10 was back up and running, I needed to get my files off of the old drive. I had already created the new C: and D: drives/partitions on the new drive, so I just copied over the contents of the old D: drive (which was now H:) to the new D: drive. The contents of the third partition (E:) on the old drive would have to go onto an external drive temporarily.

A screen shot of the Disk2vhd user interface
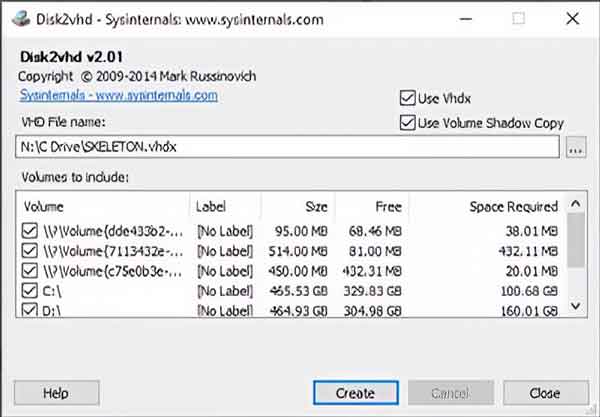
A screenshot of the Disk2vhd user interface

At this point, I have two of the original three partitions/drives recreated (C: and D:). It was time to take care of the original C: drive. To be on the safe side, I decided to create an image of it. I downloaded the latest version of Disk2vhd from Microsoft (it's part of the Sysinternals Suite) and proceeded to create an image of the C: drive. When it was complete, I copied the image over to an external drive along with a copy of the AppData folder from my old profile.

It was now time to delete all of the original partitions on the old 1TB drive and reformat it into just one partition/drive (E:). Reformatting the drive erased all of the partitions and the original Master Boot Record (MBR). That solved the problem with the motherboard not knowing what MBR to use at startup. Now that the E: drive was back in place, I copied all of the files I had put on the external drive.

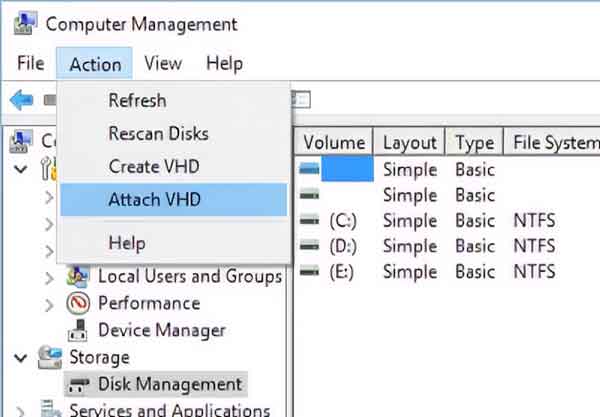
Attaching a VHD file inside of Disk Management

Everything from here on out was downhill. The only issue I had was a disk collision warning when I first attached the VHD in Windows 10. Windows 10 wrote a new disk signature to the VHD file, and everything was good. Now all I had to do was reinstall all of my software.

Free computer diagnostics

Repairing a PC can sometimes be expensive, and that is why we offer free basic in-shop diagnostics. Give one of our professional and experienced technicians a call at (602) 795-1111, and let's see what we can do for you.

Check out our reviews

Geeks In Phoenix LLC, BBB Business Review

This business is BBB Accredited

Customer service is #1

Here at Geeks in Phoenix, we take pride in providing excellent customer service. We aim to give the highest quality of service  from computer repair, virus removal, and data recovery.

Bring your computer to us and save

Repairing a computer can be time-consuming. That is why we base our in-shop service on the time we work on your computer, not the time it takes for your computer to work! From running memory-checking software to scanning for viruses, these are processes that can take some time.

Contact us

If you have any questions, please feel free to give us a call at (602) 795-1111  and talk with one of our Geeks. Or you can send us a message from our contact page , and one of our Geeks will get back to you as soon as possible. Or you can stop by and see us. Here are our hours and location.

Like Geeks in Phoenix on Facebook

Follow Geeks in Phoenix on Twitter

Watch Geeks in Phoenix on YouTube