Updated October 23, 2022
Do you have a company logo or a simple graphic that you would like to use often in a Windows program, like Microsoft Word or Excel? Maybe your line of work has special characters you would like to use but cannot find inside any of the installed Windows fonts? If so, you may want to create your own with Private Character Editor.
Using Private Character Editor (PCE), you can create up to 6,400 unique characters (such as special letters and logos) for use in your font library. PCE contains essential tools (pencil, brush, line, rectangle, and circle) for creating and editing characters and more advanced options.
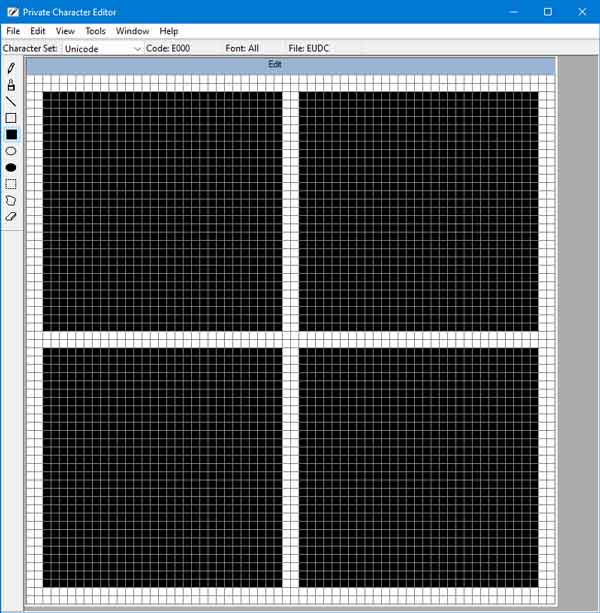
The Private Character Editor inside of Windows 11
There are some pros and cons to creating your characters. Pro: you can insert your unique character into any text line and change its size and color. Con: your special character can only be one color (font color) and is low-resolution. If you're looking for multiple colors and high resolution, you need to use a graphic instead. But if you are looking for a way to insert a single-color logo or unique character into a text line, this might be the answer.
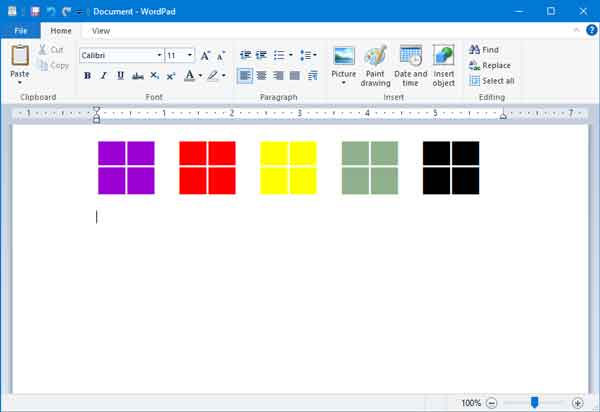
My custom Windows logo character inserted into a WordPad document
Now starting PCE can be kind of hard the first time since there is no shortcut to the program. But once you know where it is and how to start it, you're ready to rock and roll. The program name for PCE is eudcedit.exe, and it's located in the Windows\system32 directory. The easiest way to start it up is by using the Run dialog box.
How to open the Run dialog box
All versions of Windows:
On the keyboard, press the Windows logo key  + R
+ R
Windows 8.1, Windows 10, and Windows 11:
Right-click on the Windows logo on the Start Menu or press the Windows logo key + X and then select Run
For all of the ways to open a Run dialog box, check out How to get to and use the Run dialog box in Windows.
In the Run dialog box that appears, type eudcedit and select OK.
Things to keep in mind when creating special characters using Private Character Editor.
- You can choose to link your private characters to all the fonts in your font library (so that any font you've selected can display your private characters). Or you can choose to link your private characters only to specific fonts (so that only the specified font can show your private characters).
- Using the Select Code dialog box, you can view your entire set of private characters. The Select Code dialog box displays miniature views of all your private characters with their corresponding hexadecimal values.
- If you want to create a new private character using an existing character as your model, you can copy the current character to the Edit grid and then modify it to suit your needs. Or you can display the existing character in a Reference window alongside your Edit grid for use as a visual reference. You can use any character from any font that is installed on your computer.
- By default, PCE creates characters using the Unicode character set. If you have installed one of the Asian input languages (such as Chinese, Japanese, or Korean), you can also use PCE with the Windows character set.
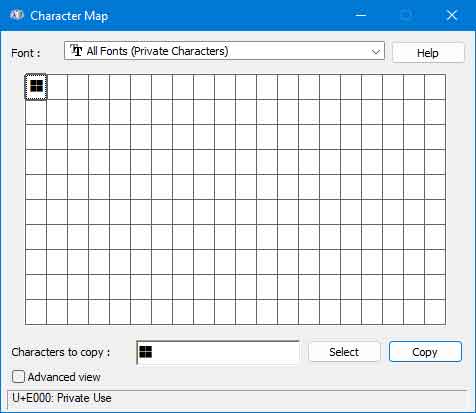
Once you have created your unique character, you will need to use the Character Map application to copy it to the clipboard, so you can paste it into your Windows program (see video below). You will first need to open the Character Map using one of the ways listed in the following article.
Using special font characters in Windows with Character Map
Once you have Character Map open, you will find your custom character at the top of the Font list under All Fonts (Private Characters).
Insert your custom character as you would any other one.
- Left-click the Font pull-down menu and select All Fonts (Private Characters).
- Left-click on the special character you want to insert into the document.
- Left-click Select and then left-click Copy.
- Open/switch to your document and left-click the location in the document where you want the special character to appear.
- Left-click the program's Edit menu or right-click the location where you want the character to appear and select Paste.
Once your unique character is inserted, you can change its format (color, size, bold, italic, etc.) any way you like.
ad361e6c-0711-4b46-9730-1af543801bd0|1|5.0|96d5b379-7e1d-4dac-a6ba-1e50db561b04