Updated January 16, 2024
Are you running out of free space on your Windows 11 computer? Or maybe you would like to clean up all the clutter that can build up over time? If so, here is how to clean and free up space on Windows 11 using Storage Sense and Disk Cleanup.

Windows 11 has two (2) built-in programs that you can use to clean up Windows 11: Storage Sense and Disk Cleanup. They both have similar features, and they both can be run manually or automatically.
Note: Both of these programs will permanently delete files on your computer, so you need to be careful what you decide to clean up. Remember, once you delete a file or files with either one of these programs, you cannot get them back.
Storage Sense

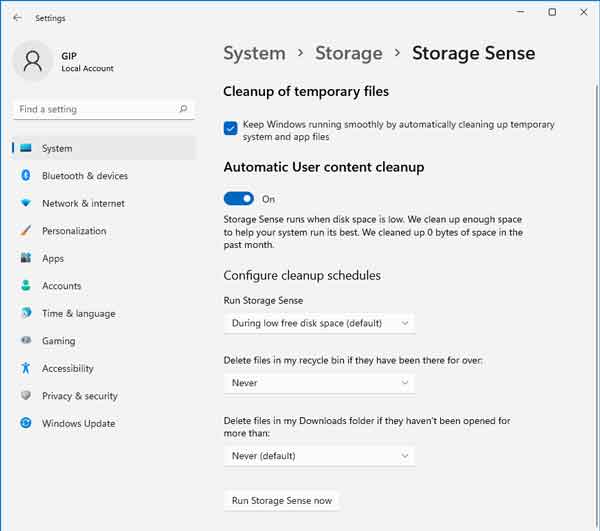
Storage Sense is relatively new, as it first appeared in Windows 10 version 1809. It is simple to use, as it only has a few settings that you can change.
Storage Sense can be run automatically when your computer starts to run out of free space or every day, week, or month. It can delete files in your Recycle Bin and Downloads folder based on how long those files have been there. You can run Storage Sense manually, too.
How to open Storage Sense in Windows 11
- Left-click on the Start
 button to bring up the Start menu.
- In the list of pinned apps on the Start menu, left-click on Settings.
- In the left-hand column, left-click on System.
- Scroll down the right-hand column and left-click on Storage.
- In the right-hand column, left-click on Storage Sense.
Disk Cleanup

Disk Cleanup has been inside Windows for some time now and has far more options for cleaning up Windows 11. And there are two (2) ways to run Disk Cleanup, which I refer to as Standard and Advanced.
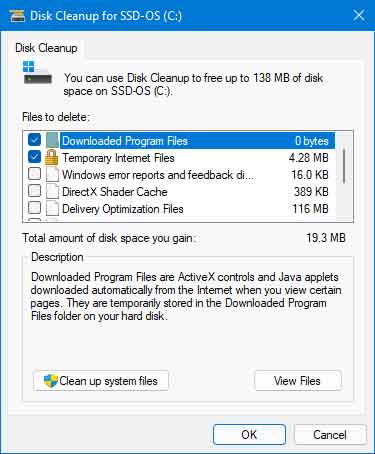
Disk Cleanup can clean up user and system files, ranging from the Recycle Bin and temporary Internet files for users to Windows Update and thumbnails for the system.
The Standard way to run Disk Cleanup
- Left-click on the Start button
 to bring up the Start menu.
- In the upper right-hand corner of the Start menu, left-click on All apps.
- Scroll down the list of programs and left-click on Windows Tools.
- Left-click on Disk Cleanup.
or
- Open File Explorer using one of the following:
- Left-click on the File Explorer icon (manilla folder) on the Taskbar.
- Press the Windows logo key
 + E at the same time.
- Use the Power User menu by right-clicking on the Start
 button and selecting File Explorer.
- In the left-side column, left-click on This PC.
- In the right-side column, right-click on the drive you want to optimize and select Properties.
- On the General tab, left-click on the Disk Cleanup button.
If you started Disk Cleanup from the Windows Tools shortcut and have more than one (1) drive inside your computer, you may be prompted for which drive you want to clean up.
From the dialog box that appears, you will see a list of user files that can be deleted. If you are looking to clean up your user profile, select the files you want to delete and left-click on the OK button.
If you want to clean up system files, then left-click on the Clean up system files button. If this is the drive with Windows installed on it, you will have several more file options to choose from. Select the files you want to clean up and left-click on the OK button.
The Advanced way to run Disk Cleanup
Using the advanced way of starting Disk Cleanup will give you all of the user and system settings options. And you can also use Task Scheduler to run the advanced Disk Cleanup settings on a schedule you set.
The first thing you need to do is open a Command Prompt with Administrator privileges. Note: The full name of Disk Cleanup is cleanmgr.exe, but you only need to use cleanmgr in the Admin Command Prompt.
How to open a Command Prompt with Administrator privileges in Windows 11
In the Admin Command Prompt, type the following and then press Enter.
cleanmgr
This will start Disk Cleanup, just like starting it from the Windows Tools shortcut. But you can use command-line switches to get all of the options (user and system). You can use several different command-line switches with cleanmgr, but you will only need to use two: /sageset:n and /sagerun:n.
cleanmgr /sageset:n
/sageset:n - This switch displays the Disk Cleanup settings dialog box and creates a registry key to store your selected settings. The n value is stored in the registry and allows you to specify different tasks for Disk Cleanup to run. The n value can be any integer value from 0 to 65535. To get all the available options when using the /sageset switch, you may need to specify the drive letter that contains the Windows installation.
cleanmgr /sagerun:n
/sagerun:n - This switch runs the specified tasks assigned to the n value using the /sageset switch. All drives in the computer will be enumerated, and the selected profile will be run against each drive.
How to create a Scheduled Task to run Disk Cleanup
First, you will need to have created a preset configuration using the /sageset:n switch. Then open Task Scheduler and create a new task.
- Left-click on the Start button
 to bring up the Start menu.
- In the upper right-hand corner of the Start menu, left-click on All apps.
- Scroll down the list of programs and left-click on Windows Tools.
- Left-click on Task Scheduler.
- In the right column labeled Actions, select Create Basic Task. The Create a Basic Task Wizard will appear.
- Give the task a name and description, and then select Next.
- Select when you want it to run (trigger).
- When prompted for what task you want to perform, select Start a program, then select Next.
- When prompted for a program/script to start, select Browse and navigate to C:\Windows\System32\ and select cleanmgr.exe.
- In the Add arguments section, type /sagerun:n and then select Next.
- Then select Finish, and you're all set.
You can also create a shortcut with the cleamgr /sagerun:n command, that way, you can run it manually whenever you want.
b8b0f9e6-9df3-4bff-99d7-4a03e7ae566e|2|5.0|96d5b379-7e1d-4dac-a6ba-1e50db561b04