Updated March 29, 2023
Are you getting a low disk space warning in Windows? Or maybe you have been prompted to delete a previous version of Windows to gain some disk space? If so, here's how to quickly free up space on your drive.

We have all been there. You are working along, and all of a sudden, a little dialog box pops out and tells you that you are low on disk space. It used to happen a whole lot more years ago when drives were smaller. But it is scary when it does pop up.
Disk Cleanup
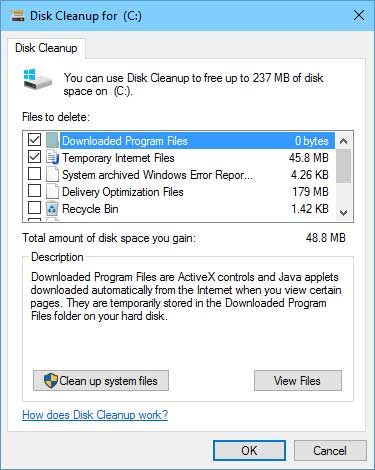
Now one way to quickly free up some disk space is to use the built-in Disk Cleanup utility. If you click on the Low Disk Space warning, it brings up Disk Cleanup with default settings.
The default settings for Disk Cleanup are pretty good and will do the job. But there are more advanced settings that can clean up even more files; you have to know how to get to them. You can also run Disk Cleanup as a Scheduled Task. Check out the links below.
Clean up Windows 7 with Disk Cleanup
Clean up Windows 8.1 with Disk Cleanup
Clean up Windows 10 with Disk Cleanup
Clean up Windows 11 with Disk Cleanup
Manually delete temporary files
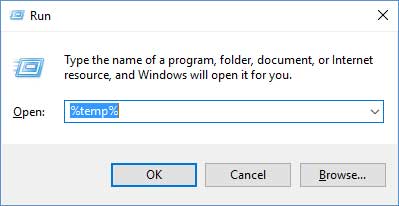
If you are looking to delete the temporary files/folders quickly on your computer, here's a down-and-dirty quick way to do it. All you have to do is bring up a Run dialog box.
How to open a Run dialog box
All versions of Windows:
On the keyboard, press the Windows logo key  + R
+ R
Windows 8, Windows 8.1, Windows 10 and Windows 11:
Right-click on the Windows logo on the Start Menu or press the Windows logo key + X and then select Run
In the Run dialog box that appears, cut and paste or type either:
- %temp%
(user temp folder)
- %systemroot%\temp
(system temp folder)
and then select OK. If you get a prompt telling you that you do not currently have permission to access the folder, click on the Continue button. File Explorer will open and display the contents of that folder.
Now highlight one of the files and then press the CTRL + A keys simultaneously to select all of the files/folders. Right-click on them and select Delete. If you get a prompt about permanently deleting the files, left-click on Yes. If you get a prompt telling you that a file is still in use, make sure the Do this for all current items checkbox is selected and then left-click on Skip.
Turn off hibernation
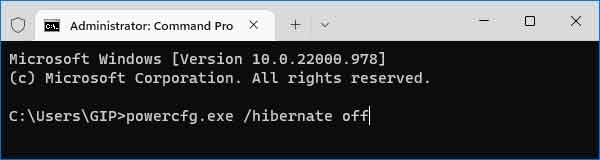
If you still need to free up some space, you can disable hibernation and delete the hilberfil.sys file. That should give you a few more gigabytes of free space. You will need an administrative command prompt to run these.
How to open a Command Prompt with Administrator privileges in Windows 7
How to open a Command Prompt with Administrator privileges in Windows 8
How to open a Command Prompt with Administrator privileges in Windows 10
How to open a Command Prompt with Administrator privileges in Windows 11
Once you have an administrative command prompt open, just cut and paste or type the following into it:
- powercfg.exe /hibernate off
(turn off hibernation)
- powercfg.exe /hibernate on
(turn on hibernation)
Graphic Visualization Tools
Now when it comes to finding large files or folders, nothing can beat an excellent visual treemap. Instead of the usual file/folder data like you see in File Explorer, a graphic visualization tool shows file/folder information using blocks. The larger the square, the bigger the file/folder.
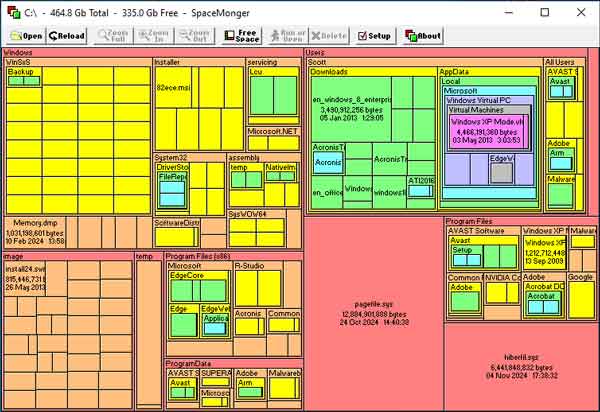
Years ago, I started using a graphic visualization tool when I had a client that all of the desktops began running out of disk space. Using a visualization tool, I found that the network-deployed anti-virus clients were downloading new virus definitions, but they were not deleting previous versions.
Now there are a couple of different graphic visualization tools out there. I first started using SpaceMonger but have since moved over to SpaceSniffer. It does not require any installation (unzip and go) and is entirely free (but donations are recommended).
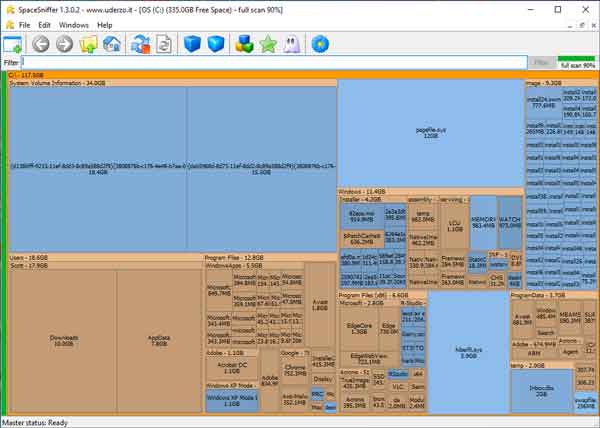
Now right out-of-the-box SpaceSniffer can be a bit overwhelming with all of the information it provides. But with a couple of changes to the configuration, SpaceSniffer can open up just the way you like.
Now be careful not to go crazy and start deleting folders/files in the Windows folder. I know that it is one of the largest folders on the C: drive, but resist the urge to delete anything inside of the Windows folder. I would focus on the size of the user(s) folders/files. For more information on SpaceSniffer and how to use it, follow the link below.
SpaceSniffer, find lost disk space the easy way
e54ee9d8-b826-4ea2-88b1-6b758f1508e7|1|5.0|96d5b379-7e1d-4dac-a6ba-1e50db561b04