Geeks in Phoenix

Geek Blog


How to create a recovery drive in Windows 10 and Windows 11

Computer problems happen when you least expect them. But having the software to repair your computer is essential. So here is how to create a recovery drive in Windows 10 and Windows 11.

How to create a recovery drive in Windows 10 and Windows 11

So what is a recovery drive? It is a bootable USB drive with all the system tools that normally appear in the advanced options menu. This is the menu that appears when your computer fails to boot correctly.

If you have not heard of a recovery drive, you are not alone. A good majority of Windows users do not know about this great device. Sadly, most learn about having a recovery drive only after their system has experienced a problem.

Now it is easy to confuse a recovery drive with a system repair disk, as they perform the same functions. But with a recovery drive, you can also reinstall Windows if you need to.
The recover from a drive option in the recovery drive boot menu
System repair disks have been around for decades, but recovery disks first appeared in Windows 8.

What is the difference between a recovery drive and a system repair disk? Essentially they are the same; the only difference is the media you use to create them. A recovery drive uses a USB drive, and a system repair disk uses, as the name implies, a CD / DVD. And with more computers coming without optical (CD/DVD/BD) drives, most people can only use a recovery drive.

The list of options is the same as if your computer did not boot correctly and you got the advanced options screen. Startup Repair, Command Prompt, Uninstall Updates, UEFI Firmware Settings, System Restore, and System Image Recovery.

How to open Recovery Drive inside of Windows 10

  1. Left-click on the Start button Windows logo to bring up the Start menu.
  2. Scroll down the list of programs and left-click on Windows Accessories.
  3. Double left-click on Recovery Drive.

or

  1. Using the search box on the right side of the Start Windows logo button, type in Recovery Drive,
  2. Left-click on it in the search results.

How to open Recovery Drive inside of Windows 11

  1. Left-click on the Start button Windows logo to bring up the Start menu.
  2. In the upper right-hand corner of the Start menu, left-click on All apps.
  3. Scroll down the list of programs and left-click on Windows Tools.
  4. Double left-click on Recovery Drive.

or

  1. Left-click on the magnifying glass to the right of the Start button Windows logo to bring up the Search dialog box.
  2. In the Search dialog box, type Recovery Drive.
  3. In the list of results, Recovery Drive should be highlighted.
  4. Left-click on Recovery Drive.

How to create a recovery drive

The requirements for creating a recovery disk are pretty simple, a USB drive that is 16GB or larger. I would recommend 32GB just to be on the safe side. Note: The USB drive you use for the recovery drive will be erased and reformatted when you create it. Please copy or move anything on the drive you want to keep before creating the recovery drive.

I would also like to mention that the time it takes to create a recovery drive that includes system files can be long. It may take a few hours, so be prepared to allow your computer the time it needs to complete the creation of the recovery drive.

The first screen that appears when you open the Recovery Drive app is where you decide whether or not to include a backup copy of Windows.
Create a recovery drive screen in the Recovery Drive program
Since you would likely only be using this drive if your computer will not function properly, I recommend including the systems files in the recovery drive.

If you decide to include the system files, you will need to update the recovery drive periodically. I would update every six to twelve months; that way, if you do need to reinstall Windows from the recovery drive, it will be as current as the last time you updated the recovery drive.

The next screen asks you what drive you want to use for the recovery drive.
Select the USB drive screen in the Recovery Drive program
Select the drive and click on Next. One final warning screen appears.
Create a recovery drive warning screen in the Recovery Drive program
Just click on Create. Now just read some email or social posts because this will take some time. Once the recovery drive has been created, remove it and put it in a safe place.

Clean up Windows 11 with Storage Sense and Disk Cleanup

Updated January 16, 2024

Are you running out of free space on your Windows 11 computer? Or maybe you would like to clean up all the clutter that can build up over time? If so, here is how to clean and free up space on Windows 11 using Storage Sense and Disk Cleanup.

Clean up Windows 11 with Storage Sense and Disk Cleanup

Windows 11 has two (2) built-in programs that you can use to clean up Windows 11: Storage Sense and Disk Cleanup. They both have similar features, and they both can be run manually or automatically.

Note: Both of these programs will permanently delete files on your computer, so you need to be careful what you decide to clean up. Remember, once you delete a file or files with either one of these programs, you cannot get them back.

Storage Sense

The Storage Sense feature inside of Windows 11 Settings

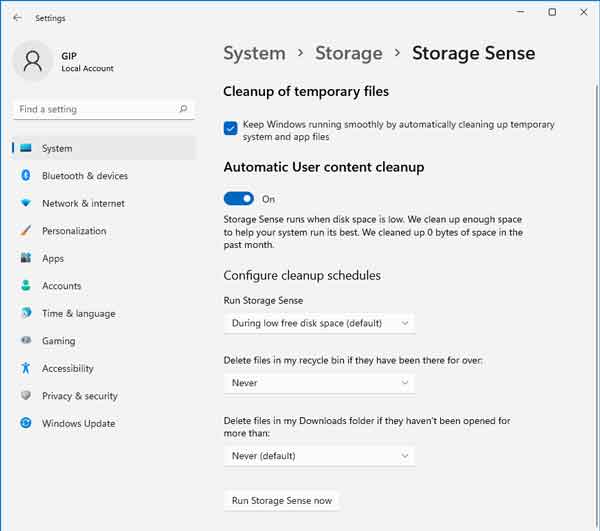
Storage Sense is relatively new, as it first appeared in Windows 10 version 1809. It is simple to use, as it only has a few settings that you can change.

Storage Sense can be run automatically when your computer starts to run out of free space or every day, week, or month. It can delete files in your Recycle Bin and Downloads folder based on how long those files have been there. You can run Storage Sense manually, too.

How to open Storage Sense in Windows 11

  1. Left-click on the Start Windows logo key button to bring up the Start menu.
  2. In the list of pinned apps on the Start menu, left-click on Settings.
  3. In the left-hand column, left-click on System.
  4. Scroll down the right-hand column and left-click on Storage.
  5. In the right-hand column, left-click on Storage Sense.

Disk Cleanup

The Disk Cleanup program inside of Windows 11

Disk Cleanup has been inside Windows for some time now and has far more options for cleaning up Windows 11. And there are two (2) ways to run Disk Cleanup, which I refer to as Standard and Advanced.

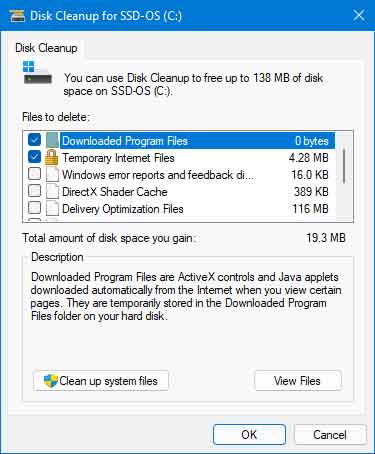
Disk Cleanup can clean up user and system files, ranging from the Recycle Bin and temporary Internet files for users to Windows Update and thumbnails for the system.

The Standard way to run Disk Cleanup

  1. Left-click on the Start button Windows logo to bring up the Start menu.
  2. In the upper right-hand corner of the Start menu, left-click on All apps.
  3. Scroll down the list of programs and left-click on Windows Tools.
  4. Left-click on Disk Cleanup.

or

  1. Open File Explorer using one of the following:
    • Left-click on the File Explorer icon (manilla folder) on the Taskbar.
    • Press the Windows logo key Windows logo + E at the same time.
    • Use the Power User menu by right-clicking on the Start Windows logo button and selecting File Explorer.
  2. In the left-side column, left-click on This PC.
  3. In the right-side column, right-click on the drive you want to optimize and select Properties.
  4. On the General tab, left-click on the Disk Cleanup button.

If you started Disk Cleanup from the Windows Tools shortcut and have more than one (1) drive inside your computer, you may be prompted for which drive you want to clean up.

From the dialog box that appears, you will see a list of user files that can be deleted. If you are looking to clean up your user profile, select the files you want to delete and left-click on the OK button.

If you want to clean up system files, then left-click on the Clean up system files button. If this is the drive with Windows installed on it, you will have several more file options to choose from. Select the files you want to clean up and left-click on the OK button.

The Advanced way to run Disk Cleanup

Using the advanced way of starting Disk Cleanup will give you all of the user and system settings options. And you can also use Task Scheduler to run the advanced Disk Cleanup settings on a schedule you set.

The first thing you need to do is open a Command Prompt with Administrator privileges. Note: The full name of Disk Cleanup is cleanmgr.exe, but you only need to use cleanmgr in the Admin Command Prompt.

How to open a Command Prompt with Administrator privileges in Windows 11

In the Admin Command Prompt, type the following and then press Enter.

cleanmgr

This will start Disk Cleanup, just like starting it from the Windows Tools shortcut. But you can use command-line switches to get all of the options (user and system). You can use several different command-line switches with cleanmgr, but you will only need to use two: /sageset:n and /sagerun:n.

cleanmgr /sageset:n

/sageset:n - This switch displays the Disk Cleanup settings dialog box and creates a registry key to store your selected settings. The n value is stored in the registry and allows you to specify different tasks for Disk Cleanup to run. The n value can be any integer value from 0 to 65535. To get all the available options when using the /sageset switch, you may need to specify the drive letter that contains the Windows installation.

cleanmgr /sagerun:n

/sagerun:n - This switch runs the specified tasks assigned to the n value using the /sageset switch. All drives in the computer will be enumerated, and the selected profile will be run against each drive.

How to create a Scheduled Task to run Disk Cleanup

First, you will need to have created a preset configuration using the /sageset:n switch. Then open Task Scheduler and create a new task.

  1. Left-click on the Start button Windows logo to bring up the Start menu.
  2. In the upper right-hand corner of the Start menu, left-click on All apps.
  3. Scroll down the list of programs and left-click on Windows Tools.
  4. Left-click on Task Scheduler.
  5. In the right column labeled Actions, select Create Basic Task. The Create a Basic Task Wizard will appear.
  6. Give the task a name and description, and then select Next.
  7. Select when you want it to run (trigger).
  8. When prompted for what task you want to perform, select Start a program, then select Next.
  9. When prompted for a program/script to start, select Browse and navigate to C:\Windows\System32\ and select cleanmgr.exe.
  10. In the Add arguments section, type /sagerun:n and then select Next.
  11. Then select Finish, and you're all set.

You can also create a shortcut with the cleamgr /sagerun:n command, that way, you can run it manually whenever you want.

Clean up Windows 10 with Disk Cleanup

There are a lot of programs out there that can clean up your Windows 10 computer. But did you know that one of the best ones comes with Windows 10? Here's how to clean up your Windows 10 computer with Disk Cleanup.

Clean up Windows 10 with Disk Cleanup

Disk Cleanup has been included with Windows since Windows XP and is part of my regular scheduled maintenance. Disk Cleanup can be run two (2) different ways and can have three (3) different sets of options. The first way to run it is from any of the shortcuts built into Windows (Start menu or disk properties). When you use a built-in shortcut, you will have two (2) different sets of options, user and system.

Disk Cleanup user options in Windows 10
Disk Cleanup system options in Windows 10

When you run Disk Cleanup with user options, you can clean up user-specific files such as downloaded program files, temporary Internet files, and the recycle bin. With system options, you can also clean up Windows system files like Windows temporary files, device driver packages, and previous installations of Windows, just to name a few.

Disk Cleanup command line options in Windows 10

Disk Cleanup can also be run using command line switches. When you do this, you get the maximum options available. But you will have to run it at an administrative command prompt to configure these options. These options include all user and system options plus a few more, like old chkdsk files, Windows Update Cleanup, and Windows ESD installation files.

How to run Disk Cleanup from the Start menu

  1. Left-click on the Start Windows logo button.
  2. Scroll down to Windows Administrative Tools and left-click to expand.
  3. Left-click on Disk Cleanup. If you have more than one (1) drive, you will be prompted on which drive you want to clean up.

Disk Cleanup will scan your system for files that it can remove and open with the available user options. You can now choose which user files you would like to delete. To activate the system options, you will need to select Clean up system files in the lower left-hand corner. When you do this, Disk Cleanup will close and rescan your computer.

This time Disk Cleanup will now include system files that can be removed. It will also have a second tab on top called More Options. Under More Options, you will find other options, Programs and Features and System Restore and Shadow Copies.

Programs and Features will take you to the Control Panel, where you can uninstall programs or add/remove Windows features. Selecting System Restore and Shadow Copies will delete all but the most recent restore point. Use this carefully, as you cannot get back any restore points once they are deleted.

How to run Disk Cleanup from an administrative command prompt

You can run Disk Cleanup with or without command-line switches. When you run Disk Cleanup without any switches, it opens with the system options selections. When you run it with switch /sageset:n, you will get even more options than the system settings.

The first thing you will need to do is open an Administrative Command Prompt.

How to open a Command Prompt with Administrator privileges in Windows 10

Then type the following into the command prompt to run Disk Cleanup.

cleanmgr

Disk Cleanup can also be used with command-line switches, further expanding on its features. And when used with the /sageset:n and /sagerun:n switches, you can save multiple configurations that can be used in a shortcut or as a scheduled task. Here's an explanation of the /sageset:n and /sagerun:n switches.

cleanmgr /sageset:n

/sageset:n - This switch displays the Disk Cleanup settings dialog box and creates a registry key to store the settings you select. The n value is stored in the registry and allows you to specify different tasks for Disk Cleanup to run. The n value can be any integer value from 0 to 65535. To get all the available options when using the /sageset switch, you may need to specify the drive letter that contains the Windows installation.

cleanmgr /sagerun:n

/sagerun:n - This switch runs the specified tasks assigned to the n value by using the /sageset switch. All drives in the computer will be enumerated, and the selected profile will be run against each drive.

How to run Disk Cleanup as a Scheduled Task

First, you will need to have created a preset configuration using the /sageset:n switch. Then open Task Scheduler and create a new task.

  1. Left-click on the Start Windows logo button.
  2. Scroll down to Windows Administrative Tools and left-click to expand.
  3. Left-click on Task Scheduler.
  4. In the right column labeled Actions, select Create Basic Task. The Create a Basic Task Wizard will appear.
  5. Give the task a name and description and then select Next.
  6. Select when you want it to run (trigger).
  7. When prompted for what task you want to perform, select Start a program, then select Next.
  8. When prompted for a program/script to start, select Browse and navigate to C:\Windows\System32\ and select cleanmgr.exe.
  9. In the Add arguments section, type /sagerun:n and then select Next.
  10. Then select Finish, and you're all set.

How to open a Command Prompt with Administrator privileges in Windows Vista and Windows 7

At some point in time, you may need to run a program or command from a Command Prompt with Administrative privileges. Some of the best features inside Windows Vista and Windows 7 are only accessible through an administrative Command Prompt. Here's how to open a Command Prompt with Administrator privileges in Windows Vista and Windows 7.

A Command Prompt in Windows 7 with Administrator privileges

  1. Left-click on the Start button.
  2. Left-click on All Programs.
  3. Left-click on Accessories.
  4. Right-click on Command Prompt.
  5. On the context menu that appears, left-click on Run as administrator. If you're prompted for an administrator password or confirmation, type the password or provide confirmation.
    or
  1. Left-click on the Start button.
  2. In the search box above the Start button, type Command Prompt.
  3. In the list of results, right-click Command Prompt.
  4. On the context menu that appears, left-click Run as administrator. If you're prompted for an administrator password or confirmation, type the password or provide confirmation.
    or
  1. Press the Windows logo key Windows logo key + X to bring up the Power User command menu.
  2. Left-click on Command Prompt (Admin). If you're prompted for an administrator password or confirmation, type the password or provide confirmation.

Clean up your hard drive in Windows 8 with Disk Cleanup

During your computer's everyday use, you will accumulate some unnecessary files (temporary setup/internet files, recycle bin, etc.). You can remove these files with the built-in Disk Cleanup (cleanmgr.exe) utility inside of Windows 8. When it comes to computer repair, I use it all the time on my client's systems. And it can be run a couple of different ways and with different options.

Running Disk Cleanup on demand

There are a couple of different ways to run Disk Cleanup on demand. The following procedure cleans up files associated with your user account. You can also use Disk Cleanup to clean up all the files on your computer.

Windows 8 Disk Cleanup dialog box with standard options

  1. On the Start menu, swipe in from the right side of the screen or press the Windows logo key Windows logo key + C to bring up the Charm bar.
  2. Left-click on the Settings button in Charm Bar.
  3. Left-click on Tiles in Settings.
  4. Drag the Show/hide administrative tools slider to the Yes position.
  5. Left-click on the background of the Start menu, making the Charm bar disappear.
  6. Once the administrative tools appear, left-click on Disk Cleanup.

or

  1. Swipe in from the right side of the screen or press the Windows logo key Windows logo key + C to bring up the Charm bar.
  2. Left-click on Search button in Charm Bar.
  3. Left-click on Apps in Search.
  4. Type Disk Cleanup in the Search field on the Search pane.
  5. In the results on the left-hand side, left-click on Disk Cleanup.

After selecting the drive you want to clean, Disk Cleanup scans it for possible files to delete. It then allows you to choose which files to delete. When you click the Clean up system files button, it restarts with a More Options tab. This tab includes two additional ways to free even more disk space:

Windows 8 Disk Cleanup dialog box with more options

  • Programs and Features. This option opens Programs and Features in Control Panel, where you can uninstall programs that you no longer use. The Size column in Programs and Features shows how much disk space each program uses.
  • System Restore and Shadow Copies. With this option, you can delete all but the most recent restore point on the disk.
    System Restore uses restore points to return your system files to an earlier point in time. If your computer is running normally, you can save disk space by deleting the earlier restore points.
    In some editions of Windows 8, restore points can include previous versions of files, known as shadow copies, and backup images created with Windows Complete PC Backup. These files and images will also be deleted.

Running Disk Cleanup with predefined options

You can also run Disk Cleanup from a command prompt. This gives you the option of predefined settings for running Disk Cleanup as a scheduled task in Task Scheduler or a shortcut on your Desktop or Start menu. Click here for more information on how to open a Command Prompt with Administrator privileges in Windows 8.

Windows 8 Disk Cleanup run at a command prompt with sageset option
Windows 8 Disk Cleanup run at a Command Prompt with sageset option

You can start the Disk Cleanup tool by running cleanmgr.exe. Disk Cleanup supports the following command-line switches:

  • cleanmgr /d driveletter: - This switch selects the drive that you want Disk Cleanup to clean. Note that the /d switch is not used with /sagerun:n.
  • cleanmgr /sageset:n - This switch displays the Disk Cleanup Settings dialog box and creates a registry key to store the settings you select. The n value is stored in the registry and allows you to specify different Disk Cleanup tasks to run. The n value can be any integer value from 0 to 65535. To get all the available options when you are using the /sageset switch, you may need to specify the drive letter that contains the Windows installation.
  • cleanmgr /sagerun:n - This switch runs the specified tasks that are assigned to the n value by using the /sageset switch. All drives in the computer will be enumerated, and the selected profile will be run against each drive.

To run Disk Cleanup with the /sagerun:n switch in Task Scheduler or in a Desktop or Start menu shortcut, you would use something similar to the following:

C:\Windows\System32\cleanmgr.exe /sagerun:n

Free computer diagnostics

Repairing a PC can sometimes be expensive, and that is why we offer free basic in-shop diagnostics. Give one of our professional and experienced technicians a call at (602) 795-1111, and let's see what we can do for you.

Check out our reviews

Geeks In Phoenix LLC, BBB Business Review

Customer service is #1

Here at Geeks in Phoenix, we take pride in providing excellent customer service. We aim to give the highest quality of service  from computer repair, virus removal, and data recovery.

Bring your computer to us and save

Repairing a computer can be time-consuming. That is why we base our in-shop service on the time we work on your computer, not the time it takes for your computer to work! From running memory checking software to scanning for viruses, these are processes that can take some time.

Contact us

If you have any questions, please feel free to give us a call at (602) 795-1111  and talk with one of our Geeks. Or you can send us a message from our contact page contact page , and one of our Geeks will get back to you as soon as possible. Or you can stop by and see us. Here are our hours and location.

Like Geeks in Phoenix on Facebook

Follow Geeks in Phoenix on Twitter

Watch Geeks in Phoenix on YouTube