Updated December 12, 2021
Have you ever tried to find a file in a disorganized filing cabinet? It can take some time. The same thing can happen when your computer's drive becomes fragmented. But you can keep all of the folders and files on your computer organized with regular defragmentation. Here's how to defragment and optimize your drive in Windows 10.
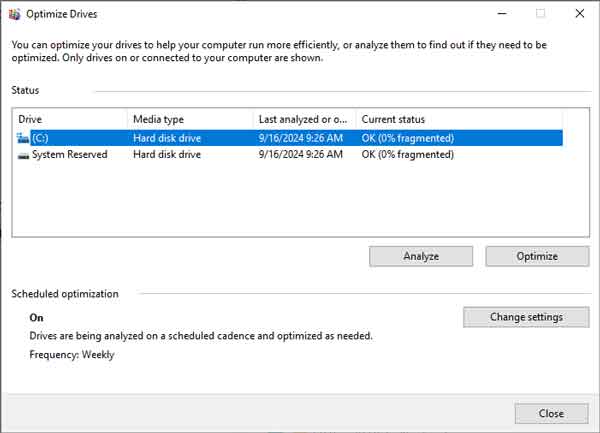
There are two (2) types of drives used in computers, Hard Disk Drive (HDD) and Solid State Drive (SSD). The kind of drive you have determines whether you need (or want) to defragment and optimize it. To find out what type of drive(s) you have, follow the standard instructions below. The Optimize Drives screen will tell you what kind of drive(s) you currently have in your computer.
The issue of drive fragmentation stemmed from the early '80s when Microsoft needed an OS, and they bought Quick and Dirty Operating System (QDOS) and renamed it MS-DOS. At that time, HDDs were the only type of drive available, and they are still the de facto standard in the industry. And they do need to be defragmented and optimized regularly.
Now SSD's are different in that there are no moving parts inside, just memory chips. So when your computer reads and writes to it, the data is going back to the same location on the drive. You can defrag and optimize an SSD, but it is not recommended since SSDs have limited read/write cycles, and any program that intensively accesses the SSD could shorten the life span of the drive. Microsoft started adding support for SSDs in Windows 7 / Windows Server 2008 with the Trim command. Since the low-level operation of SSDs differs from HDDs, the Trim command handles deletes/format requests.
You can verify Trim is enabled by typing the following into an Administrative Command Prompt:
fsutil behavior query DisableDeleteNotify
If the command returns a 0, then Trim is enabled. If it returns a 1, then it is not. To enable Trim, type the following into the Administrative Command Prompt:
fsutil behavior set DisableDeleteNotify 0
Standard drive defragment and optimization in Windows 10
- Bring up the Defragment and Optimize Drives application by:
- Left-click on the Start
 button.
- Scroll down to Windows Administrative Tools and left-click to expand.
- Left-click on Defragment and Optimize Drives.
or
- Open File Explorer by left-clicking the File Explorer icon (the manilla folder) on the Taskbar.
- In the left-side column, left-click on This PC.
- In the right-side column right-click on the drive you want to check and select Properties.
- Left-click on the Tools tab.
- Under Optimize and defragment drive left-click on Optimize.
then
- Left-click on the drive(s) you want to optimize.
- Left-click on Analyze (Analyze all) or Optimize (Optimize all)
Advanced drive defragment and optimization in Windows 10
- Open a Command Prompt with Administrative privileges (click here for instructions)
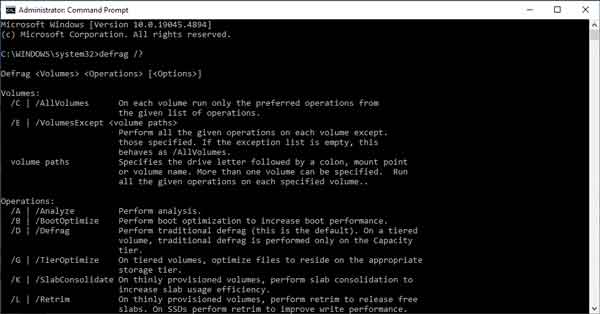
- Use the following command line syntax(s) and parameter(s) to run DEFRAG:
Defrag <Volumes> <Operations> [<Options>]
Examples:
- Defrag C: /U /V
- Defrag C: D: /TierOptimize /MultiThread
- Defrag C:\mountpoint /Analysis /U
- Defrag /C /H /V
| Volumes |
| /C | /AllVolumes |
On each volume run only the preferred operations from the given list of operations. |
| /E | /VolumesExcept <volume paths> |
Perform all the given operations on each volume except those specified. If the exception list is empty, this behaves as /AllVolumes. |
| volume paths |
Specifies the drive letter followed by a colon, mount point, or volume name. More than one volume can be specified. Run all the given operations on each specified volume. |
| Operations |
| /A | /Analyze |
Perform analysis. |
| /B | /BootOptimize |
Perform boot optimization to increase boot performance. |
| /D | /Defrag |
Perform traditional defrag (this is the default). On a tiered volume, traditional defrag is performed only on the Capacity tier. |
| /G | /TierOptimize |
On tiered volumes, optimize files to reside on the appropriate storage tier. |
| /K | /SlabConsolidate |
On thinly provisioned volumes, perform slab consolidation to increase slab usage efficiency. |
| /L | /Retrim |
On thinly provisioned volumes, perform retrim to release free slabs. On SSDs perform retrim to improve write performance. |
| /O | /Optimize |
Perform the proper optimization for each media type. |
| /T | /TrackProgress |
Track progress of a running operation for a given volume. An instance can show progress only for a single volume. To see progress for another volume launch another instance. |
| /U | /PrintProgress |
Print the progress of the operation on the screen. |
| /V | /Verbose |
Print verbose output containing the fragmentation statistics. |
| /X | /FreespaceConsolidate |
Perform free space consolidation, moves free space towards the end of the volume (even on thin provisioned volumes). On tiered volumes consolidation is performed only on the Capacity tier. |
| Options |
| /H | /NormalPriority |
Run the operation at normal priority (default is low). |
| /I | /MaxRuntime n |
Available only with TierOptimize. Tier optimization would run for at most n seconds on each volume. |
| /LayoutFile <file path> |
Available only with BootOptimize. This file contains the list of files to be optimized. The default location is %windir%\Prefetch\layout.ini. |
| /M | /MultiThread [n] |
Run the operation on each volume in parallel in the background. For TierOptimize, at most n threads optimize the storage tiers in parallel. Default value of n is 8. All other optimizations ignore n. |
| /OnlyPreferred |
When volumes are specified explicitly, defrag performs all the given operations on each specified volume. This switch lets defrag run only the preferred operations, from the given list of operations, on each specified volume. |
11e9d0d6-ef54-4c91-8951-86f7dd1bec5e|0|.0|96d5b379-7e1d-4dac-a6ba-1e50db561b04