Geeks in Phoenix

Geek Blog


How to edit autofill passwords in Windows and your browser

Updated April 24, 2025

Are you having problems with a username and password not working in your favorite browser? Or maybe the credentials for a network resource. Here is how to edit or remove autofill passwords in Windows and your favorite browser.

How to edit autofill passwords in Windows and your browser

Nothing is more frustrating than having your browser or Windows autofill a form with the wrong password. And since passwords are hidden, you are lucky if there is a preview button to check it before trying to use it. And if it is a password used by Windows, you may not even get prompted for a password.

And you know what is worse? A company website uses multiple servers, and each has saved credentials. For example, say GIP runs a bank, and we have five (5) servers that handle the website traffic.

Now the servers are networked, so when a user goes to the website, the server they get to is entirely random. One day, it might be server 1, and the next day, it might be server 5. However, the credentials (username/password) are the same for all servers since they are networked.

But your browser and Windows see things differently. They know each server as a separate website and will save usernames and passwords for each server. So as you check the autofill passwords, you may find multiple servers for a domain (server1.example.com, server2.example.com, etc.).

So in this article, I will show you how to edit or remove saved autofill passwords in Google Chrome, Microsoft Edge, Mozilla Firefox, and Windows. Each browser and Windows saves different types of information with their autofill functions.

Note: Edit autofill properties at your own risk. Remember that once any autofill data has been changed, there is no way of getting it back.

Before proceeding, you may need two (2) pieces of information, your current username and password / PIN, to log on to your computer. Some browsers require you to input your computer credentials before allowing you to edit the autofill passwords. Let's start with the browsers.

Edit or remove autofill passwords in Google Chrome

  1. Open Google Chrome and left-click on the three (3) vertical dots in the upper right-hand corner.
    The Google Chrome options menu with Settings highlighted
  2. From the menu that appears, left-click on Settings.
    The Autofill section of Google Chrome
  3. On the Settings page, left-click on the Autofill and passwords category in the left-hand column.

The Autofill and passwords page is divided into Passwords, Payment methods, and Addresses and more. You can add, edit or remove any or all autofill data stored inside Chrome. If you left-click on Google Password Manager, you will find all of the autofill passwords that have been saved.

It is here that you can configure Chrome to offer to save passwords and automatically sign in to a website or app. If autofill has saved any passwords, they will be listed below, and left-clicking on the Show password button (which looks like an eye) will reveal that password. Depending on your computer's security, you may be prompted for your username and password/PIN.

You will find the Copy Password button to the right of the Show password button. Directly below the Password field you will find Edit and Delete buttons.

Edit or remove autofill passwords in Microsoft Edge

  1. Open Microsoft Edge and left-click on the three (3) horizontal dots in the upper right-hand corner.
    The Microsoft Edge options menu with Settings highlighted
  2. From the menu that appears, left-click on Settings.
    The Profile section of Microsoft Edge
  3. On the Settings page, left-click on the Profiles category in the left-hand column.

In the right-hand column, there are several sections, but the only ones that contain autofill data are the ones listed under Microsoft Wallet. If you left-click on Open Wallet, a new page will open, and you will have five categories listed in the left-hand column.

Payment methods, Passwords, and Personal info are the three categories you want to check for stored data. Left-click on the Passwords section, and you will find all autofill passwords that have been saved.

It is here that you can configure Edge to offer to save passwords and automatically sign in to a website or app. If autofill has saved any passwords, they will be listed below, and left-clicking on the Show password button (which looks like an eye) will reveal that password. Depending on your computer's security, you may be prompted for your username and password/PIN.

You will find the Copy Password button to the right of the Show password button. Directly below the Site field you will find Edit and Delete buttons.

Edit or remove autofill passwords in Mozilla Firefox

  1. Open Firefox and left-click on the three horizontal bars in the upper-right hand corner.
    The Mozilla Firefox options menu with Settings highlighted
  2. From the menu that appears, left-click on Settings.
    The Privacy and Security section of Mozilla Firefox
  3. From the Settings page, left-click on the Privacy & Security category.

Scroll down the right-hand column, and you will find two (2) sections; Passwords and Autofill. Passwords contain, you guessed it, user credentials. And Autofill includes addresses and credit cards.

Under Passwords, you will find a button labeled Saved passwords. Left-click on it, and you will find a list in the left-hand column of all the autofill logins that Firefox has saved. Highlight a login in the left-hand column, and the details appear in the right-hand column.

Along the top of the login details are two (2) options; Edit and Remove. Below you will find the username and password. To the right of the password is a view button (which looks like an eye).

Edit or remove autofill passwords in Windows 10 or Windows 11

Credential Manager inside of Windows 11

To edit saved autofill credentials in Windows 10 or Windows 11, you will need to use Credential Manager. It is pretty well hidden, and that is for a reason, as it contains all of your Windows and web credentials. So what are your Windows credentials? Let me explain.

Let's say you have two (2) computers on the same network and set up shared folders. When you set up the network share, Windows prompts you for the username and password for a user of that computer.

If you choose to have Windows save the network credentials, guess where they will get stored: the Credential Manager. This is also where login credentials are stored for accessing FTP sites with File Explorer.

Credential Manager is located in the Control Panel under User Accounts but can be quickly accessed by performing a search.

  1. Left-click on the magnifying glass to the right of the Start Windows logo key button to bring up the Search dialog box.
  2. In the Search dialog box, type Credential Manager.
  3. Left-click on Credential Manager (Control Panel) in the search results.

You can also access Credential Manager from the Control Panel.

How to get to the Control Panel in Windows 10

How to get to the Control Panel in Windows 11

Once the Credential Manager is open, you will find two (2) types of data that are stored: Web Credentials and Windows Credentials. Before proceeding, it is recommended that you create a backup of your Windows credentials using the Back up Credentials link on that page. Remember that there will be some entries you do not recognize, so only edit the credentials you are having problems with.

Five things you can do to maintain your Windows 10 or Windows 11 computer

We all want to keep our computers running smoothly, but to do that, we need to perform maintenance periodically. So here are five (5) things you can do to keep your Windows 10 or Windows 11 computer running smoothly.

Five things you can do to maintain your Windows 10 or Windows 11 computer

If you are anything like me, you expect your computer always to be running at 100%, ready to work at a moment's notice. And it is possible to get that level of performance, but it does require regular maintenance.

I use all of the procedures outlined in this article on average of once a month, and I will usually perform these tasks at the end of the workday or on the weekend. That way, I minimize the loss of production time.

Check for corrupt system files

This is the first thing I do when I notice a system not running normally. If fact, this is one of the first things we do when a Windows-based computer comes into the shop. With the number of system files Windows uses, file corruption is quite common.

Check Windows 10 system files with System File Checker

How to check and repair system files in Windows 11

Check for drive errors

The next thing I do is check for errors in the file system. Just like scanning for corrupt system files, checking the rest of the files and folders on the drive is essential. A quick check every month is excellent preventative maintenance.

How to check your drive for errors in Windows 10

How to check your drive for errors in Windows 11

Clean up unnecessary Windows folders and files

Now that we have checked for system/file errors on the drive, let's start cleaning up the unnecessary files that accumulate. A couple of different programs built into Windows can do a great job of cleaning up Windows 10 or Windows 11.

Clean up Windows 10 with Disk Cleanup

Clean up your Windows 10 computer using the Storage feature

Clean up Windows 11 with Storage Sense and Disk Cleanup

Clear out your browser cache

Once we clean up all of the miscellaneous Windows files, we need to clean up our browser(s). Internet browsers, like Google Chrome and Microsoft Edge, use a cache of websites they have visited to speed up browsing.

But the problem is the browsers do not empty the cache automatically, so left unattended, a browser cache can become extremely large. Periodic clearing of your browser cache is highly recommended.

There is a benefit to cleaning out your browser cache; you will be removing any old website data. This can help if you have difficulty logging into a website, as any saved website data will be purged.

How to clean up and reset Google Chrome

How to clean up and reset Mozilla Firefox

How to clean up and reset Microsoft Edge

Defragment and optimize your drive

And finally, after checking for errors and cleaning up files, we need to ensure that the files and folders are in their correct location. If you use the advanced way of running Defrag, you can optimize the boot performance.

How to defragment and optimize your drive in Windows 10

How to defragment and optimize your drive in Windows 11

How to clean up and reset Google Chrome

Updated April 27, 2025

Internet browsers are prone to getting compromised. It can happen by opening an infected e-mail or viewing a malicious ad on a web page. But knowing how to get your browser back to normal is the key. Here's how to clean up and reset Google Chrome.

How to clean up and reset Google Chrome

Of the top three (3) browsers out there, Google Chrome is the most popular. One of the main reasons is that to use Google's products, like Google Earth, you have to have Chrome installed. And since it is the most popular, it is also the biggest target for adware and malware. In fact, in the past, the Chrome web store has been compromised with infected apps. Google is now scrutinizing the Chrome extensions harder than ever because of it. So knowing how to clean up and reset Chrome comes in handy.

Cleaning up and resetting Chrome

Google has made resetting the Chrome browser reasonably simple. Just open Chrome and click on the Customize and control button in the upper right-hand corner (it looks like three (3) vertical dots).
The Customize button inside of Google Chrome
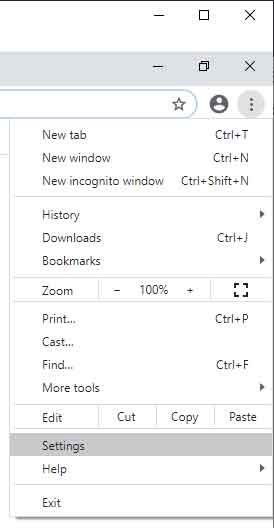
Go down and click on Settings, which will open a page with all user-configurable settings. On the left-hand column, you will find sixteen (16) links: You and Google, Autofill and passwords, Privacy and security, Performance, AI innovations, Appearance, Search engine, Default browser, On startup, Languages, Downloads, Accessibility, System, Reset settings, Extensions, and About Chrome.

The first section is You and Google. This is where you can synchronize Chrome (bookmarks, history, passwords, etc.) across multiple devices. If you are using Chrome on your computer and smartphone, this is a feature you may want to look into.

In this section, you can set up syncing all the different Google services, add a name and picture to your profile, and import bookmarks and settings from other browsers.

The second section is Autofill and passwords and has three (3) categories: Google Password Manager, Payment methods and Address and more. It is here you can choose whether or not to allow Chrome to save passwords, credit cards, and addresses.

Privacy and security is the next section. There are two categories: Safety Check and Privacy and security.

The first category is Safety check. When you click the Go to Safety Check button, Chrome checks for updates, insecure passwords, browsing protection, and harmful extensions.

The second category is Privacy and security and there are six (6) sub-categories: Delete browsing data, Privacy Guide, Third-party cookies, Ad privacy, Security, and Site settings. Let's look at each one separately.

The first category is Delete browsing data and is the first place I go when a customer complains about a website not functioning correctly. There are two categories here: Basic and Advanced.
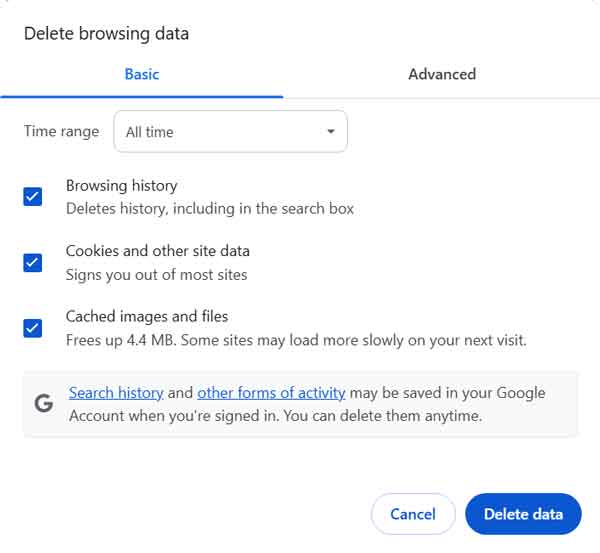
The clear browsing data windows inside of Google Chrome
Quite often, selecting the Basic settings with the Time range of All time will do the trick. If that does not fix things, try some of the Advanced options. Do one at a time until Chrome works the way you want.

The second category is the Privacy Guide, which allows you to review key privacy and security controls.

The third category is Third-party cookies. This where you define how Chrome handles cookies. The default setting is to block third-party cookies only when you use incognito mode and be perfectly safe. You can completely block third-party or all cookies if you want, but I recommend turning on the Do Not Track option. Chrome allows you to define which websites can use third-party cookies.

The fourth category is Ad privacy. This is where you can define what info websites can use to display ads. There are three (3) categories: Ad topics, Site-suggested ads, and Ad measurement.

The fifth category is Security, and this is where you define how Chrome displays websites. The default setting for Safe Browsing is Standard protection, which is recommended. You can use the Enhanced protection, but it does send browsing data back to Google. The rest of the default settings are recommended.

The sixth and last category is Site Settings. The default settings are recommended, but you can always modify them to your personal preferences. Some of these settings are in other sections, so don't be surprised if you see a setting you already configured.

The next section is Performance. You can configure various options here, including page preloading and the Memory Saver.

The AI innovations section allows you to configure the various AI settings.

The next section is Appearance, which is more about personalizing Chrome the way you want it to look. Just personal preferences here.

The Search engine section defines what search engine Chrome will use in the address bar.
The default search engine setting inside of Google Chrome
This is one place to check and see if your default search engine in Chrome has been hijacked. If you're not getting the search results you are expecting from the address bar,
The Google Chrome address bar
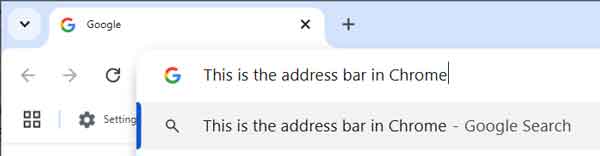
more than likely, your default search engine was changed without your knowledge. You can add or remove any of the search engines on this list.

The Default browser section has a link to the Default apps so you can make Chrome your default browser.

The On startup section defines what pages are displayed when Chrome starts up and is one of the first places I look for evidence of browser hijacking. A lot of malicious apps will try and get your browser to automatically open up their website(s) when you start up Chrome. They will also try to take advantage of another setting under System that allows apps to run even without Chrome being open (more on this one later in this article).

If Open a specific page or set of pages is selected, review the pages listed. If there are any page(s) you didn't add yourself, click on the three vertical dots that appear on each page's right-hand side and select Remove. You can also add any page you want to open when you start Chrome here.

The next following (3) sections, Languages, Downloads and Accessibility are for customizing how Chrome works and are more personal preferences. Now when it comes to downloads, I prefer having Chrome ask where I want each file to go before downloading them. Again, personal preference.

The next sections is System. Remember how I told you Chrome could be run without it having to be started? This is where you'll find the setting to turn off this feature. If you are using any Google apps that require Chrome, like Google Docs Offline, you will need to leave the Continue running background apps when Google Chrome is closed selected.
Enable or disable Chrome from running after being closed
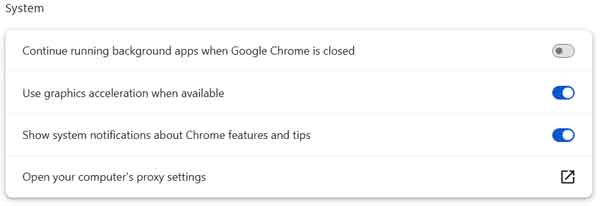
If not, I recommend that you turn this feature off. I've seen adware/malware use this setting to start Chrome when the computer starts up and then controls it remotely. If in doubt, turn it off until a Google app prompts you to enable it.

The next section is Reset settings. The link labeled Restore settings to their original defaults will do just that, reset Chrome back to its default, 'out-of-the-box' setup. It will be just like when you first installed it.

The second to the last section is Extensions. This is where you will find all of the installed apps that run inside Chrome. These extend the functionality and usefulness of Chrome. You'll typically find malicious apps that have installed themselves without your knowledge (usually in kiosk mode). It's here that you can either enable, disable, or remove them from Chrome. If you're unsure about an extension, you can always disable it to find out what it did or didn't do inside Chrome. And when you're sure you don't need it or don't remember installing it, just click the Remove button. If you accidentally remove an extension and want it back, you will have to go through the process of reinstalling it, so be careful.

When you click the Details button for an extension, you will get an option screen. One of the extension options is Allow in incognito for private browsing. Chrome can run in what is called Incognito mode, where it does not save any record of where you have been or what you may have downloaded. If an extension has the option to select Allow in incognito mode, it can be enabled for it. If you use incognito mode, I would defiantly recommend enabling any type of anti-virus, anti-adware, or anti-malware application extension.

The last section is About Chrome and will tell you what version of Chrome you currently have installed and has links to get help, report an issue, and Chrome's privacy policy.

Reinstalling Google Chrome

The last option to get Chrome back to default and work correctly is to uninstall and reinstall it. I only use this option when all else fails to get it back to full functionality. It can take a little time to do, but if you need to get Chrome fully reset, this may be the only option. There are two (2) ways to uninstall programs in Windows; the Settings app or the Control Panel.

Uninstall a program using the Settings app

  1. Click on the Start Windows logo menu, then Settings (the gear icon), then Apps, then Installed apps.
  2. Scroll down the list of apps in the right-hand column until you find Google Chrome.
  3. Highlight Google Chrome and click on the Uninstall button.

Uninstall a program using the Control Panel

  1. In the search box next to the Start Windows logo button, type Control Panel, and click on it from the results.
  2. Select Uninstall a program (if viewing by category) or Programs and Features (if viewing by icons).
  3. Highlight Google Chrome and click on the Uninstall button.

Once Google Chrome is uninstalled, restart your computer. When your computer has rebooted, and you are logged back in, you will need to remove any traces of Google Chrome before reinstalling it. There are two (2) places where you will need to look for any leftover files; inside your user profile and inside the program files directory. The files inside your user profile are hidden by default, but you can get there quickly by bringing up a Run dialog box (Windows Logo key Windows logo key + R) and typing or copy/paste the following code:

%userprofile%/AppData/Local/Google

This will open the File Explorer to the location of your Google user settings. If there is a folder named Chrome, go ahead and delete it. Next, you will have to navigate to the location of the Program Files directory and check under the folder named Google. Its location is usually C:\Program Files\Google, but it may be different if you installed Google Chrome on a different drive. Once you get there, if you find a folder named Chrome, go ahead and delete it. Now you can download and reinstall Google Chrome.

Free computer diagnostics

Repairing a PC can sometimes be expensive, and that is why we offer free basic in-shop diagnostics. Give one of our professional and experienced technicians a call at (602) 795-1111, and let's see what we can do for you.

Check out our reviews

Geeks In Phoenix LLC, BBB Business Review

This business is BBB Accredited

Customer service is #1

Here at Geeks in Phoenix, we take pride in providing excellent customer service. We aim to give the highest quality of service  from computer repair, virus removal, and data recovery.

Bring your computer to us and save

Repairing a computer can be time-consuming. That is why we base our in-shop service on the time we work on your computer, not the time it takes for your computer to work! From running memory-checking software to scanning for viruses, these are processes that can take some time.

Contact us

If you have any questions, please feel free to give us a call at (602) 795-1111  and talk with one of our Geeks. Or you can send us a message from our contact page , and one of our Geeks will get back to you as soon as possible. Or you can stop by and see us. Here are our hours and location.

Like Geeks in Phoenix on Facebook

Follow Geeks in Phoenix on Twitter

Watch Geeks in Phoenix on YouTube