Updated January 15, 2024
When it comes to repairing Windows-based computers, the one thing that will positively stop Windows from starting up is a corrupt registry. Having a backup of the registry is essential for quickly getting a system back up and running. So here is how to enable automatic registry backups in Windows 10 and Windows 11.
In previous versions of Windows, the operating system would automatically backup the registry. In fact, Windows did automatically back up the registry until Windows 10 version 1803.
With Windows 10 version 1803, Microsoft disabled the automatic registry backup to help reduce the overall footprint of Windows. Microsoft would prefer you to use the System Restore feature.
But considering that Windows 10 and Windows 11 can take up to 40GB or more of disk space, the folder that contains the registry backup (Windows\System32\config\RegBack) only takes up roughly 100MB or so of disk space. I do not see a problem with having a backup of the registry.
Now over the past couple of years, I have seen an increase in Windows computers that do not have System Protection enabled. System Protection is the feature that creates and manages the System Restore feature.
So when I get a computer in the shop with a corrupted registry, and there are no System Restore points, then the only thing I can do is reformat the drive and reinstall Windows. But you can re-enable the automatic registry backup with a simple registry edit.
Note: If you are not comfortable editing the registry, don't hesitate to contact a local computer technician to assist you.
From my experience, getting the registry backups going again is a two-step process. First, you create the registry key and restart your computer to take effect. Then you run the built-in task inside of Task Scheduler. Let's start with the registry editor.
How to open the Registry Editor in Windows 10 / Windows 11
- Open the Registry Editor by either
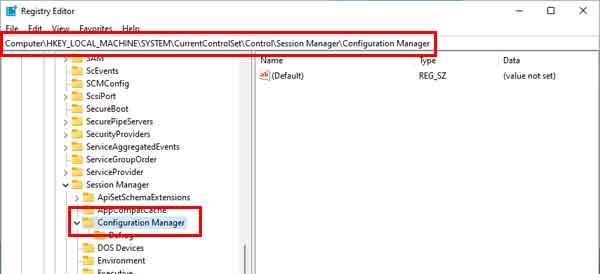
- Navigate to HKLM (HKEY_LOCAL_MACHINE) > System > CurrentControlSet > Control > Session Manager > Configuration Manager
- In the left-hand column, right-click on Configuration Manager and select New > DWORD (32-bit) Value.
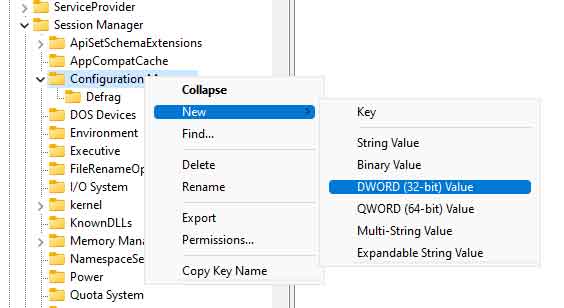
- Name the new DWORD value EnablePeriodicBackup.

- Right-click on the EnablePeriodicBackup value and select Modify.
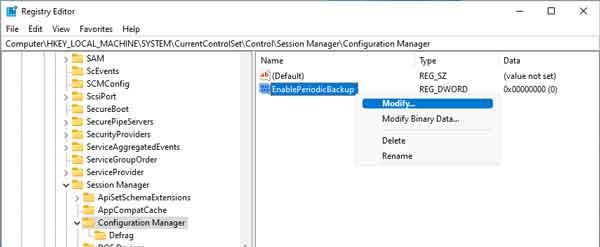
- Change the Value data from 0 to 1 and left-click on OK.

- Restart your computer.
Using File Explorer, navigate to the Windows\System32\config\RegBack folder and see if the registry files are backed up. If you encounter a couple of dialog boxes that tell you that you do not have permission to access this folder, left-click on Continue.
You should see five (5) files in this folder; DEFAULT, SAM, SECURITY, SOFTWARE, and SYSTEM. And more than likely, they will be only 0KB in size. If that is the case, we will need to run the task that backups the registry.
Now we need to run the built-in task RegIdleBackup to get the Windows to start backing up the registry. Once you run the RegIdleBackup task, you should restart your computer again to get it fully functional.
How to open the Task Scheduler in Windows 10 / Windows 11
- Open the Task Scheduler by either
- When Task Scheduler appears, navigate down the left-hand column to Task Scheduler Library > Microsoft > Windows > Registry.
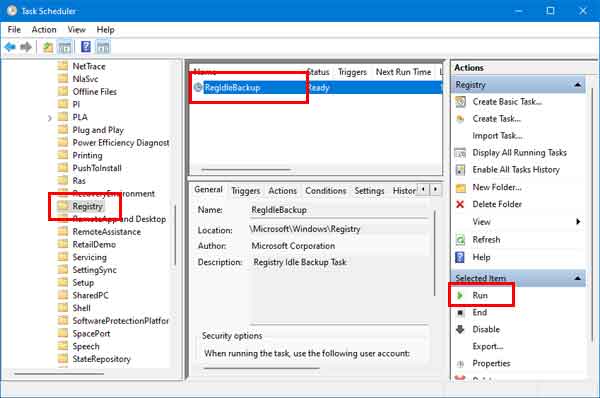
- In the center column, highlight the RegIdleBackup task and select Run in the right-hand column.
- There is no set schedule for this task. If you right-click on the RegIdleBackup task and select Properties from the context menu, you can create a new Trigger for it.
- When you are all done, restart your computer.
Windows will now be backing up the registry regularly. Now that you enabled automatic registry backups let's check and see if they are working.
Let's use File Explorer again to navigate to the Windows\System32\config\RegBack folder and see if the registry files have increased in size. You should now see they are no longer 0KB.
d3a41171-ef1a-44e1-befb-9570ab1e4934|2|5.0|96d5b379-7e1d-4dac-a6ba-1e50db561b04