Upgrading your computer to Windows 10 can be a pretty simple task. But there are occasions when upgrading can be a massive headache. And then there is my Windows 10 upgrade. Here's my personal experience upgrading to Windows 10.

Let me start by saying that I knew right from the start that upgrading my personal computer to Windows 10 would be a lot of work. But it was something that needed to happen. When I built this system in January of 2013, it was because the original motherboard failed. So I picked up a new motherboard, processor, and memory and reloaded all of the software.
Little did I know that my biggest problem for my Windows 10 upgrade started when I installed all of the software in 2013. I installed Windows 8 instead of Windows 7 that I had previously. All worked well until Windows 8.1 was released. It turned out that one of my major programs, QuickBooks Pro 2010, didn't support Windows 8.1. If I upgraded to Windows 8.1, I would have to upgrade to QuickBooks Pro 2013. It seemed like a waste of time and money, so I decided to wait.
Now let's fast forward three years or so to February of 2016 when Microsoft ends support for Windows 8 (not Windows 8.1). I decided it was time to move to Windows 10. I picked up a new 1TB hard drive and installed it alongside my 1TB Windows 8 drive. I was going to switch boot drive in the motherboard BIOS (Basic Input Output System) temporarily until I got the Windows 10 drive set up. That's when I remembered that my version of QuickBooks Pro 2010 would not install on Windows 10.
So just for the fun of it, I tried to install QuickBooks Pro 2010 inside a Windows 10 Virtual Machine (VM) running on the Windows 8 drive. The installer just wouldn't run. I tried everything, including compatibility mode, nothing worked. So I decided that I could run QuickBooks Pro 2010 inside of a Windows 7 VM. I got the Windows 7 VM all set up and running. Things got busy at work, and I had put my upgrade to Windows 10 on hold. So I disconnected the drive with Windows 10 and kept using Windows 8.
My Windows 10 upgrade got back on track last month when Intuit made me an offer to upgrade my version of QuickBooks. It seems there is a security issue with older QuickBook versions, and Intuit offered me the latest version for 70% off. That was just the thing to get my Windows 10 upgrade going again. I would have lost the integration with Microsoft Word (printing envelops) and Outlook (contacts, e-mail) running QuickBooks inside of a VM. That was something I didn't want to lose.
My original plan was back on. I already had a clean installation of Windows 10 and need to finish installing all of the programs. Yes, it is a lot of work, but a Windows 8 to Windows 10 upgrade isn't possible. And besides the new version of QuickBooks, I had several other software upgrades that I'd been waiting to do. It seemed like the perfect time to do them all.
My idea was to recreate the three (3) partitions and drive letters (C:, D: and E:) from the original 1TB drive using both of the 1TB drives. The C: and D: drive partitions would be on the first (boot) drive, and the E: drive partition would take up the whole second drive. Setting up the disks this way would double my storage space.
Now when I originally started this upgrade in February, I disconnected the old 1TB and performed a clean install of Windows 10 on the new 1TB drive. Once I had Windows 10 installed and drivers updated, I shut down my computer and reattached the old 1TB drive. During this time, I also changed the port that the drives connected to on the motherboard (I wanted the boot drive on port 0).
Now I've done this type of upgrade many times before. The only problem I was having was the motherboard BIOS was having issues with the boot records on the two drives. It didn't help that the disks were from the same manufacturer (Western Digital) and the same size (1TB). The new one was a 'Black' drive, and the old one was a 'Blue' drive. They have the same specs, but the 'Black' drive has a five (5) year warranty, where the 'Blue' drive has only a two (2) year warranty.
It was time to make the changeover. I booted up to Windows 8 one last time and did a software inventory using Belarc Advisor. When it was complete, I printed out a copy for my use. Belarc Advisor gives a full list of all the software installed on your computer. Since I was doing a clean install of Windows 10, I would defiantly use the audit for reinstalling the software.
Then I went into the BIOS and changed the boot order so that Windows 10 drive booted automatically. Once Windows 10 was back up and running, I needed to get my files off of the old drive. I had already created the new C: and D: drives/partitions on the new drive, so I just copied over the contents of the old D: drive (which was now H:) to the new D: drive. The contents of the third partition (E:) on the old drive would have to go onto an external drive temporarily.

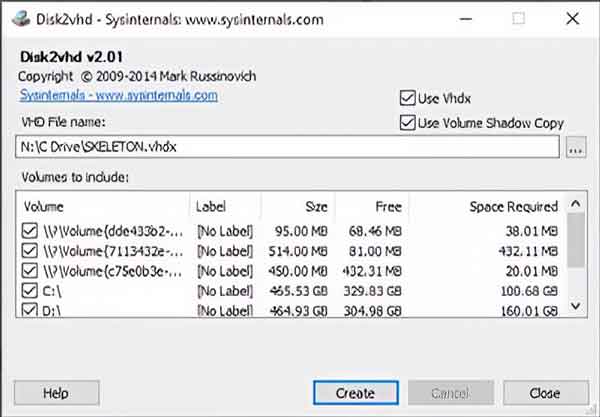
A screenshot of the Disk2vhd user interface
At this point, I have two of the original three partitions/drives recreated (C: and D:). It was time to take care of the original C: drive. To be on the safe side, I decided to create an image of it. I downloaded the latest version of Disk2vhd from Microsoft (it's part of the Sysinternals Suite) and proceeded to create an image of the C: drive. When it was complete, I copied the image over to an external drive along with a copy of the AppData folder from my old profile.
It was now time to delete all of the original partitions on the old 1TB drive and reformat it into just one partition/drive (E:). Reformatting the drive erased all of the partitions and the original Master Boot Record (MBR). That solved the problem with the motherboard not knowing what MBR to use at startup. Now that the E: drive was back in place, I copied all of the files I had put on the external drive.

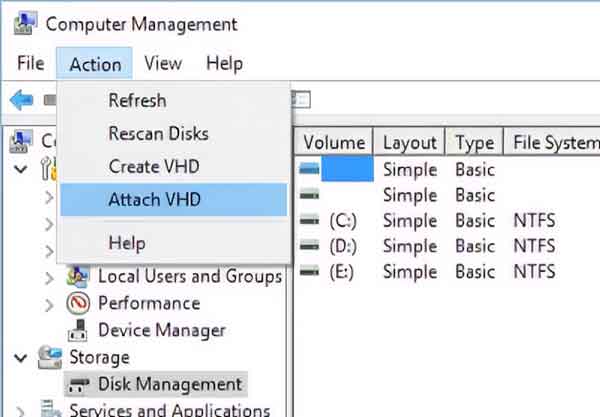
Attaching a VHD file inside of Disk Management
Everything from here on out was downhill. The only issue I had was a disk collision warning when I first attached the VHD in Windows 10. Windows 10 wrote a new disk signature to the VHD file, and all was good. Now all I had to do was reinstall all of my software.
00ce1b12-6df1-4c38-87d4-e143358241db|0|.0|96d5b379-7e1d-4dac-a6ba-1e50db561b04