Updated January 30, 2024
Everyone knows that when you make any significant change to your computer, you must backup the registry first. But not many casual computer users understand what the registry is and how to back it up. So here's how to backup and restore the registry in Windows 10 and Windows 11.
So, what is the registry? The registry is a database that contains information on the hardware, software, and user(s) installed on your computer. Even though it may sound like a single entity, it consists of several different files. The collection of these files is called the registry hive.
FYI: The information in the registry hive is stored in two (2) essential elements: Keys and Values. Keys are like folders; they can contain values and keys. Values are like files; they contain data in various formats.
Automatically backup and restore the registry in Windows 10 and Windows 11
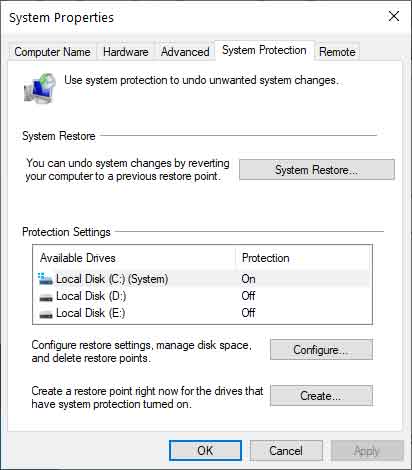
The System Protection tab of the System Properties dialog box inside Windows 10
Now, the simplest way to backup the registry is to create a restore point. Restore points contain backup copies of the registry, most drivers, and files with particular extensions.
Restore points can be a lifesaver if your system fails to start after a change or modification. Just make sure to create a system repair disk or recovery drive (instructions below) and have it on hand only in case your system won't start up correctly. You can use it to boot your computer and access a restore point.
How to create a restore point in Windows 10 and Windows 11
- Bring up the System > About page by either:
- Pressing the Windows logo key
 + Pause.
- Pressing the Windows logo key + X to bring up the Power User menu and press Y to select System.
- Right-clicking on the Windows logo on the Start menu to bring up the Power User menu and select System.
- In the right-hand column, left-click on the System protection link.
- In the Protection Settings field, check and ensure system protection is enabled. If it is not, then highlight the drive's name and left-click on the Configure ... button. Once you have verified that system protection is enabled, proceed to the next step.
- Highlight the C: (System) drive, and left-click on the button labeled Create ....
- Type in a descriptive title for your restore point (the date and time are automatically added).
- Left-click on Create.
How to use a restore point in Windows 10 and Windows 11
- Bring up the System > About page by either:
- Pressing the Windows logo key + Pause.
- Pressing the Windows logo key + X to bring up the Power User menu and press Y to select System.
- Right-clicking on the Windows logo on the Start menu to bring up the Power User menu and select System.
- In the right-hand column, left-click on the System protection link.
- At the top of the System Protection tab, left-click on the button under the System Restore section labeled System Restore ....
- When the starting screen appears, left-click on Next >.
- Highlight the restore point you want to use, then left-click on Next >.
- When the confirmation screen appears, left-click on Finish.
- A warning should appear telling you not to interrupt the system restore process. Left-click on Yes to proceed.
- Your computer will start restoring the system (including the registry) to how it was when the restore point was created and reboot.
Creating a system repair disk or recovery drive in Windows 10 and Windows 11
System repair disks and recovery drives are essentially the same thing. They are bootable drives that contain the essential system tools to repair your Windows installation. The only difference is the media they use; system repair disks use CDs/DVDs, and recovery drives use USBs. Recovery drives can also reinstall Windows. Click here for more on Recovery Drives for Windows 10 and Windows 11.
How to create a system repair disk for Windows 10 or Windows 11 (requires a blank CD/DVD)
- Bring up the Run dialog box by either:
- Pressing the Windows logo key + R
- Right-click on the Windows logo on the Start Menu or press the Windows logo key + X and then select Run
- In the Run dialog box that appears, type recdisc and select OK. If you're prompted for an administrator password or confirmation, type the password or provide confirmation. Just follow the prompts.
How to create a recovery drive for Windows 10 (requires an empty USB drive 16GB or larger)
- Left-click on the Start button to bring up the Start menu.
- Scroll down the list of programs and left-click on Windows Accessories.
- Double left-click on Recovery Drive. Just follow the prompts.
How to create a recovery drive for Windows 11 (requires an empty USB drive 16GB or larger)
- Left-click on the Start button to bring up the Start menu.
- In the upper right-hand corner of the Start menu, left-click on All apps.
- Scroll down the list of programs and left-click on Windows Tools.
- Double left-click on Recovery Drive. Just follow the prompts.
Manually backup and restore the registry in Windows 10 and Windows 11
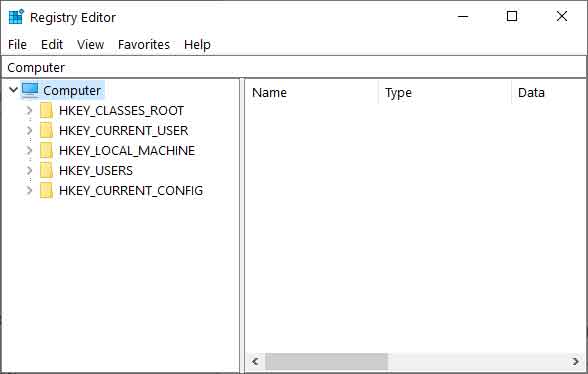
The Registry Editor interface inside of Windows 10
Another way to backup the registry is to use the built-in Registry Editor. The beautiful thing about using the Registry Editor is that you don't have to backup the whole registry if you don't want to. You can just backup any key or value you want.
There is a downside to using the Registry Editor to manually backup the registry. To restore anything with the Registry Editor, you must boot your computer in either standard or safe mode. A system repair disc doesn't have the Registry Editor included.
How to manually backup the registry using the Registry Editor in Windows 10 and Windows 11
- Bring up the Run dialog box by either:
- Pressing the Windows logo key + R
- Right-click on the Windows logo on the Start Menu or press the Windows logo key + X and then select Run
- In the Run dialog box that appears, type regedit and select OK. If you're prompted for an administrator password or confirmation, type the password or provide confirmation.
- When the Registry Editor appears either:
- Highlight Computer in the left-hand column to backup the complete registry.
- Highlight the key or value you want to backup.
- Left-click on the File pull-down menu and left-click on Export.
- Select the location and a descriptive file name for the backup file, and then left-click on Save.
How to manually restore the registry using the Registry Editor in Windows 10 and Windows 11
- Bring up the Run dialog box by either:
- Pressing the Windows logo key + R
- Right-click on the Windows logo on the Start Menu or press the Windows logo key + X and then select Run
- In the Run dialog box that appears, type regedit and select OK. If you're prompted for an administrator password or confirmation, type the password or provide confirmation.
- When the Registry Editor appears either:
- Left-click on the File pull-down menu and left-click on Import.
- Navigate to the location of the REG file you want to import and left-click on it.
- Left-click on the Open button. You should get a confirmation screen telling you successfully imported the file.
848b6848-e97d-4ddd-9abe-b204e802d75d|2|5.0|96d5b379-7e1d-4dac-a6ba-1e50db561b04