Geeks in Phoenix

Geek Blog


How to find Windows 10 features and programs

Updated October 9, 2024

Since Windows 10 is a popular operating system, getting to all settings and controls is essential. However, locating some of the components can be kind of tricky. So here are some of my favorite ways to find Windows 10 features and applications.

Power User menu

Did you know you can get to Settings, Computer Management, or an Admin Command Prompt / Admin PowerShell in Windows 10 with just a few keystrokes or mouse clicks? That's just what you can do and more when you use the Power User menu.

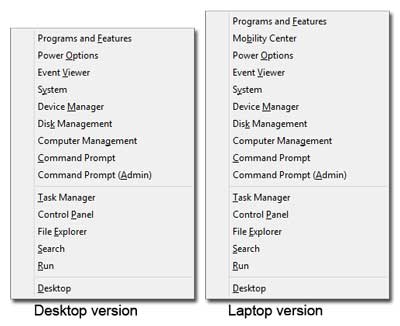
The two different versions of the Power User menu in Windows 10

The Power User menu first appeared in Windows 8 to supplement users' need to find essential programs and features quickly. Without a Start Menu, it was tough for regular users to find anything inside Windows 8. The Power User menu made up for no Start Menu, well, not really, but it was better than nothing at all.

The Power User menu contains shortcuts to the most used programs and features inside Windows 10 (see list below). In the Taskbar settings,
Windows 10 Power User menu with either Command Prompt or PowerShell option
you can choose to have either the Command Prompt or Windows PowerShell shortcuts. There are two different ways of bringing up the Power User menu: by mouse or keyboard.

How to display the Power User menu using your mouse

Right-click on the Windows logo Windows logo key on the Start Menu

How to display the Power User menu using your keyboard

Press the Windows logo key Windows logo key + X

Using the keyboard method, you also get keyboard shortcuts added to all of the menu selections.

Power User menu keyboard shortcuts

Press To
Windows logo key + X Open the Power User menu
Then press To open
F Apps and Features
O Power Options
V Event Viewer
Y System
M Device Manager
W Network Connections
K Disk Management
G Computer Management
You can select to have either the Command Prompt or PowerShell on the Power User menu in the Taskbar settings
C Command Prompt
I Windows PowerShell
A Admin Command Prompt / Admin PowerShell
T Task Manager
N Settings
E File Explorer
S Search
R Run dialog box
U Shut down or sign out
U then I Sign out
U then U Shut down
U then R Restart
D Desktop

Keyboard shortcuts for Windows

It just so happens that the keyboard shortcut for the Power User menu is only one of almost fifty Windows logo key shortcuts for Windows 10. The Windows logo key was introduced in '95 to coincide with the release of Windows 95 and the new, at that time, Start Menu. Microsoft has added and modified the Windows logo key shortcuts with every version of Windows since then. Some of my favorites are listed below, and most of them only require one hand.

Press To
Windows logo key Open the Start menu
Windows logo key + A Open Action Center
Windows logo key + D Show desktop
Windows logo key + R Run dialog box
Windows logo key + S Search
Windows logo key + X Open the Power User menu

Click here for the complete list of Windows logo key shortcuts for Windows 10

If you like using keyboard shortcuts, I also personally love and use the general keyboard shortcuts and the dialog box keyboard shortcuts. And since I am right-handed and prefer to keep my hand on the mouse, I use many left-handed keyboard shortcuts.

For more information on any of the keyboard shortcuts in this article, please check the links below.

Windows logo key shortcuts for Windows 10

Dialog box keyboard shortcuts

General keyboard shortcuts

My favorite left-hand Windows keyboard shortcuts

Should you upgrade your computer to Windows 10?

With Microsoft giving away free Windows 10 upgrades to Windows 7 and Windows 8.1 users, the one question that I keep getting asked is, "Should I upgrade to Windows 10?" The real question should be, "Will my hardware run smoothly with Windows 10?" Let's take a look and see if you should upgrade from Windows 7 or Windows 8.1 to Windows 10.

Should you upgrade your computer to Windows 10?

When Microsoft first released Windows 10, they had an application called Get Windows 10 (GWT). This program would analyze the hardware and software inside your computer and let you know if there was anything that was not Windows 10 compatible. That program is gone, but the Windows 10 installer will still analyze your computer before starting the installation.

Just remember that even if the Windows 10 installer says everything is compatible, it doesn't mean it will work smoothly with Windows 10. I have seen systems that were completely compatible with Windows 10, but when they got the upgraded, the performance was below what it was with the previous version of Windows.

The first thing we should look at is the hardware requirements for Windows 10. When compared to Windows 7 and Windows 8.1, they are necessarily precisely the same for all three versions.

Windows 7 requirements:

  • 1 Gigahertz (GHz) or faster 32-bit (x86) or 64-bit (x64) processor
  • 1 Gigabyte (GB) RAM (32-bit) or 2 GB RAM (64-bit)
  • 16 GB available hard disk space (32-bit) or 20 GB (64-bit)
  • DirectX 9 graphics device with WDDM 1.0 or higher driver

Windows 8.1 requirements:

  • Processor: 1 Gigahertz (GHz)* or faster with support for PAE, NX, and SSE2
  • RAM: 1 Gigabyte (GB) (32-bit) or 2 GB (64-bit)
  • Hard disk space: 16 GB (32-bit) or 20 GB (64-bit)
  • Graphics card: Microsoft DirectX 9 graphics device with WDDM driver

Windows 10 requirements:

  • Processor: 1 Gigahertz (GHz) or faster processor or SoC
  • RAM: 1 Gigabyte (GB) for 32-bit or 2 GB for 64-bit
  • Hard disk space:
    • Windows 10 version 1809 and prior: 16 GB for 32-bit OS 20 GB for 64-bit OS
    • Windows 10 version 1903 and newer: 32 GB for 32-bit and 64-bit OS
  • Graphics card: DirectX 9 or later with WDDM 1.0 driver

So what differentiates Windows 10 from Windows 7 or Windows 8? The hardware drivers. Let me explain.

In the past, when a manufacturer discontinued a hardware piece, Microsoft would take the last known Windows Hardware Quality Labs (WHQL) certified driver for that hardware and incorporate it into the driver's directory for the next version of Windows. The Windows\System32\Drivers directory is the generic driver collection that is inside of the installation media for Windows. If Windows cannot find a driver for a specific type of hardware in the driver's directory, it will go out to the Internet database and look for a suitable driver.

But when a type of hardware gets outdated, Microsoft has been known to remove the driver from the driver's directory after a couple of years. That's when things can get tough. I've have had to go back into previous versions of Windows installation media and extract drivers from older driver directories. I have a customer with a large format plotter that Windows hasn't had a driver for since Windows Server 2003 64-bit. But I have extracted the driver from the installation media and have used it on 64-bit versions of Windows Vista and Windows 7 with no problem.

So what am I saying? It comes down to whether the manufacturer(s) of your hardware is still supporting them with new drivers. If the device is no longer being sold, you can assume that there will be no new drivers for it. Now there are exceptions to this rule. Expansion cards, like graphic/video cards, are one of them. I've found that companies like NVIDIA and AMD will create new drivers for what they call legacy hardware (discontinued hardware).

Before you decide to upgrade your Windows 7 or Windows 8.1 computer, take a couple of minutes and go over to all of the manufacturer's website(s) and locate the drivers for your system components. A few minutes now can save you hours later. As Benjamin Franklin once said, "An ounce of prevention is worth a pound of cure."

With all of that in mind, if the last version of drivers that came from the manufacturer was for Windows 7, then the drivers in Windows 8.1 were Microsoft WHQL certified drivers. And if that is the case, then Windows 10 may or may not come with a compatible generic driver. It may have to go out to the Internet database and find a driver. And if that's the case, you can bet it will be a completely generic driver.

But if the last version of drivers that came from the manufacturer was for Windows 8.1, then the Windows 10 driver will most likely be a Microsoft WHQL certified hardware driver.

Bottom line; if your system or components were built before the release of Windows 8 / Windows 8.1 (October 2012) and are no longer in production, I would be skeptical about whether to upgrade to Windows 10. But if your system and/or components were built after the release of Windows 8 / Windows 8.1 (October 2012) and may or may not be still in production, there is a good chance that Windows 10 will run perfectly fine. But remember, there will be exceptions.

My digital toolbox 2

My Digital Toolbox

When it comes to computer repair, every technician has a collection of software that they use regularly. Whether on a CD, DVD, or USB drive, these programs are essential to diagnosing different computer-related issues. Here are just a few of my favorite programs that I keep in my digital toolbox.

Recuva

The main screen inside of Recuva

I get many calls from customers that say they accidentally deleted a file and want to know how they can get it back. When it comes to simple data recovery, nothing beats Recuva. From photos on memory cards to documents on your hard drive, the easiest way to recover a deleted file is with Recuva. So if you have accidentally erased a files, give Recuva a try.

Click here for more information on Recuva

Ultimate Boot CD (UBCD)

The Ultimate Boot CD main menu

Another of my favorite diagnostic tools is UBCD. It contains a bunch of useful programs that run from a Linux based CD. All of the applications provided on the UBCD are free of charge. The programs included in it range from memory diagnostics to hard drive erasers. And it has the best selection of hard drive manufacturer's diagnostic programs you will ever find. UBCD does come as an .ISO file that you can burn to a CD, or load it on to a USB drive. Their website has all of the instructions on how to do it. UBCD is a private fund project, so if you find it useful, please donate.

Click here for more information on UBCD

Diagnostic and Recovery Toolset (DaRT)

The main screen for the Diagnostic and Recovery Toolset

My all-time favorite set of diagnostic tools is DaRT. It is not just one program but a complete set of diagnostic tools that boots up on a version of Windows (depending on what version of Windows you build it on). It is similar to the system recovery disk you can make inside of every version of Windows, but it also includes various programs that you can use for diagnostics.

DaRT has quite a few programs straight out of Windows, like File Explorer, Registry Editor, and Computer Management. It includes Crash Analyzer, SFC (System File Checker), and Locksmith (resets passwords for local accounts). When you create the DaRT media, you can configure what programs are going into your DaRT build.

Now here is the downside. DaRT is part of the Microsoft Desktop Optimization Pack (MDOP) and is only available to Microsoft's Volume Licensing Service, MSDN, or Action Pack subscribers. But if you or your company has one of these subscriptions, DaRT is one tool you'll be glad you have in your digital toolbox.

Click here for more information on the Diagnostic and Recovery Toolset (DaRT)

Troubleshooting Windows Update problems

Updated October 1, 2024

When it comes to repairing Windows computers, there are a couple of problems that I get a lot of help requests. One of them is when a computer cannot get updates to Windows. So here are a few of my favorite resources for fixing Windows Update.

Troubleshooting Windows Update problems

There are several reasons why Windows Update can fail. There could be corrupted files or folders; the different services that Windows Update requires are not starting, registry errors, etc. The following is a list of some procedures I use to repair Windows Update.

Remember to always restart your computer after running any of these procedures before trying Windows Update again.

Windows Update Troubleshooter

Windows 10 and Windows 11 have several troubleshooters built-in, including one for Windows Update. All of the Troubleshooters are located in Windows Settings. There are a few different ways to get to Windows Settings.

How to access the Windows Update troubleshooter in Windows 11

You can find all of the troubleshooters for Windows 11 in the Settings app. To get to the Settings app, do one of the following:

  • Left-click on the Start Windows logo menu and left-click on Settings (the gear icon)
  • Right-click on the Start Windows logo menu or press the Windows logo key Windows logo + X and select Settings from the Power User menu
  • Press the Windows logo key Windows logo + I

The Settings app should open with the Home category highlighted in the left-hand column. Left-click on the System category in the left-hand column, scroll down the right-hand column, select Troubleshoot, Other troubleshooters, and then left-click on the Run button on the right-hand side of Windows Update.

How to access the Windows Update troubleshooter in Windows 10

You can find all of the troubleshooters for Windows 10 in the Settings app. To get to the Settings app, do one of the following:

  • Left-click on the Start Windows logo menu and left-click on Settings (the gear icon)
  • Right-click on the Start Windows logo menu or press the Windows logo key Windows logo + X and select Settings from the Power User menu
  • Press the Windows logo key Windows logo + I

Once you open Windows Settings, select Update and Security, then Troubleshoot in the left-hand column. In the right-hand column, select Additional troubleshooters, then select Windows Update.

So if the Windows Update Troubleshooter (repair) did not fix the issue, you could attempt to reset the components that Windows Update uses. The following link gives complete instructions on how to manually reset the Windows Update components, plus some additional resources.

Reset Windows Update components

There is another way to reset the Windows Update components. The Reset Windows Update Tool is a script-based application that performs the same functions as the instructions above. Along with resetting Windows Update components, it can run Secure File Checker (see below), repair invalid registry keys, and repair the Windows system image using DISM (see below).

Reset Windows Update Tool

Check your drive for errors

If you have run the Windows Update troubleshooters (repair/reset) and Windows Update is still not functioning correctly, it's time to do some general system checks. Sometimes there can be an error(s) with the file system that does not allow the troubleshooters to fix the issue(s). I have had this problem many times before. There is nothing worse than feeling like a dog chasing his tail. At this point, check your drive for errors by running checkdisk.

Check your drive for errors in Windows 11

Check your drive for errors in Windows 10

Once you are done with a checkdisk, go ahead and rerun the Windows Update troubleshooter. First, run the repair troubleshooter and try checking for updates. If it doesn't fix it, run the reset troubleshooter. If Windows Update still won't work, then it is time to check system files.

Check system files

SFC

Windows has a built-in program called System File Checker (SFC) to check system files for corruption and incorrect versions. SFC is run inside of an administrative command prompt. Just follow the link below for your version of Windows for instructions on how to bring up an admin command prompt.

Open an Administrative Command Prompt in Windows 11

Open a Command Prompt with Administrator privileges in Windows 10

SFC is the same in all of the currently supported versions of Windows. Here is the link to the most detailed instructions for SFC (Windows 10, Windows 11).

Check Windows 11 system files with System File Checker

Check Windows 10 system files with System File Checker

Once you are done running SFC and have corrected any problems it may have found, try running Windows Update. If it still doesn't work, try running the troubleshooters (repair/reset) one at a time, running Windows Update in between. If you again cannot run Windows Update successfully, it may be time to run the most advanced system corruption repair tools.

DISM

Deployment Image Servicing and Management (DISM) is the complete way of checking for file corruption in Windows. The link to the instructions on how to run it is below. DISM is meant to be used by advanced users, so if you don't feel comfortable running this program, please contact a local computer repair shop like Geeks in Phoenix for assistance.

Fix Windows Update errors by using the DISM

After running DISM, check again to see if Windows Update will work. If Windows Update still does not work, it may be time to perform a repair upgrade to Windows 10 / Windows 11.

How to perform a repair upgrade of Windows 11

How to perform a repair upgrade or Windows 10

How to clean up and reset Mozilla Firefox

Updated April 28, 2025

When it comes to computer repair, the most common problem I find is browser corruption. Malicious browser extensions are the most common way a browser can get corrupted. So here's how to clean up and reset Mozilla Firefox.

How to clean up and reset Mozilla Firefox

I've shown how to clean up and reset Google Chrome and Microsoft Edge, so this article shouldn't be a surprise. What might surprise you is that all three browsers are installed on my personal computer, and Firefox is my default browser. Each has pros and cons, but since Firefox is a product of the Mozilla Foundation (a non-profit organization), I prefer supporting them.

I've always considered Mozilla Firefox a cross between Internet Explorer and Google Chrome, having the best elements. A case in point is how you can access the options in Firefox. You can either use the Menu button in the upper right-hand corner (the button with three (3) horizontal bars, similar to the three dots in Chrome) or enable the Menu Bar on top of the browser window (similar to Internet Explorer).
The Firefox Menu Bar and Menu Button locations
To get the Menu Bar, right-click the blank area above the Address Bar and select Menu Bar. Some options can only be accessed using the Menu Bar, but I'll discuss that later in this article.

Let's start with the necessary options. If you're using the Menu Button, select Settings; if you're using the Menu Bar, select the Tools pull-down menu and then Settings. This will bring up the Firefox preferences. On the left-hand side is a list with several selections; General, Home, Search, Privacy & Security, Sync, Firefox Labs, More from Mozilla, Extensions & Themes, and Firefox Support.

The first panel on the left-side menu is General and is where you will find the most basic settings: Startup, Import Browser data, Tabs, and Browser Layout. Also, under the General section, you will also find Language and Appearance, Files and Applications, Firefox Updates, Performance, Browsing, and Network Settings.

These settings are mainly personal preferences that configure how Firefox looks and works. Under Files and Applications you will find the Downloads section. This is one setting I always change, as I prefer to be prompted as to where I want to save a download, as I don't always want them just saved into my default downloads folder.

Right below Downloads is Applications. Here you can choose what happens when you select different actions, like when you click a mailto: link. There is nothing really out of the ordinary here. I would review them to make sure everything looked good. If you think something is questionable, just change the action. You can always change it back if it doesn't work how you want it to. Below Files and Applications is the Firefox Updates section; make sure that Automatically install updates (recommended) is selected.

The second panel is Home and includes Homepage and new windows, New tabs, and the Firefox Home Content. If Firefox has been modified by a malicious piece of malware/adware, you'll want to check the Homepage and new windows and New tabs settings to ensure they are not opening up malicious web pages when Firefox starts. If any of the settings have been changed, you can reset Firefox back to the default settings by clicking on the pull-down menu and selecting Firefox Home (Default).

The next panel on the left-side menu is Search. This is where you configured how Search works in Firefox.
The Search options inside of Firefox
You can select what search engine Firefox uses from a preset collection of the most popular search engines. You also can have a separate search bar or use the address bar for navigation and search. If you decide to use the separate search bar, you can change the search engine it uses on the fly by clicking on the magnifying glass on the Search box's left side.

The next panel is Privacy and Security. In this section, you have to go through each subcategory and make sure the settings will work for you. Right out of the box, these settings are pretty perfect, although there are a couple I prefer to configure for my taste.

Under Browser Privacy, you can select how Firefox handles website tracking. The default setting (Standard) works fine, but you can restrict what a website can do if you want to. But remember that with stricter security policies, you may break or disable the functionally of some sites.

In the Cookies and Site Data section, you can manage the website data that Firefox stores. Here, you can clean out the cookies and cached data from websites. You can automatically have Firefox clean out this data when you close it, but that setting is in the History section (see below).

The Passwords section is, as the name implies, where you configure Firefox to save usernames and passwords or not. If you plan on using the Sync feature, you will want to have Firefox save this data.

The next section is the Autofill area. If you want Firefox to automatically fill out website forms with your data (name, phone, email address, etc.), make sure the Save and fill address and Save and fill payment methods checkboxes are selected. You can edit any saved data here, too.

In the History section is where you can have Firefox clear data when you close it. If you pull down the selections under Firefox will: and select Use custom settings for history, you get a few more options. I recommend that you check Clear history when Firefox closes box and then click on the Settings button.
Settings for clearing the history inside of Firefox
You can choose what items you want Firefox to delete when it is closed in the window that appears. I deselect everything but Cache. But this is strictly a personal preference.

Next is Permissions, and there are two (2) items you want to make sure are selected: Block pop-up windows and Warn you when websites try to install add-ons. Firefox Data Collection and Use comes next. It is your preference if you want to enable any of these options.

Under the Security section, make sure that Block dangerous and deceptive content, Block dangerous downloads, and Warn you about unwanted and uncommon software are selected. The Certificates section is, again, personal preference, but the default settings are just right.

The next panel on the left side menu is Sync. This is a cool feature if you have Firefox installed on multiple devices. I use this feature with a couple of computers and a smartphone. I love how it will sync saved passwords across all of my devices. Enough said.

The next panel is Firefox Labs. Here you can reset Firefox back to default and try some experimental features.

The More from Mozilla panel has links to some of their different products.

Now that we've checked/reset and changed the preferences let's look at the add-ons section. There are three (3) ways to get to it:

  • On the Settings page, click on the Extensions & Themes link at the bottom of the left-hand column.
  • Click on the Menu Button (3 horizontal bars) in the upper-right hand corner and select Add-ons and Themes.
  • On the Menu Bar, left-click on Tools and select Add-ons and Themes from the drop-down menu.

Once you have the Add-ons page up, you will find four (4) selections on the left side menu; Recommendations, Extensions, Themes, and Plugins.

The first selection is Recommendations, which, as the name implies, are extensions and themes that Firefox recommends. Pretty simple.

The second selection on the left side is Extensions. This is where you look for malicious apps that like to run inside Firefox. Go through the list here, and if you find one that you don't remember installing, just click the Enable / Disable slider on the right-hand side.
The Extensions options inside of Firefox
You will be prompted to restart Firefox to disable it altogether. Remember that even if you disable an extension, you can always enable it at a later date. Or if you find you don't need it at all, you can always delete it. But remember that if you delete an extension and then realize you did want it, you will have to reinstall it.

The next selection on the left side menu is Themes, and this is where you change the look of Firefox. If you don't like the default theme, you can always download a new tone using the Find more themes button at the bottom of the right-hand column.

The fourth selection down the left side menu is Plugins.
The Plugins options inside of Firefox
Plugins add support for different types of Internet content, like videos and encrypted media.

Now, if after going through the previous steps and Firefox is still not working the way it did when you installed it, there are two (2) things you can do. You can either reset it or uninstall/reinstall it. Usually, a reset will fix about 90% of Firefox problems, but sometimes, only an uninstall/reinstall will work. I always try a reset first.

To reset Firefox, you will need to have access to the Menu Bar. To get the Menu Bar to appear, just right-click the blank area above the Address bar and select Menu Bar from the context menu. Once you have the Menu Bar, left-click on Help and then More Troubleshooting Information.
Accessing the Troubleshooting Information inside of Firefox
When the Troubleshooting Information page appears, click on the Refresh Firefox button on the page's right side. You will be prompted on how you're about to reset Firefox back to its default settings. Click on Refresh Firefox, and Firefox will be reset back to its original default settings. It also creates a folder on your desktop called Old Firefox Data, just in case you need to restore anything, like your bookmarks.

Now, if that doesn't get Firefox back to normal, then the last resort is to uninstall/reinstall. This may take a little time to perform, but if you really want Firefox back to pristine condition, this is what it might take. There are two (2) ways to uninstall programs in Windows; the Settings app or the Control Panel.

Uninstall a program using the Settings app

  1. Click on the Start Windows logo menu, then Settings (the gear icon), then Apps. then Installed Apps.
  2. Scroll down the list of apps in the right-hand column until you find Mozilla Firefox.
  3. Highlight Mozilla Firefox and click on the three (3) horizontal dots to the right and select Uninstall.

Uninstall a program using the Control Panel

  1. In the search box next to the Start Windows logo button type Control Panel and click on it from the results.
  2. Select Uninstall a program (if viewing by category) or Programs and Features (if viewing by icons).
  3. Highlight Mozilla Firefox and click on the Uninstall button.

Once Mozilla Firefox is uninstalled, restart your computer. When your computer is rebooted, and you are logged back in, you will need to remove any traces of Firefox before reinstalling it. There are three (3) places that you will need to look for any leftover files, two (2) inside your user profile and one (1) inside of the Program Files directory. The files inside your user profile are hidden by default, but you can get there quickly by bringing up a Run dialog box (Windows Logo key Windows logo key + R) and typing or copy/paste the following lines:

%userprofile%/AppData/Local/Mozilla %userprofile%/AppData/Roaming/Mozilla

This will open the File Explorer to the locations of your Firefox user profile settings. If there is a folder named Firefox, go ahead and delete it. Next, you will have to navigate to the location of the Program Files directory and check under the folder named Mozilla Firefox. Its location is usually C:\Program Files\Mozilla Firefox, but it may be different if your Windows version is 32-bit or if you installed Firefox on a different drive. Once you get there, go ahead and delete it. Now you can download and reinstall Mozilla Firefox.

Free computer diagnostics

Repairing a PC can sometimes be expensive, and that is why we offer free basic in-shop diagnostics. Give one of our professional and experienced technicians a call at (602) 795-1111, and let's see what we can do for you.

Check out our reviews

Geeks In Phoenix LLC, BBB Business Review

This business is BBB Accredited

Customer service is #1

Here at Geeks in Phoenix, we take pride in providing excellent customer service. We aim to give the highest quality of service  from computer repair, virus removal, and data recovery.

Bring your computer to us and save

Repairing a computer can be time-consuming. That is why we base our in-shop service on the time we work on your computer, not the time it takes for your computer to work! From running memory-checking software to scanning for viruses, these are processes that can take some time.

Contact us

If you have any questions, please feel free to give us a call at (602) 795-1111  and talk with one of our Geeks. Or you can send us a message from our contact page , and one of our Geeks will get back to you as soon as possible. Or you can stop by and see us. Here are our hours and location.

Like Geeks in Phoenix on Facebook

Follow Geeks in Phoenix on Twitter

Watch Geeks in Phoenix on YouTube