Geeks in Phoenix

Geek Blog


How to get to and use the Advanced Boot Options inside of Windows 11

Have you ever needed to boot Windows 11 into Safe Mode? Or maybe restore Windows 11 using a Restore Point? You can do all these and more with the Advanced Boot Options inside Windows 11.

How to get to and use the Advanced Boot Options inside of Windows 11

Many people have never heard of the Advanced Boot Options in Windows 11. The Advanced Boot Options have been inside of Windows for several versions now. In Windows 7 and earlier versions, you could press the F7 key at boot to get to the Advanced Boot Options.

But starting with Windows 8, Microsoft changed how you get to the Advanced Boot Options. You can either get to the Advanced Boot Options inside of Windows 11 or when you log in to Windows 11.

So why would you want or need to get to the Advanced Boot Options? Some features can only be accessed through the Advanced Boot Options, like Safe Mode and UEFI / BIOS Settings.

Note: Accessing some of the features in the Advanced Boot Options may require a username, password, and a BitLocker decryption key. The BitLocker key is saved to your Microsoft account, so you may want to get the key before you attempt to access the Advanced Boot Options.

How to get to the Advanced Boot Options when logged in to Windows 11

How to get to the Advanced Boot Options when logged in to Windows 11

  1. Left-click on the Start button Windows logo to bring up the Start menu.
  2. In the list of pinned apps on the Start menu, left-click on Settings.
  3. Left-click on the System category in the left-hand column.
  4. Scroll down the right-hand column and left-click on Recovery.
  5. Under Advanced startup, left-click on Restart now.

How to get to the Advanced Boot Options when logged out of Windows 11

How to get to the Advanced Boot Options when logged out of Windows 11

  1. At the login screen, left-click on the Power icon in the lower right-hand corner. This will bring up the power options.
  2. Hold down the shift key while you left-click on Restart.

The following is a list of features you can access from the Advanced Boot Options.

The Windows 11 Choose an option screen

  • Continue - Exit and continue to Windows 11.
  • Use a device - Use a USB drive, network connections, or a Windows recovery disk.
    The Windows 11 Troubleshoot screen
  • Troubleshoot - Reset your PC or see advanced options.
    • Reset this PC - Lets you choose to keep or remove your personal files and then reinstalls Windows.
    • Advanced options
      The Windows 11 Advanced options screen
    • Startup Repair - Fix problems that keep Windows from loading.
    • Startup Settings - Change Windows startup behavior.
    • Command Prompt - Use the Command Prompt to perform advanced troubleshooting.
    • Uninstall Updates - Remove recently installed feature or quality updates from your computer.
    • UEFI Firmware Settings - Change settings in your computer's BIOS (Basic Input/Output System).
    • System Restore - Use a restore point on your computer to restore Windows.
    • System Image Recovery - Recover Windows using a system image file.
  • Turn off your PC - Turns your computer off.

For more on the Windows 11 Advanced Boot Options, check out our video on YouTube.

How to use Windows 10 Advanced Boot Options

Since I do computer repair for a living, there are times when I need to boot a Windows 10 system up into Safe Mode. But with newer computers utilizing UEFI (Unified Extensible Firmware Interface) and fast/safe boot features, this can be not easy. So here is how to use the Windows 10 Advanced Boot Options.

How to use Windows 10 Advanced Boot Options

In previous versions of Windows, getting to the advanced boot options was pretty easy. All you had to do was press the F8 key at startup. But with Windows 10, getting the advanced boot options is a little different. You can bring up the advanced boot options just one time or set it up permanently. Both require the system to be able to boot up into Windows 10 first.

Enable Window 10 Advanced Boot Options screen one-time

You can bring up the one-time Windows 10 boot options, either logged on or off. Since I repair computers for a living, I prefer not to log in under any user's profile. That way, I don't have to deal with any of the programs that may load when a user signs in. There are two (2) ways (logged in and logged out) of getting to the Windows 10 one-time boot options.

When you are logged in to Windows 10:

  1. Left-click on the Start Windows logo button.
  2. Left-click on Settings (the gear icon).
  3. Left-click on Update & Security.
  4. In the left column, left-click on Recovery.

    Windows 10 advanced startup option when logged in
  5. Under Advanced startup, left-click on Restart now. The computer will log you off and bring up the Choose an option screen.

When you are logged out of Windows 10:

  1. At the login screen, left-click on the Power button in the lower right-hand corner to bring up the different options.

    Windows 10 advanced startup option when logged out
  2. Hold down the Shift key on the keyboard and right-click on Restart. This will bring up the Choose an option screen.

When you get to the Choose an option screen:

    Windows 10 choose an option screen
  1. Left-click on Troubleshoot.

    Windows 10 troubleshoot screen
  2. Left-click on Advanced options.

    Windows 10 advanced options screen
  3. Left-click on Startup Settings.

    Windows 10 startup settings screen
  4. Left-click on the Restart button.

    Windows 10 standard advanced boot options screen
  5. When the Startup Settings page appears, select the number that coincides with the function you would like to perform.

Enable Window 10 Advanced Boot Options screen permanently

This option should be used very carefully. Not only do you have to edit the boot configuration of your Windows 10 computer, but once permanently enabled, you will have to select a boot option you want to use every time your computer starts or restarts. There is no timer for this screen as there was in previous versions of Windows. To edit the boot configuration, you will need to use an administrative command prompt.

How to open a Command Prompt with Administrator privileges in Windows 10

The first thing we have to do is turn on the Windows 10 Advanced Boot Options. Type or cut and paste the following code into an administrative command prompt:

bcdedit /set {globalsettings} advancedoptions true

To turn off the Windows 10 Advanced Boot Options, type or cut and paste the following code into an administrative command prompt:

bcdedit /set {globalsettings} advancedoptions false

You can also change the default boot manager used with the advanced boot options. The default is the Windows 10 standard version, but you can change it to the legacy version if you like the old DOS look.
Windows 10 legacy advanced boot options screen
To change to the legacy boot manager used in previous Windows versions, like Windows 7, you can type or cut and paste the following code into an administrative command prompt:

bcdedit /set {default} bootmenupolicy legacy

To restore the boot menu to the default, type or cut/paste the following code into an administrative command prompt.

bcdedit /set {default} bootmenupolicy standard

Six ways to make Windows 8 easier to use

Repairing computers for a living requires working on different versions of Windows. Windows 8 must have the most changes out of all the Windows releases I've seen in the last decade or so. It seems like what worked in previous versions of Windows doesn't work in Windows 8. So here are six ways to make Windows 8 easier to use.

1. Create Shutdown, Restart, and Logoff shortcuts

Microsoft made shutting down and restarting Windows 8 kind of hard. You have to go to the Start screen and log-off before you can get to these options. It just seemed like too many steps for me, so I just created my own shortcuts and toolbar for shutting down, restarting, and logging off.

How to create log-off, restart, and shutdown shortcuts on the Start screen in Windows 8.

2. Start menu replacements
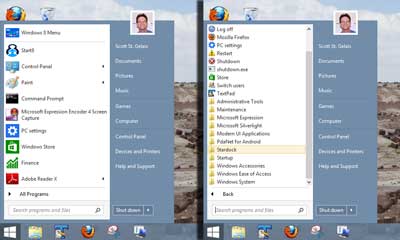
Windows 7 style Start menu in Windows 8 using Start8

If you're a die-hard Windows user and find the Start screen just doesn't work for you, there is hope. There are numerous third-party shell menus out there like Start8, Open Shell, and Pokki's Windows 8 Start Menu. Get one, and Windows 8 will feel just like Windows 7.

3. Power users command menu
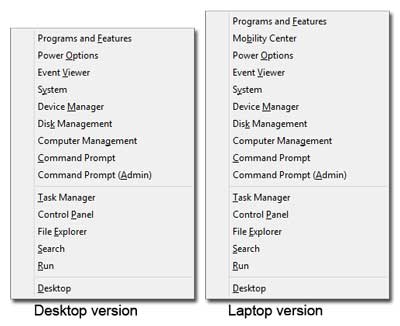
The desktop and laptop versions of the Windows 8 Power User command menu

This is one of the Windows logo key shortcuts for Windows 8 (see below), but I think it deserves to be listed separately. It contains links to some of the most used programs inside of Windows. From the Control Panel, Computer Management, and an Admin Command Prompt, if it's a commonly used Windows program, you'll probably find it here. Add it works on both the Desktop and Start screen.

Press To
Windows logo key + X Open the Power User command menu. There are over a dozen different apps you can run from this menu.

4. Start screen hidden search feature

Most people find it hard to find programs on the Start screen (Windows RT). But there is one cool feature that actually will help you search for programs. If you go to the Start screen and just type the first couple of letters of the name of the program you're looking for, Windows RT will bring up the Search charm with Apps pre-selected. Remember that there is no box or form field associated with this feature; you just type.

5. Windows 8 Keyboard shortcuts

The Windows logo key Windows logo key has been around since Windows 95, and with every new version of Windows, Microsoft just adds more key combinations. There are now forty (40) different Windows logo key shortcuts in Windows 8.

Windows logo key shortcuts for Windows 8.

6. Windows 8 restart options
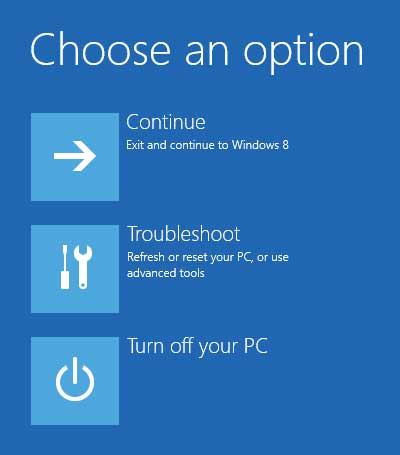
Windows 8 restart option screen

It used to be when you had a problem with Windows, you could press F8 at startup and get to the boot options. This was the primary way to start Windows in Safe Mode or boot to other media. But with newer computers using Unified Extensible Firmware Interface (UEFI) and Windows 8 booting faster, pressing F8 at boot is hard, if not impossible. But there are a couple of ways to get there once Windows 8 is started. Note: If you want to boot from removable media, make sure that the media you want to boot to is attached (USB) or inserted (CD/DVD) before proceeding.

If you are logged off:

  1. On the logon screen, in the lower right-hand corner, tap or left-click the Power Icon. Hold the Shift key down while you tap or left-click on Restart.
  2. On the restart options screen, tap or left-click Troubleshoot.
  3. Tap or left-click on Advanced options.
  4. From here, you can choose what startup settings you want to use or boot to a bootable CD/DVD or USB drive.

If you are logged on:

  1. Press the Windows logo key Windows logo key + C to bring up the Charms bar.
  2. Tap or left-click Change PC Settings.
  3. Tap or left-click General.
  4. Scroll down to Advanced startup and tap or left-click Restart now.
  5. On the restart options screen, tap or left-click Troubleshoot.
  6. Tap or left-click on Advanced options.
  7. From here, you can choose what startup settings you want to use or boot to a bootable CD/DVD or USB drive.

And if you would like to enable the Advanced Boot Options menu, you can do that too. Just remember that there is no timer on the Advanced Boot menu anymore. If enabled, Windows 8 will wait for user input every time the system starts. How to enable the Advanced Boot Options menu at start up in Windows 8.

How to enable the Advanced Boot Options menu at start up in Windows 8

When performing computer repair on a Windows-based system, the one feature I like is the Advanced Boot Options menu. By pressing the F8 key at startup, you would get the advanced boot options menu, enabling safe mode, boot logging, debugging, etc. With the fast startup options inside of Windows 8 and modern motherboards, getting to the boot options menu is hard. Here's how to get the Advanced Boot Options menu back in Windows 8.

Warning! There is no default timer when the Advanced Boot Menu option is enabled in Windows 8, and the system will wait for user input every time it starts or restarts. This works excellent when troubleshooting Windows 8. You can also choose which Windows Boot Manager (WBM) you want to use, Standard (Windows 8) or Legacy (Windows 7, Vista). The first thing we have to do is edit the Boot Configuration Data (BCD) store using an administrative command prompt and bcdedit.exe.

Bcdedit is a command-line tool that modifies the boot configuration data store. The boot configuration data store contains boot configuration parameters and controls how the operating system is booted. It needs to be run at an administrative command prompt.

How to open a Command Prompt with Administrator privileges in Windows 8.

How to enable/disable the advanced boot options menu in Windows 8

The standard advanced boot options menu in Windows 8

The first thing we have to do is turn on the advanced boot options. Type or cut/paste the following code into an administrative command prompt:

bcdedit /set {globalsettings} advancedoptions true<

To turn off the advanced boot options, type or cut / paste the following code into an administrative command prompt:

bcdedit /set {globalsettings} advancedoptions false

How to enable / disable the legacy advanced boot manager in Windows 8

The legacy advanced boot options menu in Windows 8

This next step will change which boot manager loads and is an option. If you want to boot using the older legacy boot manager used in Windows 7 and Vista, type or cut/paste the following code into an administrative command prompt:

bcdedit /set {default} bootmenupolicy legacy

To restore the boot menu to the default, type or cut/paste the following code into an administrative command prompt.

bcdedit /set {default} bootmenupolicy standard

Free computer diagnostics

Repairing a PC can sometimes be expensive, and that is why we offer free basic in-shop diagnostics. Give one of our professional and experienced technicians a call at (602) 795-1111, and let's see what we can do for you.

Check out our reviews

Geeks In Phoenix LLC, BBB Business Review

Customer service is #1

Here at Geeks in Phoenix, we take pride in providing excellent customer service. We aim to give the highest quality of service  from computer repair, virus removal, and data recovery.

Bring your computer to us and save

Repairing a computer can be time-consuming. That is why we base our in-shop service on the time we work on your computer, not the time it takes for your computer to work! From running memory checking software to scanning for viruses, these are processes that can take some time.

Contact us

If you have any questions, please feel free to give us a call at (602) 795-1111  and talk with one of our Geeks. Or you can send us a message from our contact page contact page , and one of our Geeks will get back to you as soon as possible. Or you can stop by and see us. Here are our hours and location.

Like Geeks in Phoenix on Facebook

Follow Geeks in Phoenix on Twitter

Watch Geeks in Phoenix on YouTube