Geeks in Phoenix

Geek Blog


How to replace a CD/DVD/BD drive in your desktop computer

When it comes to desktop computer repair, one of the most common hardware failures is CD/DVD/BD drives. If you're having problems with getting the disk tray to eject or disks are not being recognized, it may be time to replace it. Here's how to replace a CD/DVD/BD drive in your desktop computer.

How to replace a CD/DVD/BD drive in your desktop computer

So you're tired of trying to get your old desktop CD/DVD/BD drive to work and are ready to replace it with a new one. Having to use a paper clip to manually eject your computer's CD/DVD/BD drive tray can get old quick. Replacing a desktop CD/DVD/BD drive is relatively easy; you have to make sure you get one with the correct connections and dimensions.

Find a new drive

The majority of CD/DVD/BD drives on the market nowadays will have SATA (Serial ATA) connectors for data and power. But there are still quite a few older systems that still use PATA (Parallel ATA) for data and 4 Pin Molex for power. SATA type drives are the de facto standard, so finding PATA replacement drives can be tricky. Newegg and TigerDirect are good places to find these older style drives.

SATA and PATA drive connections
PATA and SATA drive connections

Desktop CD/DVD drives have standard width and height dimensions, so all you have to do is check your existing drive's depth. Sometimes you have room to put a deeper drive in, and sometimes you don't. Always check to see what kind of space you have available before purchasing a replacement drive.

Uninstall the old software

Once you have your new CD/DVD/BD drive, you will need to uninstall the software that came with your old CD/DVD/BD drive. It's usually a version of Nero or PowerDVD, and it is branded to your old drive. Once you remove the old drive, the software that came bundled with it won't work anymore. Your new drive should have come with its own disk burning software.

Install the new drive

From here, we need to turn the computer off, disconnect the power cord from the back of the system, and open up the case. Now there are two possible ways of mounting the CD/DVD/BD drive in the case: screws or quick release rails. You may have to remove the front bezel from the case to access the CD/DVD/BD drive, as it will need to come out the front of the case. Please note the connections and remove the old drive and replace it with the new one.

Drives attached by screws and quick release rails

Install the new software

Once you get the system back together, power it up, and let Windows discover the new CD/DVD/BD drive. Windows may require a restart to finalize the setup. After that, you are ready to install the software that came with the new drive.

How to check your desktop computer for failed capacitors

Is your desktop computer running slower than usual? Does it randomly or frequently freeze up or restart? Or maybe it doesn't boot to the operating system or even boot at all. If so, your computer could have a failed capacitor.

Every computer repair shop has its own set of standard procedures, and we are no different. The very first thing we do when someone brings in a desktop computer is check for blown capacitors. With a quick visual inspection, we can spot a costly computer repair. And you can too. Here's how to inspect your desktop computer for failed capacitors.

Symptoms of bad capacitors

Now before you go and take your system apart, let's take a look at the symptoms of a failed capacitor. Does your computer have any of the following problems?

  • Runs slow
  • Randomly freezes up
  • Randomly / constantly restarts
  • Won't boot to an operating system
  • Won't start at all

If so, it might be worth the time to take a look inside your computer.

Types of capacitors

Visual differences between water based and polymer based electrolyte capacitors
Visual differences between water-based and polymer-based electrolyte capacitors

There are primarily two types of capacitors used on computer circuit boards (motherboards, graphics cards, etc.), water-based electrolyte and polymer-based electrolyte. I have seen the majority of failures with water-based capacitors, but polymer-based do fail too, just not as often. From 1999 thru 2007, millions of faulty water-based capacitors were produced by some Taiwanese manufacturers. The electrolyte will evaporate and turn into a gas, thus bulging the case and leaking in some cases.

Checking for bad capacitors

Top view of a row of failed capacitors
Side view of a failed capacitor

The following can be performed with the computer in-place, provided you have enough room. If not, you will have to move your computer to a location that does. Please take a photo of where everything goes first and completely disconnect all cables attached to it.

  1. Power down your computer and
    • Remove the power cord from the back of the power supply (in-place inspection)
      or
    • Disconnect all cables (relocated inspection)
  2. Open the case.
  3. Remove any obstructions, like fan shrouds, so that you can view the entire motherboard and other add-in cards.
  4. Using a flashlight, visually inspect all capacitors on the circuit boards (motherboard, graphics card, etc.). You may need to remove some of the add-in cards to examine them physically. Visual symptoms include:
    • Bulging or cracking of the vent on top
    • Casing sitting crooked on board as the base may be pushed out
    • Electrolyte that may have leaked out on to motherboard (rust-colored)
    • Case is detached or missing

What to do if you find a bad capacitor

If you do find a bad capacitor, there are three (3) options. First thing, if your computer is still operable, backup your data ASAP (see links below). There are many factors involved in deciding which option to choose, the system's age, and cost being the two major ones.

  1. Repair the motherboard
    You can replace the bad capacitor yourself (see link below) or have a trained professional do it for you.
  2. Replace the motherboard
    eBay is a great place to find a refurbished motherboard.
  3. Replace the computer
    If you've been looking for an excuse to get a new computer, you just found one. Or maybe two or three.

For more information on failed capacitors:

Capacitor plague - Wikipedia

For more information on how to replace failed capacitors:

Recapping your motherboard - Badcaps.net

For more information on how to backup your computer:

Windows XP Backup

Windows Vista / Windows 7 Backup

Windows 8 Backup

Windows 10 Backup

A computer that randomly and frequently freezes up

When it comes to computer repair, you have to be a detective of sorts. And once in a while, I come across a really good mystery. I recently got an HP M7360N in the shop that would randomly freeze-up in Windows XP when you moved the mouse. It would run perfectly fine in Safe Mode. Maybe a bad driver?

A check of the event logs yields absolutely nothing, not a single error. I check Device Manager and find the hard drive controller listed under the Unknown category, even though it is correctly identified as an Intel controller. I uninstall it inside Device Manager and then scan for hardware changes. The hard drive controller reinstalls back into the Unknown category.

The system is still freezing up randomly when the mouse is moved. I tried a PS2 and USB mouse and got the same results with both. I disable all non-essential drivers and reboot with no change. I download the original and latest drivers for the system, trying all with no luck. Maybe a corrupt installation?

I create an image of the hard drive and then wipe it clean. Using the supplied recovery disks, I proceed to re-install the operating system and recovery partition. The system froze-up three times during reinstallation. But this time, the hard drive controller is under the correct category, IDE ATA/ATAPI controllers. It's starting to look like a hardware issue.

I run a few DOS-based utilities to test the memory, hard drive, etc. with no luck. I even try the HP recovery diagnostics. Every test I run tells me that there is nothing wrong with the hardware. Using the keyboard only in Windows, I can install another utility to test all of the motherboard components. I allow it to run for six hours, and the system passes every test.

The BIOS is the next place I look and find it's a few versions older than what is currently available for download. I download and install the latest BIOS version, and it still keeps freezing up randomly when the mouse is moved. I start searching the internet for clues.

After a few different search queries, I come across an article at Badcaps.net discussing symptoms of capacitor failure on motherboards, one being 'system randomly and frequently freezes'. I check the motherboard thoroughly and find no capacitors that look bad. I start checking the expansion (add-in) cards, and all at once, the mystery was solved.

There on the graphics card was a bank of capacitors that the tops were swollen.
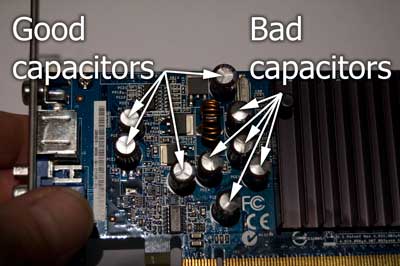
Top view of the graphics card showing the difference between a good and bad capacitors
Top view of the graphics card showing the difference between good and bad capacitors.
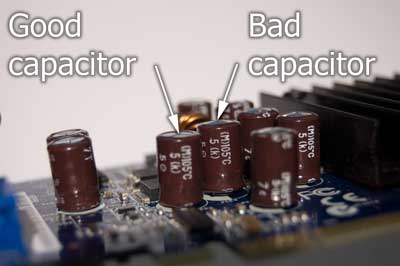
Side view of the graphics card showing the difference between a good and bad capacitor
Side view of the graphics card showing the difference between a good and a bad capacitor.

The movement of the mouse on the screen was causing the graphics card to freeze-up. I re-assembled the system with a new graphics card, and the issue was gone. Another computer repair mystery was solved.

How to clean the dust out of your desktop computer

Updated July 18, 2024

Living in the desert, we're no strangers to dust. It's a persistent issue that can clog up air vents, heat sinks, and cooling fans inside your computer. Moreover, dust is a conductor of electricity, making it a potential hazard. To stay ahead of these issues, it's crucial to clean the inside and outside of your computer at least every three (3) months, and even more frequently if you live in particularly dusty areas like Phoenix. I personally do it monthly, given that my primary system is in an open case (Antec Skeleton).

Let's start by turning off the computer and unplugging the power supply. Now, with the system de-energized, we can begin cleaning it. Since this can be messy, I recommend that you do this outdoors. This does mean disconnecting all attached devices/peripherals, but you won't be blowing the dust back into the surrounding area.

*** Note: When using compressed air, it's important to exercise caution. Always use a non-metallic utensil, like a wooden skewer, to hold any fan in place as you clean it. This prevents the fan motor from being damaged by spinning it too fast. As you clean your computer, be sure to check for cooling fans that spin freely with your finger. If you find a fan that is hard to spin, it may have failed and needs to be replaced. ***

First, let's open the case. If the front panel of your case can be safely removed, go ahead and remove it too. Using a can of compressed air or air compressor and a non-metallic utensil, let's start inside and work our way out.

Typical computer case with front and side panels removed
Typical case with front and side panels removed

Clean the CPU fan & heat sink fins
Clean the CPU fan and heat sink fins

Clean the vents and/or cooling fan on the power supply
Clean the vents and cooling fan on the power supply

If your system has a graphics card, clean the fan and/or heat sink
If your system has a graphics card, clean the fan and heat sink

Clean all heat sinks and open slots

Clean all case fans
Clean all case fans

Clean all openings in case and connection points
Clean all openings in the case and connection points

Once the dust has settled, reassemble the case, re-attach all devices, and you are all done.

When your motherboard does not save settings it may be time to replace the CMOS battery

Your motherboard may forget the time and date or the onboard device settings at some point in time. A Complementary Metal-Oxide-Semiconductor (CMOS) is used on the computer's motherboard to save the system settings (time and date, on-board devices, etc.). It uses an on-board battery to keep it powered when the system is turned off. The standard replacement is a CR2032 lithium battery.

Typical CMOS battery
A generic CR2032 lithium cell

Common indicators that the CMOS battery needs to be replaced

  • You start your computer and almost immediately get a message similar to this: System settings have changed. Press F1 to resume, F2 to Setup.
  • You run your computer 24/7, only restarting for maintenance. You notice that the on-board clock is running slow and not keeping the correct time.

Replacing the CMOS battery

  1. With the system turned off, unplug the power cord.
  2. Open the computer case.
  3. Locate the CMOS battery.
    Typical CMOS battery location
  4. Press the battery release lever, and the battery will pop up.
    CMOS battery release lever
    CMOS battery released
  5. Replace with a new battery.
  6. Close the computer case and plug in the power cord.

Free computer diagnostics

Repairing a PC can sometimes be expensive, and that is why we offer free basic in-shop diagnostics. Give one of our professional and experienced technicians a call at (602) 795-1111, and let's see what we can do for you.

Check out our reviews

Geeks In Phoenix LLC, BBB Business Review

Customer service is #1

Here at Geeks in Phoenix, we take pride in providing excellent customer service. We aim to give the highest quality of service  from computer repair, virus removal, and data recovery.

Bring your computer to us and save

Repairing a computer can be time-consuming. That is why we base our in-shop service on the time we work on your computer, not the time it takes for your computer to work! From running memory checking software to scanning for viruses, these are processes that can take some time.

Contact us

If you have any questions, please feel free to give us a call at (602) 795-1111  and talk with one of our Geeks. Or you can send us a message from our contact page , and one of our Geeks will get back to you as soon as possible. Or you can stop by and see us. Here are our hours and location.

Like Geeks in Phoenix on Facebook

Follow Geeks in Phoenix on Twitter

Watch Geeks in Phoenix on YouTube