Is your desktop computer running slower than usual? Does it randomly or frequently freeze up or restart? Or maybe it doesn't boot to the operating system or even boot at all. If so, your computer could have a failed capacitor.
Every computer repair shop has its own set of standard procedures, and we are no different. The very first thing we do when someone brings in a desktop computer is check for blown capacitors. With a quick visual inspection, we can spot a costly computer repair. And you can too. Here's how to inspect your desktop computer for failed capacitors.
Symptoms of bad capacitors
Now before you go and take your system apart, let's take a look at the symptoms of a failed capacitor. Does your computer have any of the following problems?
- Runs slow
- Randomly freezes up
- Randomly / constantly restarts
- Won't boot to an operating system
- Won't start at all
If so, it might be worth the time to take a look inside your computer.
Types of capacitors

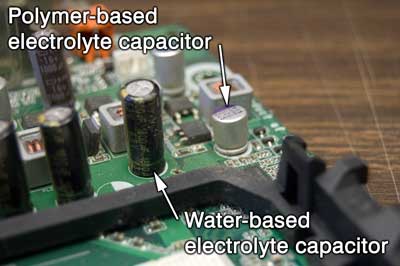
Visual differences between water-based and polymer-based electrolyte capacitors
There are primarily two types of capacitors used on computer circuit boards (motherboards, graphics cards, etc.), water-based electrolyte and polymer-based electrolyte. I have seen the majority of failures with water-based capacitors, but polymer-based do fail too, just not as often. From 1999 thru 2007, millions of faulty water-based capacitors were produced by some Taiwanese manufacturers. The electrolyte will evaporate and turn into a gas, thus bulging the case and leaking in some cases.
Checking for bad capacitors

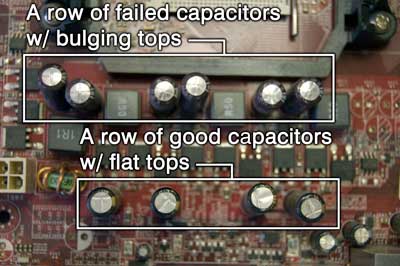
Top view of a row of failed capacitors

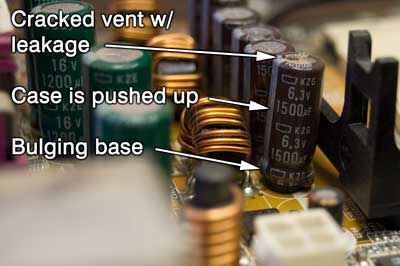
Side view of a failed capacitor
The following can be performed with the computer in-place, provided you have enough room. If not, you will have to move your computer to a location that does. Please take a photo of where everything goes first and completely disconnect all cables attached to it.
- Power down your computer and
- Remove the power cord from the back of the power supply (in-place inspection)
or
- Disconnect all cables (relocated inspection)
- Open the case.
- Remove any obstructions, like fan shrouds, so that you can view the entire motherboard and other add-in cards.
- Using a flashlight, visually inspect all capacitors on the circuit boards (motherboard, graphics card, etc.). You may need to remove some of the add-in cards to examine them physically. Visual symptoms include:
- Bulging or cracking of the vent on top
- Casing sitting crooked on board as the base may be pushed out
- Electrolyte that may have leaked out on to motherboard (rust-colored)
- Case is detached or missing
What to do if you find a bad capacitor
If you do find a bad capacitor, there are three (3) options. First thing, if your computer is still operable, backup your data ASAP (see links below). There are many factors involved in deciding which option to choose, the system's age, and cost being the two major ones.
- Repair the motherboard
You can replace the bad capacitor yourself (see link below) or have a trained professional do it for you.
- Replace the motherboard
eBay is a great place to find a refurbished motherboard.
- Replace the computer
If you've been looking for an excuse to get a new computer, you just found one. Or maybe two or three.
For more information on failed capacitors:
Capacitor plague - Wikipedia
For more information on how to replace failed capacitors:
Recapping your motherboard - Badcaps.net
For more information on how to backup your computer:
Windows XP Backup
Windows Vista / Windows 7 Backup
Windows 8 Backup
Windows 10 Backup
2492cea7-a738-4050-bdee-bade0123870e|0|.0|96d5b379-7e1d-4dac-a6ba-1e50db561b04