Geeks in Phoenix

Geek Blog


Windows logo key shortcuts for Windows 10

Updated October 16, 2020

Twenty-five years ago, in 1995, Microsoft released Windows 95 with a new way to navigate the GUI (Graphic User Interface) called the Start menu. To make it easy to use, they added a new key to the standard keyboard called the Windows logo key and added some useful shortcuts. Since then, Microsoft has integrated Windows logo key shortcuts into every version of Windows. Here's is a complete list of Windows logo key shortcuts for Windows 10.

Windows logo key shortcuts for Windows 10

There are now almost fifty different Windows logo key shortcuts inside Windows 10 (all of them are listed below). For more keyboard shortcuts for Windows, see the links at the bottom of this article.

Windows logo key shortcuts for Windows 10

Press To
Windows logo key Start menu
Windows logo key + A Open action center
Windows logo key + D Show desktop
Windows logo key + E Open File Explorer
Windows logo key + F Open Feedback Hub
Windows logo key + H Share
Windows logo key + I Settings
Windows logo key + K Connect to devices
Windows logo key + L Switch users (Lock computer if on a domain)
Windows logo key + M Minimize all windows (desktop)
Windows logo key + P Project options
Windows logo key + R Run...
Windows logo key + S Opens Cortana with search box highlighted
Windows logo key + T Set focus on taskbar and cycle through pinned / running desktop apps
Windows logo key + U Ease of Access Center
Windows logo key + V Cycle through notifications (+Shift to go backward)
Windows logo key + W Opens the Start menu with the Search box highlighted
Windows logo key + X Quick link power user commands (Opens Windows Mobility Center if present)
Windows logo key + 1-9 Go to the app at the given position on the taskbar
Windows logo key + + (plus) Zoom in (Magnifier)
Windows logo key + - (minus) Zoom out (Magnifier)
Windows logo key + , (comma) Peek at the desktop
Windows logo key + Enter Open Narrator
Windows logo key + Spacebar Switch input language and keyboard layout
Windows logo key + Tab Show all open apps and view additional desktops
Windows logo key + Esc Exit Magnifier
Windows logo key + Home Minimize non-active desktop windows
Windows logo key + Pause/Break System Properties
Windows logo key + Left Arrow Snap desktop window to the left (+Shift to move window to left monitor)
Windows logo key + Right Arrow Snap desktop window to the right (+Shift to move window to right monitor)
Windows logo key + Up Arrow Maximize desktop window (+Shift to keep width)
Windows logo key + Down Arrow Restore/minimize desktop window (+Shift to keep width)
Windows logo key + F1 Windows Help and Support
Windows logo key + Ctrl + D Add a desktop
Windows logo key + Ctrl + Right arrow Switch between desktops you’ve created on the right
Windows logo key + Ctrl + Left arrow Switch between desktops you’ve created on the left
Windows logo key + Ctrl + F4 Close the desktop you’re using
Windows logo key + Shift + Right arrow Move an app to a monitor on the right
Windows logo key + Shift + Left arrow Move an app to a monitor on the left
The following Windows logo key shortcuts were added in the Creators update (Version 1703).
Windows logo key + G Open the Game bar
Windows logo key + Alt + G Record the last few moments of gameplay (You can change the amount of time recorded in Game bar > Settings.)
Windows logo key + Alt + R Start/stop recording
Windows logo key + Alt + Print Screen Take a screenshot of your game
Windows logo key + Alt + T Show / hide the recording timer
Windows logo key + Alt + M Start / stop microphone recording
The following Windows logo key shortcuts were added in the Fall Creators update (Version 1709).
Windows logo key + Period (.) or Semicolon (;) Open the emoji, kaomoji and symbol panel
Windows logo key + H To open a dictation window
The following Windows logo key shortcut was added in the Windows 10 feature update (Version 1809).
Windows logo key + Shift + S Open the Snipping Bar
The following Windows logo key shortcut was modified in the Windows 10 feature update (Version 1809).
Windows logo key + V Displays clipboard history

For more keyboard shortcuts for Windows, see the links below:

Windows logo key keyboard shortcuts

General keyboard shortcuts

Natural keyboard shortcuts

Dialog box keyboard shortcuts

Accessibility keyboard shortcuts

Windows Explorer keyboard shortcuts

How to open a Command Prompt with Administrator privileges in Windows 10

Updated July 20, 2020

There may be a time when you need to bypass the Windows GUI (Graphical User Interface) and enter commands directly into an Administrative Command Prompt. Quite a few of our favorite Geeks Tips require the use of it. So here's how to open a Command Prompt with Administrator privileges in Windows 10.

The Command Prompt with Administrator privileges in Windows 10

Open a Command Prompt with Administrator privileges in Windows 10

  1. Left-click on the Start Windows logo button.
  2. Scroll down the program list and then left-click on the Windows System folder to expand.
  3. Right-click on Command Prompt.
  4. On the context menu that appears, hover your cursor over More and then left-click on Run as administrator. If you're prompted for an administrator password or confirmation, type the password or provide confirmation.

or

  1. In the search box next to the Start Windows logo button, type Command Prompt.
  2. In the list of results, the Command Prompt should be highlighted.
  3. In the right-hand column under Command Prompt, there is an options menu. Left-click on Run as administrator. If you're prompted for an administrator password or confirmation, type the password or provide confirmation.

With the Windows 10 Creators Update (version 1703), the Command Prompt on the Power User menu was replaced with Windows PowerShell. But it can be changed back by changing the default setting for the Taskbar.

How to restore the Command Prompt option on the Power Users menu in Windows 10

  1. Right-click on an empty space on the Taskbar.
  2. On the context menu that appears, left-click on Taskbar settings.
  3. In the right-hand column, find the setting labeled Replace Command Prompt with Windows PowerShell in the menu when I right-click the start button or press Windows key + X.
  4. Move or left-click on the slider to the off position.

Using the Power User menu to open a Command Prompt with Administrator privileges in Windows 10

  1. Right-click on the Start Windows logo button to bring up the Power User command menu.
  2. Left-click on Command Prompt (Admin). If you're prompted for an administrator password or confirmation, type the password or provide confirmation.

or

  1. Press the Windows logo key Windows logo key + X to bring up the Power User command menu.
  2. Press the letter A to select Command Prompt (Admin). If you're prompted for an administrator password or confirmation, type the password or provide confirmation.

How to list everything inside of the Windows 10 Control Panel in one folder

When it comes to finding something in the Control Panel in Windows 10, you have to know where to look. You could spend hours going through all of the categories. But what if you could see everything that was inside of the Control Panel in just one window. Here's how to list everything inside of the Windows 10 Control Panel.

How to list everything inside of the Windows 10 Control Panel in one folder

This shortcut was initially nicknamed 'God Mode' when it was first discovered inside of Windows Vista. It is a registry key that, when rendered inside the File Explorer, displays the Control Panel's complete contains. No searching through categories and subcategories, everything is right there in one folder.

How to create an expanded Control Panel folder

Windows 10 expanded Control Panel code
1. Highlight the following code, right-click on it, and select Copy.

Control Panel Expanded.{ED7BA470-8E54-465E-825C-99712043E01C}

Note:
For this article, I am going to use the name Control Panel Expanded. You can use whatever name you like, just keep the GUID (Global Unique Identifier) extension (.{ED7BA470-8E54-465E-825C-99712043E01C}) at the end.

Create a new Desktop folder in Windows 10
2. Right-click on the Desktop background and select New > Folder.

Paste Windows 10 expanded Control Panel code into folder name
3. Right-click on the new folder name and select Paste.

New expanded Control Panel icon on Desktop
4. You now have a folder on your Desktop that has a Control Panel icon. Just double-click to open it.

How to speed up the boot time of your computer

Updated January 3, 2023

Does it seem like your computer takes forever to boot up? Waiting for your Windows-based computer to boot can be quite frustrating. But there are a few things you can do. Here is how to speed up the boot time of your computer.

How to speed up the boot time of your computer

Check the drive for errors

If your computer has a Hard Disk Drive (HDD), this is the first thing you want to do. HDD's are notorious for not writing data back to the exact place where the data was read. Little known fact, but Microsoft didn't invent the Disk Operating System (DOS). It bought Quick and Dirty Operating System (QDOS) in the early '80s and renamed it MS-DOS. If you have a Solid State Drive (SSD), you can bypass this step, as SSD's don't have moving parts.

Check for hardware issues first with the software provided by the manufacturer of your HDD. The Ultimate Boot CD (UBCD) has all of the significant drive manufacturer's diagnostics software built-in, so this is always the right place to start.

Diagnose computer hardware issues with the Ultimate Boot CD

Then check for software issues with Windows built-in CHKDSK.

Check your hard disk for errors in Windows Vista / Windows 7

Check your hard drive for errors in Windows 8

Check your hard drive for errors in Windows 10

How to check your drive for errors in Windows 11

Uninstall any unwanted programs

This one is a no-brainer. Allot of adware/junkware will load itself up at boot, causing an increase in boot time. It also takes away resources that could be used by programs you want to run. The first thing to do is to go to the Control Panel > Programs > Programs and Features. Then go through the list of programs to see which ones can be uninstalled. Remember that you can change the way the programs are listed just by clicking on the column name. I like to know when a program was installed because you can find many unwanted clutter installations that way.

Remove unwanted items from startup

MSCONFIG inside of Windows 11

You can temporarily disable programs and services that start up with Windows using MSCONFIG. MSCONFIG is a diagnostic tool built into Windows that allows you to troubleshoot boot issues. You can enable and disable various boot settings, including programs and services that startup with Windows. Just open an Administrator Command Prompt and type MSCONFIG.

How to open a Command Prompt with Administrator privileges in Windows Vista and Windows 7

How to open a Command Prompt with Administrator privileges in Windows 8

How to open a Command Prompt with Administrator privileges in Windows 10

How to open a Command Prompt with Administrator privileges in Windows 11

Once you have your system fine-tuned with MSCONFIG, you could leave your system running in diagnostic mode by having MSCONFIG not displayed at startup. That's one of the first things I check for on systems I work on. It just too easy to let it go. But if you want to permanently remove the items you have disabled in MSCONFIG, here's how to do it.

The Autoruns Everything tab inside of Windows 11
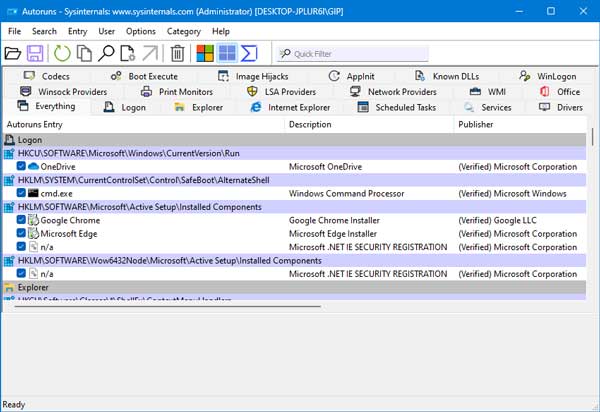
The Everything tab inside of Autoruns

  1. Download and extract the latest version of Autoruns from Microsoft.
  2. Open MSCONFIG and make a note of each item you have disabled.
  3. On the General tab of MSCONFIG, select Normal startup, then left-click Apply and OK. When prompted, close MSCONFIG and do not restart the computer. Yes, this will enable all of the items you have disabled, but we will delete them next.
  4. Open the folder where you saved Autoruns.exe, right-click on it and select Run as Administrator.
  5. Once it is done scanning, you need to find the items you had disabled with MSCONFIG. Check the Services and the Logon tabs first. Remember that you can check the logon items for each user with the User pull-down menu. Once you find your things, you can 1) disable it with the checkbox on the left or 2) you can right-click on it and select Delete.

Clean up the drive

It's time to clean up some of the clutter that seems to pile up. Using Windows built-in Disk Cleanup tool (cleanmgr.exe) will quickly clean out all sorts of crap, like user temp files and temporary Internet files. If you want to go a little further with cleaning your drive, download a copy of CCleaner.

Free up more disk space with Windows Vista / Windows 7 Disk Cleanup

Clean up your hard drive in Windows 8 with Disk Cleanup

Clean up Windows 10 with Disk Cleanup

Clean up your Windows 10 computer using the Storage feature

Clean up Windows 11 with Storage Sense and Disk Cleanup

Clean up and optimize your computer for free with CCleaner

Defragment your HDD

This is another step that only pertains to HDD's since SSD's don't get fragmented. If your HDD is fragmented, it takes it longer to find and load files. Optimizing the HDD structure will always give you a little more speed. You can use Windows built-in Optimize and Defragment drive tool or another disk utility like Defraggler from Piriform.

Geek Tip: If you use run the Disk Defragmenter from an Admin Command Prompt, you can use the /B switch to optimize the boot performance. For example, if you want to optimize booting on the C: drive, you would use the following:

Defrag C: /B

Using Disk Defragmenter in Windows Vista

Using Disk Defragmenter in Windows 7

Defragment and Optimize your hard drive in Windows 8

How to defragment and optimize your drive in Windows 10

How to defragment and optimize your drive in Windows 11

Perform advanced disk defragmentation with Defraggler from Piriform

If you want to go the extra mile with optimizing your HDD, remove the swap file before you defrag and restore it after you're done. And when you restore it, go ahead and use the following calculations.

The minimum pagefile size is one and a half (1.5) x the amount of memory. The maximum pagefile size is three (3) x the minimum pagefile size. Let's say you have 2 Gb (2,048 Mb) of memory. The minimum pagefile size would be 1.5 x 2,048 = 3,072 Mb and the maximum pagefile size would be 3 x 3,072 = 9,216 Mb.

Speed up your Windows 8 computer with ReadyBoost

Does your Windows 8 computer take a long time to boot up or open programs? Does it seem like the hard drive light is always on? Then you might be able to speed up your computer by using ReadyBoost inside of Windows 8 and Windows 8.1.

ReadyBoost testing a USB flash drive for capability in Windows 8

ReadyBoost is a disk caching software that allows you to use a compatible storage device (USB flash drive, SD card) as a hard drive cache for increasing the read access time to the hard drive. ReadyBoost will work with Hard Disk Drives (HDDs) and not Solid State Drives (SSD's), as SSD's already have fast read access times.

ReadyBoost options for a USB flash drive inside of Windows 8

You can use USB flash drives, SD cards, flash memory, or SSD's with ReadyBoost. Keep in mind that you will need to keep the storage device attached to the computer at all times. For desktops, think about using a spare USB port or two on the back of your system. ReadyBoost supports USB 2.0 or higher, so USB 3.0 port(s) would be preferred. For laptops, think SD card (if you have an SD reader built-in).

You will also need to format your storage device in NTFS or exFAT to get a ReadyBoost cache file larger than 4GB. The maximum ReadyBoost cache size is 32GB, and you can have up to eight (8) storage devices on one (1) system for a maximum total of 256GB. The recommended ratio of ReadyBoost memory to system memory is 1:1 to 2.5:1

Here are some tips for selecting a storage device from Microsoft's website:

The minimum amount of available space recommended for ReadyBoost to effectively speed up your computer is 1 GB.

For best results, use a flash drive or flash memory card with available space of at least double the amount of memory (RAM) in your computer, and preferably four times as much memory. For example, if your computer has 1 GB of RAM and you plug in a 4 GB USB flash drive, set aside at least 2 GB on the flash drive to get the best performance gain from ReadyBoost, and preferably the entire 4 GB. How much memory you need depends on how you use your computer. Keeping a lot of programs open at once uses more memory.

Give ReadyBoost 2 GB to 4 GB of space for the best results on most computers. You can reserve more than 4 GB of space for ReadyBoost on most flash drives and flash memory cards. (Storage devices formatted with the older FAT32 file system can't store more than 4 GB.) You can use a maximum of 32 GB of available space on any single removable storage device with ReadyBoost and up to 256 GB total per computer (by inserting up to eight USB flash drives or flash memory cards into the same computer).

To work with ReadyBoost, a USB flash drive must support USB 2.0 or higher. Your computer must have at least one free USB 2.0 port where you can plug in the flash drive. ReadyBoost works best if you plug the flash drive into a USB port directly on the computer, rather than into an external USB hub shared with other USB devices.

If you want to be sure a USB flash drive works with ReadyBoost, look for a note from the manufacturer that the flash drive is "Enhanced for ReadyBoost." Not all manufacturers list this on their packaging. If there is no mention of ReadyBoost compatibility, the flash drive still might work with ReadyBoost.

There are many different kinds of flash memory cards, such as CompactFlash and Secure Digital (SD) memory cards. Most memory cards work with ReadyBoost. Some SD memory cards don't work well with ReadyBoost due to issues with the SD card interface. ReadyBoost will display a warning message if you attempt to use one of these cards.

How to turn on ReadyBoost in Windows 8 / Windows 8.1

  1. Insert the storage device.
  2. Open the File Explorer:
    A. Swipe in from the screen's right edge or press the Windows logo key Windows logo key + C to bring up the Charms bar and then tap or left-click Search. Enter File Explorer in the search box, and then tap or left-click Apps. Tap or left-click File Explorer in the search results.
    B. On the Desktop, left-click on the File Explorer (manila folder) icon on the Taskbar.
    C. Press the Windows logo key Windows logo key + E.
  3. Right-click on the storage device you want to use with ReadyBoost and select Properties.
  4. From the Properties dialog box, select the ReadyBoost tab.
  5. Select your choice of options and click on Apply.

Free computer diagnostics

Repairing a PC can sometimes be expensive, and that is why we offer free basic in-shop diagnostics. Give one of our professional and experienced technicians a call at (602) 795-1111, and let's see what we can do for you.

Check out our reviews

Geeks In Phoenix LLC, BBB Business Review

Customer service is #1

Here at Geeks in Phoenix, we take pride in providing excellent customer service. We aim to give the highest quality of service  from computer repair, virus removal, and data recovery.

Bring your computer to us and save

Repairing a computer can be time-consuming. That is why we base our in-shop service on the time we work on your computer, not the time it takes for your computer to work! From running memory checking software to scanning for viruses, these are processes that can take some time.

Contact us

If you have any questions, please feel free to give us a call at (602) 795-1111  and talk with one of our Geeks. Or you can send us a message from our contact page contact page , and one of our Geeks will get back to you as soon as possible. Or you can stop by and see us. Here are our hours and location.

Like Geeks in Phoenix on Facebook

Follow Geeks in Phoenix on Twitter

Watch Geeks in Phoenix on YouTube