Everyone wants their computer to last forever. But the reality is the average life span of a computer is 3-5 years. Allot of times, you can get a computer to run for over a decade with common sense and regular maintenance. Here's how to keep your computer running longer.
Keep your computer clean
As the saying goes, "A clean computer is a happy computer," and it's true. A dust-free system will run cooler and have less chance of creating a short circuit (dust is a conductor of electricity). Visually inspecting your computer every month or so and cleaning as needed can extend its life. If a fan fails to cool, the extra heat could damage the hardware.
A while back, I wrote an article on cleaning the dust out of your computer that covered essential removal from desktops. The same holds for laptops too. But there are just a couple of areas on a laptop that you have to pay attention to, the air vents. Since the cooling vents usually are on the bottom, they can and will draw in lint, fuzz, pet hair, and other debris. If they get clogged up, your laptop could overheat and damage the system.
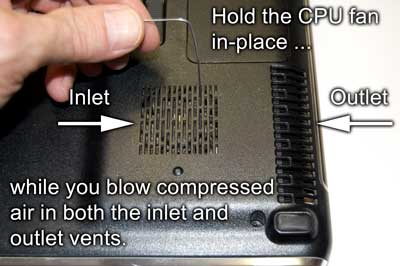
How to clean a laptop CPU fan
In the article 'How to clean the dust out of your computer', I talk about using non-metallic rods (plastic, wood) to hold the various fans in-place while cleaning them with compressed air. Since the vents on laptops are smaller than desktops, you will need to use a thinner rod to hold the CPU fan in-place. I usually use a toothpick, but if the vents' holes are tiny, I have to use an unfolded paper clip. Remember to blow compressed air in both the inlet and outlet vents.
Stay away from static electricity
The placement of your computer will affect its life span. I always recommend placing a desktop computer at least 18" off the floor to prevent static electricity issues. I have had problems with static electricity in my house. The dry climate in Arizona and wool carpet does create a lot of static electricity. To resolve the static electricity issue, I have a spray bottle full of tap water. Whenever I feel the static building up on the carpet, I spray a light mist of water on the carpet's high-traffic areas, and the static dissipates.
Liquids and computers don't mix
The last item on my list seems like a no-brainer, but it does bear repeating, liquids, and computers don't mix. Your cup of coffee or soda should never be placed on the same surface as your computer. If you need to have your computer on top of your desk, then elevate it above the desktop. With a laptop, you can use a stand or riser; with a desktop, you can use a stand, a couple of 2x4's cut to size, or even an 8x16x4 CMU block. That way, even if you do spill some liquid, it won't be able to get into your computer.
b5d2d2b7-cf54-4b79-8c70-fde4fc085fca|0|.0|96d5b379-7e1d-4dac-a6ba-1e50db561b04