Geeks in Phoenix

Geek Blog


Creating panoramic images with Image Composite Editor 2

One of the things I like to do when I go on vacation is taking panoramic photos. Since my camera doesn't take panoramic photos, I have to use software to stitch images together. One of the best image stitchers I have found yet is Image Composite Editor 2 from Microsoft Research Computational Photography Group.

Image Composite Editor 2

Image Composite Editor (ICE) can take photos taken from a single location that overlap and create stunning panoramic images from them. Using techniques from the field of computer vision, ICE scans the images for similarities to each other and then estimates the vantage point for each photo. ICE can even create panoramic images from videos too.

Sample ICE 2 panoramic image without auto complete
Sample ICE 2 panoramic image without autocomplete
Sample ICE 2 panoramic image with auto complete
Sample ICE 2 panoramic image with autocomplete

Microsoft Research Computational Photography Group recently released a new version of ICE. The following is a quote from the ICE website of changes included in ICE 2:

  • Redesigned user interface
    ICE has a new look that makes all the features more understandable and easier to use.
  • Automatic image completion
    ICE can now fill in any missing pixels around the edges of your panorama, making a smooth boundary even in cases where you missed a shot.
  • Improved workflow
    ICE now guides you through the steps required to make a great panorama. And you can back up a step to change settings, then see the effects of those changes without having to start over from scratch.
  • Full-resolution preview
    Panorama previews are no longer limited by your screen resolution. ICE now allows you to zoom in to see every detail of your stitched panorama, no matter how big, before you export.
  • Built-in Photosynth uploader
    ICE no longer requires the installation of a separate application to upload a panorama to the Photosynth web site. You can now upload and share your panorama directly from within ICE.

ICE will work on 32-bit or 64-bit versions of Windows Vista SP2, Windows 7, Windows 8.1, and Windows 10. For more information on Image Composite Editor from Microsoft Research Computational Photography Group, follow the links below:

ICE Homepage
ICE Support Forums

How to replace a CD/DVD/BD drive in your desktop computer

When it comes to desktop computer repair, one of the most common hardware failures is CD/DVD/BD drives. If you're having problems with getting the disk tray to eject or disks are not being recognized, it may be time to replace it. Here's how to replace a CD/DVD/BD drive in your desktop computer.

How to replace a CD/DVD/BD drive in your desktop computer

So you're tired of trying to get your old desktop CD/DVD/BD drive to work and are ready to replace it with a new one. Having to use a paper clip to manually eject your computer's CD/DVD/BD drive tray can get old quick. Replacing a desktop CD/DVD/BD drive is relatively easy; you have to make sure you get one with the correct connections and dimensions.

Find a new drive

The majority of CD/DVD/BD drives on the market nowadays will have SATA (Serial ATA) connectors for data and power. But there are still quite a few older systems that still use PATA (Parallel ATA) for data and 4 Pin Molex for power. SATA type drives are the de facto standard, so finding PATA replacement drives can be tricky. Newegg and TigerDirect are good places to find these older style drives.

SATA and PATA drive connections
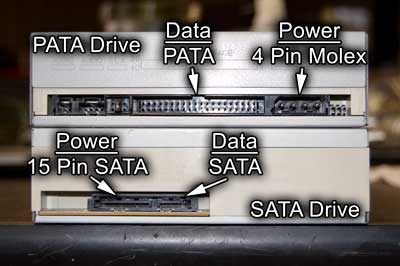
PATA and SATA drive connections

Desktop CD/DVD drives have standard width and height dimensions, so all you have to do is check your existing drive's depth. Sometimes you have room to put a deeper drive in, and sometimes you don't. Always check to see what kind of space you have available before purchasing a replacement drive.

Uninstall the old software

Once you have your new CD/DVD/BD drive, you will need to uninstall the software that came with your old CD/DVD/BD drive. It's usually a version of Nero or PowerDVD, and it is branded to your old drive. Once you remove the old drive, the software that came bundled with it won't work anymore. Your new drive should have come with its own disk burning software.

Install the new drive

From here, we need to turn the computer off, disconnect the power cord from the back of the system, and open up the case. Now there are two possible ways of mounting the CD/DVD/BD drive in the case: screws or quick release rails. You may have to remove the front bezel from the case to access the CD/DVD/BD drive, as it will need to come out the front of the case. Please note the connections and remove the old drive and replace it with the new one.

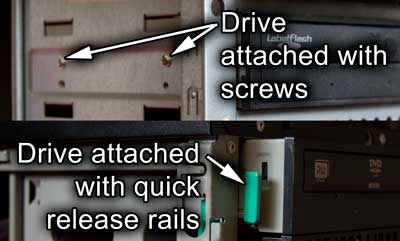
Drives attached by screws and quick release rails

Install the new software

Once you get the system back together, power it up, and let Windows discover the new CD/DVD/BD drive. Windows may require a restart to finalize the setup. After that, you are ready to install the software that came with the new drive.

Eliminate spam from your inbox with MailWasher Pro 7.5

When it comes to communication, e-mail is the fastest and easiest way to exchange thoughts and ideas. But it can also be one of the quickest ways to spread viruses/malware too. But you can protect yourself and your computer by using MailWasher Pro 7.5 by Firetrust.

About screen inside MailWasher Pro 7.5

MailWasher Pro is an anti-spam program that allows you to view your e-mail without worrying about setting off a virus. How does it work? It merely downloads only the text of the e-mail, not any of the links or attachments. It then allows you to delete any unwanted e-mail right then and there. That way, spam e-mail never makes its way into your inbox.

View of Inbox inside of MailWasher Pro 7 dot 5
View of Inbox inside of MailWasher Pro 7.5

MailWasher Pro also has some great built-in tools to help you figure out what is good e-mail and what is spam. The Origin of spam tool checks blacklist databases for known spam servers (you can edit the list). MailWasher Pro also checks the FirstAlert online database for known spam e-mails.

Origin of spam shows this mail came from a blacklisted IP
Origin of spam shows this e-mail came from a blacklisted IP

MailWasher Pro also has a Friends list and a Blacklist, which allows you to specify which individual e-mail addresses are good or spam. And with Filters, you can create wild-card rules to even further screen out the junk e-mail. MailWasher Pro 7.5 includes improvements in the way it handles IMAP mail accounts.

There is a free version of MailWasher Pro called MailWasher Free that has a limited feature set. MailWasher Pro allows you to use multiple e-mail addresses, has a recycle bin, a full preview pane, and technical support. And if you use the MailWasher Mobile app, you can sync e-mail accounts, friends list, and blacklist from MailWasher Pro. Both versions work with Outlook, Outlook Express, Windows Live Mail, G-mail, and every other mail program.

For more information on MailWasher Pro or MailWasher Free, follow the links below.

MailWasher Pro
MailWasher Free

How to keep your hard drive healthy

When it comes to computer repair, hard drive failures are among the top issues I deal with. A failed hard drive can be disastrous. But with some regular maintenance, you can keep your hard drive spinning like a top. Here's how to keep your hard drive healthy.

How to keep your hard drive healthy

Hard drive failures fall into two (2) classes: Predictable and Unpredictable. Predictable failures arise from mechanical wear and the eventual degrading of the storage surface. Unpredictable failures come from parts becoming defective or sudden mechanical failures. Around 60% of hard drive failures are from gradual wear and tear from daily use. With regular maintenance, you may be able to find, fix, and repair problems before they become catastrophic.

CHKDSK (check disk)

CHKDSK running on Windows 10 Tech Preview boot

Every operating system has a built-in utility for checking the health of your hard drive. In the early years of Windows (when it ran on top of DOS), there was ScanDisk. When Microsoft came out with Windows NT and NTFS, the disk checking utility changed to CHKDSK and is still in use today. The functionally has been expanded, but the commands have changed very little. CHKDSK verifies the integrity of the file system and fixes logical file system errors. It can also check for bad sectors and mark them as bad, but it cannot repair them. Cost: Free

Run CHKDSK in Windows XP

Run CHKDSK in Windows Vista / Windows 7

Run CHKDSK in Windows 8.1

Run CHKDSK in Windows 10

Manufacturer's software

UBCD HHD diagnostics list A thru P
UBCD HDD diagnostics list A thru P

Almost all hard drive manufacturers have utilities to check their drives for errors. Their software can check the SMART (Self-Monitoring, Analysis, and Reporting Technology) status and test the hard drive's physical condition. Best of all, their software can re-map bad sectors to spare sectors. You can find most diagnostics software on the manufactures' website or use the version included in the Ultimate Boot CD (recommended). Cost: Free.

Ultimate Boot CD

SpinRite

Intro screen from GRC SpinRite

SpinRite from Gibson Research Corporation is a magnetic storage data recovery, repair, and maintenance utility. The way it works is quite ingenious. It reads the data from each sector, inverts it, and then writes it back to the drive. It then reads the same sector, inverts the data, and then writes it back to the drive in the original format. If it can read, invert and write to a bad sector, it can clear the bad sector flag and make it usable again. SpinRite also has a feature called DynaStat that can reassemble missing data from bad sectors. Cost: $89.

SpinRite

How to create a custom power plan in Windows 8 / Windows 8.1

One of the biggest complaints I hear from customers is how their computers go into sleep mode at the most inconvenient times. It happens mostly with laptop computers that are stationary and are using the ac power charger. The best way to deal with this issue is to change the power options inside of Windows. Here is how to create a custom power plan inside of Windows 8 / Windows 8.1.

How to create a custom power plan inside of Windows 8 / 8.1

Right out of the box, Windows does a pretty good job of matching its' power options to the hardware inside of your computer. But for some of us, those settings won't work. I don't like my system to go to sleep or hibernate. One of the biggest problems I have encountered is having my computer go to sleep as I'm charging my smartphone via USB port. When the system goes to sleep, so does the USB port. I have disabled hibernation entirely on my system. I have the display turn off after a certain amount of time.

How to create a custom power plan inside of Windows 8 / 8.1

How to create a Windows 8 custom power plan 1
1. Go to the Control Panel and left-click on Hardware and Sound.

How to create a Windows 8 custom power plan 2
2. Left-click on Power Options.

How to create a Windows 8 custom power plan 3
3. In the left-side column, select Create a power plan.

How to create a Windows 8 custom power plan 4
4. Select an existing plan to start with; give it a name and left-click on Next.

How to create a Windows 8 custom power plan 5
5. Make any changes to you may want for the display and when the computer goes to sleep, then left-click on Create.

How to create a Windows 8 custom power plan 6
6. Now you should see your power plan set as default. To change the advanced power settings, left-click on the Change plan settings on the right side of your power plan name.

How to create a Windows 8 custom power plan 7
7. Left-click on Change advanced power settings.

How to create a Windows 8 custom power plan 8
8. On the Advanced settings dialog box that appears, left-click on Change settings that are currently unavailable. Now you can modify every aspect of the power settings for your computer.

Free computer diagnostics

Repairing a PC can sometimes be expensive, and that is why we offer free basic in-shop diagnostics. Give one of our professional and experienced technicians a call at (602) 795-1111, and let's see what we can do for you.

Check out our reviews

Geeks In Phoenix LLC, BBB Business Review

Customer service is #1

Here at Geeks in Phoenix, we take pride in providing excellent customer service. We aim to give the highest quality of service  from computer repair, virus removal, and data recovery.

Bring your computer to us and save

Repairing a computer can be time-consuming. That is why we base our in-shop service on the time we work on your computer, not the time it takes for your computer to work! From running memory checking software to scanning for viruses, these are processes that can take some time.

Contact us

If you have any questions, please feel free to give us a call at (602) 795-1111  and talk with one of our Geeks. Or you can send us a message from our contact page contact page , and one of our Geeks will get back to you as soon as possible. Or you can stop by and see us. Here are our hours and location.

Like Geeks in Phoenix on Facebook

Follow Geeks in Phoenix on Twitter

Watch Geeks in Phoenix on YouTube