Geeks in Phoenix

Geek Blog


How to clean up and reset Mozilla Firefox

Updated July 29, 2020

When it comes to computer repair, the most common problem I find is browser corruption. Malicious browser extensions are the most common way a browser can get corrupted. So here's how to clean up and reset Mozilla Firefox.

How to clean up and reset Mozilla Firefox

I've shown how to clean up and reset Google Chrome and Internet Explorer, so this article shouldn't be any surprise. What might surprise you is that I have all three browsers installed on my personal computer, and Firefox is my default browser. Each has its pros and cons, but since Firefox is a product of the Mozilla Foundation (a non-profit organization), I prefer to support them.

I've always thought of Mozilla Firefox as a cross between Internet Explorer and Google Chrome, having the best elements. Case in point is the way you can access the options in Firefox. You can either use the Menu button in the upper right-hand corner (the button with three (3) horizontal bars, similar to the three dots in Chrome) or enable the Menu Bar on top of the browser window (similar to Internet Explorer).
The Firefox Menu Bar and Menu Button locations
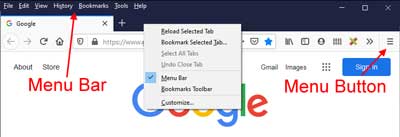
To get the Menu Bar, just right-click the blank area above the Address Bar and select Menu Bar. And some options can only be accessed by using the Menu Bar, but I'll talk about that later in this article.

Let's start with the necessary options. If you're using the Menu Button, select Options; if you're using the Menu Bar, select the Tools pull-down menu and then Options. This will bring up the Firefox preferences. On the left-hand side is a list with several selections; General, Home, Search, Privacy & Security, Sync, Extensions & Themes, and Firefox Support.

The first panel on the left-side menu is General and is where you will find the most basic settings. These settings are mainly personal preferences that configure how Firefox looks and works. One of the default settings on this page that I always change is in the Downloads section. I prefer to be prompted as to where I want to save a download, as I don't always want them just saved into my default downloads folder.

The next section is Applications. Here you can choose what happens when you select different actions, like when you click on a mailto: link. Nothing really out of the ordinary here. I would just review them to make sure everything looked good. If you think something is questionable, just change the action. You can always change it back if it doesn't work the way you want it to. Also in this category is the Firefox Updates section, make sure that Automatically install updates is selected.

The second panel is Home and is anything to do with your homepage, new windows, new tabs, and the Firefox Home screen itself. If Firefox has been modified by a malicious piece of malware/adware, you'll want to check the New Windows and Tabs settings to make sure that it's not opening up malicious web pages when it starts up. If any of the settings have been changed, you can reset Firefox back to the default settings by clicking on the Restore Defaults button in the Home section's upper-right corner.

The next panel on the left-side menu is Search. This is where you configured how Search works in Firefox.
The Search options inside of Firefox
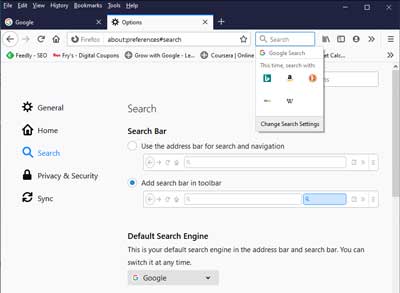
You can select what search engine Firefox uses from a preset collection of the most popular search engines. You also can have a separate search bar or use the address bar for navigation and search. If you decide to use the separate search bar, you can change the search engine it uses on the fly by clicking on the magnifying glass on the Search box's left side.

The next panel is Privacy and Security. In this section, you have to go through each subcategory and make sure the settings will work for you. Right out-of-the-box, these settings are pretty perfect, although there are a couple I prefer to configure for my taste.

Under Browser Privacy, you can select how Firefox handles website tracking. The default setting (Standard) works fine, but you can restrict what a website can do if you want to. But remember that with stricter security policies, you may break or disable functionally of some sites.

In the Cookies and Site Data section, you can manage the website data that Firefox stores. It is here that you can clean out the cookies and cached data from websites. You can automatically have Firefox clean out this data when you close it, but that setting is in the History section (see below).

The Login and Passwords section is, as the name implies, is where you configure Firefox to save usernames and passwords or not. If you plan on using the Sync feature, you will want to have Firefox save this data.

The next section is the Forms and Autofill area. If you want Firefox to automatically fill out website forms with your data (name, phone, email address, etc.), make sure the Autofill addresses checkbox is selected. You can edit any saved data here too.

In the History section is where you can have Firefox clear data when you close it. If you pull down the selections under Firefox will: and select Use custom settings for history, you get a few more options. I recommend that you check Clear history when Firefox closes box and then click on the Settings button.
Settings for clearing the history inside of Firefox
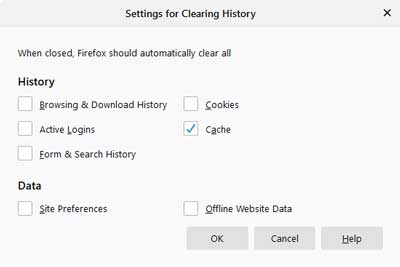
You can choose what items you want Firefox to delete when it is closed in the window that appears. I deselect everything but Cache. But this is strictly a personal preference.

The next section is Address Bar and is pretty straight forward. Next is Permissions, and there are two (2) items you want to make sure are selected: Block pop-up windows and Warn you when websites try to install add-ons. Firefox Data Collection and Use comes next. It is your preference if you want to enable any of these options.

Under the Security section, make sure that Block dangerous and deceptive content, Block dangerous downloads, and Warn you about unwanted and uncommon software is selected. The Certificates section is, again, personal preference, but the default settings are just right.

The next panel on the left side menu is Sync. This a pretty cool feature if you have Firefox installed on multiple devices. I use this feature with a couple of computers and a smartphone. I love the way it will sync saved passwords across all of my devices. Enough said.

Now that we've checked/reset and changed the preferences let's take a look at the add-ons section. There are three (3) ways to get to it:

  • On the Options page, click on the Extensions & Themes link in the bottom of the left-hand column.
  • Click on the Menu Button (3 horizontal bars) in the upper-righthand corner and select Add-ons.
  • On the Menu Bar, left-click on Tools and select Add-ons from the drop-down menu.

Once you have the Add-ons page up, you will find four (4) selections on the left side menu; Recommendations, Extensions, Themes, and Plugins.

The first selection is Recommendations and, as the name implies, are extensions and themes that Firefox recommends. Pretty simple.

The second selection on the left side is Extensions. This is where you look for malicious apps that like to run inside of Firefox. Go through the list here, and if you find one that you don't remember installing, just click the Enable / Disable slider on the right-hand side.
The Extensions options inside of Firefox
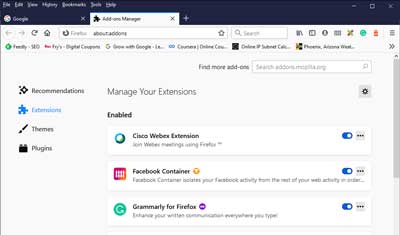
You will be prompted to restart Firefox to disable it altogether. Remember that even if you disable an extension, you can always enable it at a later date. Or if you find you don't need it at all, you can always delete it. But remember that if you delete an extension and then realize you did want it, you will have to reinstall it.

The next selection on the left side menu is Themes, and this is where you change the look of Firefox. If you don't like the default theme, you can always download a new tone using the Find more add-ons button at the bottom of the right-hand column.

The fourth selection down the left side menu is Plugins. Plugins add support for different types of Internet content, like PDF files and Flash content.
The Plugins options inside of Firefox
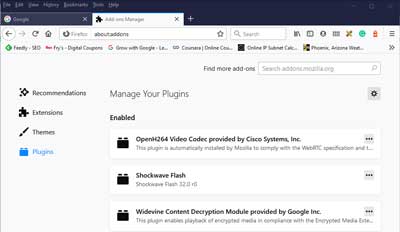
One thing you can do here for security is to make sure Shockwave Flash is set to Ask to Activate. You can do that with any plugin that you're not sure you want to run automatically.

Now, if after going through the previous steps and Firefox is still not working the way it did when you installed it, there are two (2) things you can do. You can either do a reset or uninstall/reinstall. Usually, a reset will fix about 90% of Firefox problems, but there are times when only an uninstall/reinstall will work. I always try a reset first.

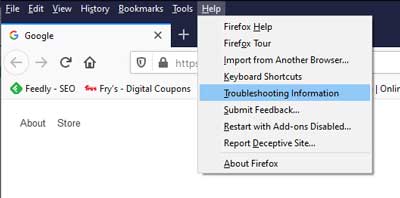
To reset Firefox, you will need to have access to the Menu Bar. To get the Menu Bar to appear, just right-click the blank area above the Address bar and select Menu Bar from the context menu. Once you have the Menu Bar, left-click on Help and then Troubleshooting Information.
Accessing the Troubleshooting Information inside of Firefox
When the Troubleshooting Information page appears, click on the Refresh Firefox button on the page's right side. You will be prompted on how you're about to reset Firefox back to its default settings. Click on Refresh Firefox, and Firefox will be reset back to its original default settings. It also creates a folder on your desktop called Old Firefox Data, just in case you need to restore anything, like your bookmarks.

Now, if that doesn't get Firefox back to normal, then the last resort is to do an uninstall/reinstall. This may take a little time to perform, but if you really want Firefox back to pristine condition, this is what it might take. There are two (2) ways to uninstall programs in Windows 10; the Settings app or the Control Panel.

Uninstall a program using the Settings app

  1. Click on the Start Windows logo menu, then Settings (the gear icon), then Apps. then Apps & Features.
  2. Scroll down the list of apps in the right-hand column until you find Google Chrome.
  3. Highlight Mozilla Firefox and click on the Uninstall button.

Uninstall a program using the Control Panel

  1. In the search box next to the Start Windows logo button type Control Panel and click on it from the results.
  2. Select Uninstall a program (if viewing by category) or Programs and Features (if viewing by icons).
  3. Highlight Mozilla Firefox and click on the Uninstall button.

Once Mozilla Firefox is uninstalled, restart your computer. When your computer is rebooted, and you are logged back in, you will need to remove any traces of Firefox before reinstalling it. There are three (3) places that you will need to look for any leftover files, two (2) inside your user profile and one (1) inside of the Program Files directory. The files inside your user profile are hidden by default, but you can get there quickly by bringing up a Run dialog box (Windows Logo key Windows logo key + R) and typing or copy / paste the following lines:

%userprofile%/AppData/Local/Mozilla %userprofile%/AppData/Roaming/Mozilla

This will open the File Explorer to the locations of your Firefox user profile settings. If there is a folder named Firefox, go ahead and delete it. Next, you will have to navigate to the location of the Program Files directory and check under the folder named Mozilla Firefox. Its location is usually C:\Program Files (x86)\Mozilla Firefox, but it may be different if your Windows version is 32-bit (C:\Program Files\Mozilla Firefox) or if you installed Firefox on a different drive. Once you get there, if you find a folder named Mozilla Firefox, go ahead and delete it. Now you can download and reinstall Mozilla Firefox.

How to clean up and reset Google Chrome

Updated August 7, 2020

Internet browsers are prone to getting compromised. It can happen by opening an infected e-mail or viewing a malicious ad on a web page. But knowing how to get your browser back to normal is the key. Here's how to clean up and reset Google Chrome.

How to clean up and reset Google Chrome

Of the top three (3) browsers out there, Google Chrome is the most popular. One of the main reasons is that to use Google's products, like Google Earth, you have to have Chrome installed. And since it is the most popular, it is also the biggest target for adware and malware. In fact, in the past, the Chrome web store has gotten compromised with infected apps. Google is now scrutinizing the Chrome extensions harder than ever because of it. So knowing how to clean up and reset Chrome comes in handy.

Cleaning up and resetting Chrome

Google has made resetting the Chrome browser reasonably simple. Just open Chrome and click on the Customize button in the upper right-hand corner (it looks like three (3) horizontal dots).
The Customize button inside of Google Chrome
Go down and click on Settings, which will open a page with all user-configurable settings. On the left-hand column, you will find eleven (11) links: You and Google, Autofill, Safety check, Privacy and security,
Appearance, Search engine, Default browser, On startup, Advanced, Extensions, and About Chrome.

The Advanced link is a sub-menu that includes Languages, Downloads, Printing, Accessibility, System and Reset and cleanup. All of the links take you those sections on the Settings page except for Extensions and About Chrome. Those links go to separate pages.

The first section is You and Google. This is where you can synchronize Chrome (bookmarks, history, passwords, etc.) across multiple devices. If you are using Chrome on your computer and smartphone, this is a feature you may want to look into.

In this section, you can set up syncing all of the different Google services, adding a name and picture to your profile, and importing bookmarks and settings from other browsers.

The second section is Autofill. As the name suggests, you can choose if Chrome can store your data for online forms and what information it is allowed to save. Chrome can save and fill in passwords, payment methods, names, addresses, and e-mail addresses.

The next section is Safety check. When you click on the Check now button, Chrome checks for updates, insecure passwords, browsing protection, and harmful extensions.

Privacy and security is the next section. There are four categories: Clear browsing data, Cookies and other site data, Security, and Site settings. Let's look at each one separately.

The first category is Clear browsing data and is the first place I go when a customer complains about a website not functioning correctly. There are two categories here: Basic and Advanced.
The clear browsing data windows inside of Google Chrome
Quite often, just selecting the Basic settings with the Time range of All time will do the trick. If that does not fix things, try some of the Advanced options. I recommend doing one at a time until Chrome works the way you want.

The second category is Cookies and other site data. This where you define how Chrome handles cookies. The default setting is to block third-party cookies only when you use incognito mode and be perfectly safe.

You can completely block third-party or all cookies if you want, but I recommend turning on the Do Not Track option. Chrome does allow you to define what websites can and cannot use cookies. You can also specify what website cookies are cleared out when you close Chrome.

The third category is Security, and this is where you define how Chrome displays websites. The default setting for Safe Browsing is Standard protection and is recommended. You can use the Enhanced protection, but it does send browsing data back to Google. The rest of the default settings are recommended.

The fourth and last category is Site Settings. The default settings are recommended, but you can always modify them to your personal preferences. Some of these settings are actually in other sections, so don't be surprised if you see a setting you have already configured.

The next section is Appearance and is more for personalizing Chrome the way you want it to look. Just personal preferences here.

The Search engine section just defines what search engine Chrome will use in the address bar.
The default search engine setting inside of Google Chrome
This is one place to check and see if your default search engine in Chrome has been hijacked. If you're not getting the search results you are expecting from the address bar,
The Google Chrome address bar
more than likely, your default search engine has been changed without your knowledge. You can add or remove any of the search engines on this list.

The Default browser section has a link to the Default apps so you can make Chrome your default browser.

The On startup section defines what pages are displayed when Chrome starts up and is one of the first places I look for evidence of browser hijacking. Allot of malicious apps will try and get your browser to automatically open up their website(s) when you start up Chrome. They will also try and take advantage of another setting under System that allows apps to be run even without Chrome being open (more on this one later in this article).

If Open a specific page or set of pages is selected, review the pages listed. If there are any page(s) you didn't add yourself, click on the three horizontal dots that appear on each page's right-hand side and select Remove. You can also add any page you would like to open when you start up Chrome here too automatically.

When you click on Advanced, there is a list of categories that, in my opinion, are just personal preferences. Categories like Languages, Downloads, Printing, and Accessibility are for customizing how Chrome works. Now when it comes to downloads, I prefer having Chrome ask where I want each file to go before downloading them. Again, personal preference.

Second to the last section under Advanced is System. Remember how I told you Chrome could be run without it having to be started? This is where you'll find the setting to disable this feature. If you are using any Google apps that require Chrome, like Google Docs Offline, you will need to leave the Continue running background apps when Google Chrome is closed selected.
Enable or disable Chrome from running after being closed
If not, I recommend that you turn this feature off. I've seen adware/malware use this setting to start Chrome when the computer starts up and then controls it remotely. If in doubt, disable it until you are prompted by a Google app to enable it.

The last section under Advanced is Reset and clean up. The link labeled Restore settings to their original defaults will do just that, reset Chrome back to its default, 'out-of-the-box' setup. I'll be just like when you first installed it. The Clean up computer link will scan your computer for unwanted ads, pop-ups, and malware that directly affects Chrome.

The second to the last section is Extensions. This where you will find all of the installed apps that run inside of Chrome. These extend the functionality and usefulness of Chrome. You'll typically find malicious apps that have installed themselves without your knowledge (usually in kiosk mode). It's here that you can either enable, disable, or remove them from Chrome. If you're not sure about an extension, you can always disable it to find out what it did or didn't do inside Chrome. And when you're sure you don't need it or don't remember installing it, just click on the Remove button. If you accidentally remove an extension and want it back, you will have to go through the process of reinstalling it, so be careful.

When you click the Details button for an extension, you will get an option screen. One of the extension options is Allow in incognito for private browsing. Chrome can run in what is called Incognito mode, where it does not save any record of where you have been or what you may have downloaded. If an extension has the option to select Allow in incognito mode, it can be enabled for it. If you use incognito mode, I would defiantly recommend enabling any type of anti-virus, anti-adware, or anti-malware application extension.

The last option to get Chrome back to default and work correctly is to uninstall and reinstall it. I only use this option when all else fails to get it back to full functionality. It can take a little time to do, but if you need to get Chrome fully reset, this may be the only option. There are two (2) ways to uninstall programs in Windows 10; the Settings app or the Control Panel.

Uninstall a program using the Settings app

  1. Click on the Start Windows logo menu, then Settings (the gear icon), then Apps, then Apps & Features.
  2. Scroll down the list of apps in the right-hand column until you find Google Chrome.
  3. Highlight Google Chrome and click on the Uninstall button.

Uninstall a program using the Control Panel

  1. In the search box next to the Start Windows logo button, type Control Panel, and click on it from the results.
  2. Select Uninstall a program (if viewing by category) or Programs and Features (if viewing by icons).
  3. Highlight Google Chrome and click on the Uninstall button.

Once Google Chrome is uninstalled, restart your computer. When your computer has rebooted and you are logged back in, you will need to remove any traces of Google Chrome before reinstalling it. There are two (2) places where you will need to look for any leftover files; inside your user profile and inside the program files directory. The files inside your user profile are hidden by default, but you can get there quickly by bringing up a Run dialog box (Windows Logo key Windows logo key + R) and typing or copy / paste the following code:

%userprofile%/AppData/Local/Google

This will open the File Explorer to the location of your Google user settings. If there is a folder named Chrome, go ahead and delete it. Next, you will have to navigate to the location of the Program Files directory and check under the folder named Google. Its location is usually C:\Program Files (x86)\Google, but it may be different if you installed Google Chrome on a different drive. Once you get there, if you find a folder named Chrome, go ahead and delete it. Now you can download and reinstall Google Chrome.

How to clean up and reset the Internet Explorer

In repairing computers for a living, the one thing I find myself doing continually is cleaning up and resetting web browsers. Removing adware, malware and viruses can screw up the Internet Explorer. So here is how to clean up and reset the Internet Explorer.

How to clean up and reset the Internet Explorer

Internet Explorer (IE) has been included in every version of Windows since Windows 98. Microsoft has made cleaning IE reasonably straightforward, but there can be some tricky items. All of IE's settings are accessible from either inside of IE or the Control Panel. The best way is to go through the Control Panel because that is when IE is not technically running. If you use Outlook or Windows Mail, you will need to close these programs too before attempting to clean up IE, as they use IE to rendered HTML formatted e-mails.

When it comes to resetting the IE, you have to first get into the Control Panel. The easiest way to do it with Windows Vista and Windows 7 is to type Control Panel into the search box above the Start button and select Control Panel from the search results. The easiest and fastest way in Windows 8 is to use the Power Users menu (Windows logo key Windows logo key + X) and then select Control Panel. In Windows 10, use the search box next to the Start Windows logo button, type Control Panel, and click on it from the results. Once you have the Control Panel up, select Network and Internet then Internet Options (if viewing by category) or just Internet Options (if viewing by icons).

The Internet Properties General tab inside of Windows 10

The Internet Options haven't changed much over the years, so the tabs on the Internet Properties will look similar in Windows Vista as they do in Windows 10. When you first open Internet Properties, the General tab appears by default. You can go down to Browsing history and delete everything from temporary Internet files and cookies to form data and passwords. Remember that you cannot get it back once you delete something like passwords, so choose carefully.

The Internet Properties Programs tab inside of Windows 10

Once you're done with the General tab, go over to the Programs tab and select Manage add-ons. Here is where you enable, disable and sometimes delete add-ons that have been installed into the IE. There are times when all you can do is disable an add-on, so that is when you'll need a third-party program like CCleaner from Piriform. CCleaner can clean up all of the major browsers, but the only one I've had issues with getting rid of third-party applications is IE.

The Internet Properties Advanced tab inside of Windows 10

The last tab in Internet Properties is Advanced, and it is the most powerful. It has only two buttons, Restore advanced settings and Reset. The first one you click is Restore advanced settings, then click on Apply in the lower right-hand corner. Then to completely reset IE click on Reset. You will get a screen warning you that you are about to reset IE back to its original default settings. Windows 7, Windows 8, and Windows 10 users will also have the option of deleting personal settings. Remember that these cannot be undone, so choose carefully. If in doubt, leave the personal files checkbox empty. You can always come back and remove them if need be.

Now, if after you have reset IE, you find you cannot get into some secure sites, like bank websites, go back into Internet Properties and select the Security tab, and deselect Enable Protected Mode. When you click Apply, you will get a prompt telling you that your current security setting might put you at risk. Then try the website you were having problems with. If you can now get into it, you are all set.

The Windows features menu inside of Windows 10

There is one option that is not available to IE, and that is to uninstall and reinstall. As I stated earlier in this article, IE is integrated into the operating system as a feature and is used by other programs like Outlook and Windows Mail. The only thing you can do is turn off the IE feature in the Control panel, restart your computer and turn it back on. To do this, go to the Control Panel and select Programs and Features, then Uninstall or change a program. In the left-hand column, left-click on Turn Windows features on or off.

How to change default programs in Windows 10

Updated August 8, 2020

The default programs that Windows 10 uses to open different file types are pretty good right from the start. But maybe you'd like to change what program opens music or photos? Here's how to change the default applications in Windows 10.

How to change default programs in Windows 10

As with previous versions of Windows, there can be multiple programs that can open the same type of file. Some are UWP (Universal Windows Platform), and some are standard Desktop programs. And then there are the programs you may install yourself. Knowing how to change the default programs in Windows 10 is essential since Windows 10 is prone to reset default programs when performing a Feature update.

How to change the default apps in Windows 10 Settings

  1. Left-click on the Start Windows logo button.
  2. Left-click on Settings (the gear icon).
  3. Left-click on Apps.
  4. In the left-hand column, left-click on Default apps.

Changing the default apps in Windows 10 Settings

The six (6) most common apps are listed at the top of the right-hand column. They are Email, Maps, Music player, Photo viewer, Video player, and Web browser. You will find three more advanced ways of modifying the default applications on the bottom of the right-hand column.

  • Choose default apps by type
    Warning! By choosing the wrong application for specific file types, you can make your system unusable. This method of setting the default program requires you to know the extension of the object you want to open. Be sure of the file extension before making any changes. When in doubt, use the Set defaults by app settings.
  • Choose default apps by protocol
    Warning! By choosing the wrong application for specific protocols, you can make your system unusable. This method of setting the default program requires you to know the protocol of the object you want to open. Be sure of the protocol before making any changes. When in doubt, use the Set defaults by app settings.
  • Set defaults by app
    When you choose this option, you are presented with a list of installed programs, and you can select what each one does or does not do. You can set an application to open all types of files it can or choose which types of files to open with that particular program.

Check Windows 10 system files with System File Checker

Updated July 20, 2020

I was thinking the other day about what program I use the most in doing computer repair. The one program I use the most on Windows computers would have to be System File Checker (SFC). SFC checks for system files that may have gotten corrupt or replaced with incorrect versions. Here's how to check Windows 10 system files with System File Checker.

Check Windows 10 system files with System File Checker

SFC has been included in every version of Windows since Windows XP. You can also build it into the Microsoft Diagnostics and Recovery Toolset (DaRT). There is no shortcut or link to SFC in Windows 10, as it runs inside an Administrative Command Prompt.

How to open a Command Prompt with Administrator privileges in Windows 10

SFC running inside of Windows 10 Administrative Command Prompt

The following is the syntax and switches for SFC. The most commonly used syntax/switch is: sfc /scannow.

SFC [/SCANNOW] [/VERIFYONLY] [/SCANFILE=<file>] [/VERIFYFILE=<file>] [/OFFWINDIR=<offline windows directory> /OFFBOOTDIR=<offline boot directory>]

/SCANNOW (Scans integrity of all protected system files and repairs files with problems when possible.)
/VERIFYONLY (Scans integrity of all protected system files. No repair operation is performed.)
/SCANFILE (Scans integrity of the referenced file, repairs file if problems are identified. Specify full path <file>.)
/VERIFYFILE (Verifies the file's intergrity with full path <file>. No repair operation is performed.)
/OFFBOOTDIR (For offline repair specify the location of the offline boot directory.)
/OFFWINDIR (For offline repair specify the location of the offline windows directory.)

Examples

sfc /scannow sfc /verifyfile=c:\windows\filetobereplaced.dll sfc /scanfile=d:\windows\filetobereplaced.dll /offbootdir=d:\ /offwindir=d:\windows sfc /verifyonly

Once SFC is done scanning the system files, it will give one of four possible results:

  • Windows Resource Protection did not find any integrity violations.
    All system files are fine, and you're good to go.
  • Windows Resource Protection could not perform the requested operation.
    There may be another program preventing SFC from running. In this case, boot the system up into safe mode and run SFC from there.
  • Windows Resource Protection found corrupt files and successfully repaired them.
    All system files are now correct, and you're ready to go. If you want to view the repair details, see below.
  • Windows Resource Protection found corrupt files but was unable to fix some of them.
    If you get this message, SFC found a file or files that it couldn't repair. The next thing you will need to do is find out the name of the file(s). Using the Find String utility, you can filter out the SFC results with only the scanned components and create a text file with that information on your Desktop called sfcdetails.txt. Just copy the following code into an Administrative Command Prompt:

findstr /c:"[SR]" %windir%\Logs\CBS\CBS.log >"%userprofile%\Desktop\sfcdetails.txt"

Manually replacing a corrupt system file in Windows 10

Note: To replace a corrupt system file, you will need to have a known good copy of the file(s) in question. A good source for files is another computer or virtual machine running Windows 10. Since I do computer repair for a living, I have all of the versions of Windows that are still supported by Microsoft running inside of Oracle VirtualBoxes.

The first thing to do is note the location (path) and name of the file(s) that need to be replaced from the sfcdetails.txt file. Once you have another copy of the corrupt file(s), you will need to take administrative ownership of the file(s). To do this, modify the following command with the path\filename of the file you want to replace and then type it into an Administrative Command Prompt:

takeown /f path\filename

Example: takeown /f C:\Windows\FileToBeReplaced.dll

Next, you will have to grant administrators full access to the file(s) being replaced. To do this, modify the following command with the path\filename of the file you want to replace and then type it into an Administrative Command Prompt:

icacls path\filename /grant administrators:F

Example: icacls C:\Windows\FileToBeReplaced.dll /grant administrators:F

The third thing to do is copy over the new file(s) and replace the corrupt one(s).To do this, modify the following command with the path\filename of the file you want to replace and then type it into an Administrative Command Prompt:

copy path\filename path\filename

Example: copy C:\Temp\FileToBeReplaced.dll C:\Windows\FileToBeReplaced.dll

Free computer diagnostics

Repairing a PC can sometimes be expensive, and that is why we offer free basic in-shop diagnostics. Give one of our professional and experienced technicians a call at (602) 795-1111, and let's see what we can do for you.

Check out our reviews

Geeks In Phoenix LLC, BBB Business Review

Customer service is #1

Here at Geeks in Phoenix, we take pride in providing excellent customer service. We aim to give the highest quality of service  from computer repair, virus removal, and data recovery.

Bring your computer to us and save

Repairing a computer can be time-consuming. That is why we base our in-shop service on the time we work on your computer, not the time it takes for your computer to work! From running memory checking software to scanning for viruses, these are processes that can take some time.

Contact us

If you have any questions, please feel free to give us a call at (602) 795-1111  and talk with one of our Geeks. Or you can send us a message from our contact page contact page , and one of our Geeks will get back to you as soon as possible. Or you can stop by and see us. Here are our hours and location.

Like Geeks in Phoenix on Facebook

Follow Geeks in Phoenix on Twitter

Watch Geeks in Phoenix on YouTube