Geeks in Phoenix

Geek Blog


What is a Bit? What is a Byte?

You hear these terms when you talk about computers: Megabyte, Gigabyte, Terabyte, 32-bit, 64-bit. For a novice computer user, these can be quite confusing. So, here's an explanation of a Bit and a Byte.

What is a Bit? What is a Byte?

The terminology is familiar to almost everyone, but do you know what they are? To understand it, we have to go break it down to the primary 0's and 1's.

What is a Bit?

A Bit is the basic unit in computer information and has only two different values, generally defined as a 0 or 1. These values can be interpreted as on or off, yes or no, true or false, etc. It just depends on the binary code.

What is a Byte?

A Byte is just 8 Bits and is the smallest unit of memory that can be addressed in many computer systems. The following list shows the relationship between all of the different units of data.

0 (Off) or 1 (On) = 1 Bit
8 Bits = 1 Byte
1,024 Bytes = 1 Kilobyte
1,024 Kilobytes = 1 Megabyte
1,024 Megabytes = 1 Gigabyte
1,024 Gigabytes = 1 Terabyte
1,024 Terabytes = 1 Petabyte
1,024 Petabytes = 1 Exabyte
1,024 Exabytes = 1 Zettabyte

Let's take a look at a simple text file I created called sample.txt. It contains only eight (8) characters, four (4) upper case, and four (4) lower case letters. I created my text file using Notepad, so it is encoded using the American National Standards Institute (ANSI) standard binary code.

A sample text file with only eight characters opened in a text editor

The closest we can get to viewing raw binary code is to open my sample text file in a hexadecimal file editor. Hexadecimal digits allow for a more human-friendly representation of binary code.

A sample text file with only eight characters opened in a hexadecimal editor

Since the ANSI code standard is a revision of the American Standard Code for Information Interchange (ASCII) code, we'll need to use that standard for references to binary information. Using the table of ASCII printable characters on Wikipedia, we can find the binary code equivalent.

Character Hexadecimal Binary
A 41 01000001
a 61 01100001
B 42 01000010
b 62 01100010
C 43 01000011
c 63 01100011
D 44 01000100
d 64 01100100

So, as you can see, each character contains 8 bits or 1 byte, and the whole sample.txt file is 8 bytes in size. To put this in perspective, I created a Microsoft Word document (sample.docx) with the same characters as the sample text file.

A sample Microsoft Word file with only eight characters opened in Microsoft Word

A sample Microsoft Word file with only eight characters opened in a hexadecimal editor

Here you can see all of the underlying formatting, and the size has increased significantly. The sample.docx file is almost 12 kilobytes (11,513 bytes) in size but contains only eight (8) characters.

What is 32-bit / 64-bit?

The terms 32-bit and 64-bit define the fixed-size piece of data a processor can transfer to and from memory. So, in theory, 64-bit computers can handle data twice as fast 32-bit systems.

The 32-bit computer architecture is most commonly known as x86 and was based on the Intel 8086 / 8088 processor. The Intel 8086 / 8088 processor was found in the original stand-alone Pac-Man video arcade console. The term for 64-bit computer architecture is x64, a little more straight forward.

The following Wikipedia articles were used for reference:

Bit - Wikipedia
Byte - Wikipedia
American National Standards Institute (ANSI) - Wikipedia
American Standard Code for Information Interchange (ASCII) - Wikipedia
Binary code - Wikipedia
Hexadecimal - Wikipedia

How to backup and restore the registry in Windows 10 and Windows 11

Updated January 30, 2024

Everyone knows that when you make any significant change to your computer, you must backup the registry first. But not many casual computer users understand what the registry is and how to back it up. So here's how to backup and restore the registry in Windows 10 and Windows 11.

How to backup and restore the registry in Windows 10

So, what is the registry? The registry is a database that contains information on the hardware, software, and user(s) installed on your computer. Even though it may sound like a single entity, it consists of several different files. The collection of these files is called the registry hive.

FYI: The information in the registry hive is stored in two (2) essential elements: Keys and Values. Keys are like folders; they can contain values and keys. Values are like files; they contain data in various formats.

Automatically backup and restore the registry in Windows 10 and Windows 11

The System Protection tab of the System Properties dialog box inside of Windows 10
The System Protection tab of the System Properties dialog box inside Windows 10

Now, the simplest way to backup the registry is to create a restore point. Restore points contain backup copies of the registry, most drivers, and files with particular extensions.

Restore points can be a lifesaver if your system fails to start after a change or modification. Just make sure to create a system repair disk or recovery drive (instructions below) and have it on hand only in case your system won't start up correctly. You can use it to boot your computer and access a restore point.

How to create a restore point in Windows 10 and Windows 11

  1. Bring up the System > About page by either:
    • Pressing the Windows logo key Windows logo key + Pause.
    • Pressing the Windows logo key Windows logo key + X to bring up the Power User menu and press Y to select System.
    • Right-clicking on the Windows logo Windows logo key on the Start menu to bring up the Power User menu and select System.
  2. In the right-hand column, left-click on the System protection link.
  3. In the Protection Settings field, check and ensure system protection is enabled. If it is not, then highlight the drive's name and left-click on the Configure ... button. Once you have verified that system protection is enabled, proceed to the next step.
  4. Highlight the C: (System) drive, and left-click on the button labeled Create ....
  5. Type in a descriptive title for your restore point (the date and time are automatically added).
  6. Left-click on Create.

How to use a restore point in Windows 10 and Windows 11

  1. Bring up the System > About page by either:
    • Pressing the Windows logo key Windows logo key + Pause.
    • Pressing the Windows logo key Windows logo key + X to bring up the Power User menu and press Y to select System.
    • Right-clicking on the Windows logo Windows logo key on the Start menu to bring up the Power User menu and select System.
  2. In the right-hand column, left-click on the System protection link.
  3. At the top of the System Protection tab, left-click on the button under the System Restore section labeled System Restore ....
  4. When the starting screen appears, left-click on Next >.
  5. Highlight the restore point you want to use, then left-click on Next >.
  6. When the confirmation screen appears, left-click on Finish.
  7. A warning should appear telling you not to interrupt the system restore process. Left-click on Yes to proceed.
  8. Your computer will start restoring the system (including the registry) to how it was when the restore point was created and reboot.

Creating a system repair disk or recovery drive in Windows 10 and Windows 11

System repair disks and recovery drives are essentially the same thing. They are bootable drives that contain the essential system tools to repair your Windows installation. The only difference is the media they use; system repair disks use CDs/DVDs, and recovery drives use USBs. Recovery drives can also reinstall Windows. Click here for more on Recovery Drives for Windows 10 and Windows 11.

How to create a system repair disk for Windows 10 or Windows 11 (requires a blank CD/DVD)

  1. Bring up the Run dialog box by either:
    • Pressing the Windows logo key Windows logo key + R
    • Right-click on the Windows logo Windows logo key on the Start Menu or press the Windows logo key Windows logo key + X and then select Run
  2. In the Run dialog box that appears, type recdisc and select OK. If you're prompted for an administrator password or confirmation, type the password or provide confirmation. Just follow the prompts.

How to create a recovery drive for Windows 10 (requires an empty USB drive 16GB or larger)

  1. Left-click on the Start button Windows logo to bring up the Start menu.
  2. Scroll down the list of programs and left-click on Windows Accessories.
  3. Double left-click on Recovery Drive. Just follow the prompts.

How to create a recovery drive for Windows 11 (requires an empty USB drive 16GB or larger)

  1. Left-click on the Start button Windows logo to bring up the Start menu.
  2. In the upper right-hand corner of the Start menu, left-click on All apps.
  3. Scroll down the list of programs and left-click on Windows Tools.
  4. Double left-click on Recovery Drive. Just follow the prompts.

Manually backup and restore the registry in Windows 10 and Windows 11

The Registry Editor interface inside of Windows 10

Another way to backup the registry is to use the built-in Registry Editor. The beautiful thing about using the Registry Editor is that you don't have to backup the whole registry if you don't want to. You can just backup any key or value you want.

There is a downside to using the Registry Editor to manually backup the registry. To restore anything with the Registry Editor, you must boot your computer in either standard or safe mode. A system repair disc doesn't have the Registry Editor included.

How to manually backup the registry using the Registry Editor in Windows 10 and Windows 11

  1. Bring up the Run dialog box by either:
    • Pressing the Windows logo key Windows logo key + R
    • Right-click on the Windows logo Windows logo key on the Start Menu or press the Windows logo key Windows logo key + X and then select Run
  2. In the Run dialog box that appears, type regedit and select OK. If you're prompted for an administrator password or confirmation, type the password or provide confirmation.
  3. When the Registry Editor appears either:
    • Highlight Computer in the left-hand column to backup the complete registry.
    • Highlight the key or value you want to backup.
  4. Left-click on the File pull-down menu and left-click on Export.
  5. Select the location and a descriptive file name for the backup file, and then left-click on Save.

How to manually restore the registry using the Registry Editor in Windows 10 and Windows 11

  1. Bring up the Run dialog box by either:
    • Pressing the Windows logo key Windows logo key + R
    • Right-click on the Windows logo Windows logo key on the Start Menu or press the Windows logo key Windows logo key + X and then select Run
  2. In the Run dialog box that appears, type regedit and select OK. If you're prompted for an administrator password or confirmation, type the password or provide confirmation.
  3. When the Registry Editor appears either:
  4. Left-click on the File pull-down menu and left-click on Import.
  5. Navigate to the location of the REG file you want to import and left-click on it.
  6. Left-click on the Open button. You should get a confirmation screen telling you successfully imported the file.

How to disable or enable auto-start programs and drivers in Windows 10 and Windows 11

Updated March 26, 2024

In doing computer repair, I often get asked, "Why does my computer take so long to start up?". Quite frequently, it turns out there are items set to auto-start that don't need to or don't exist anymore. Here's how to disable programs, drivers, and services that auto-start in Windows 10 and Windows 11.
How to disable or enable auto-start programs and drivers in Windows 10 and Windows 11

Now, this one doesn't cost any money and can dramatically improve the time it takes for your computer and programs to start up. By minimizing the number of applications that launch at startup, you can also free up memory.

Now, there are three (3) programs I use to enable or disable programs, drivers, or services that start up in Windows 10 and Windows 11. The built-in programs (Task Manager and System Configuration) are pretty safe to use but still can degrade performance if not used properly. The third program (Autoruns / Autoruns64) can be dangerous because not only can it enable or disable entries, but it can also delete them.

Note: I recommended that you make changes one at a time and restart between them. That way, you can find out if you need that program or service you just disabled. Yes, it's time-consuming, but sometimes you have to do it.

Task Manager (Auto-start programs)
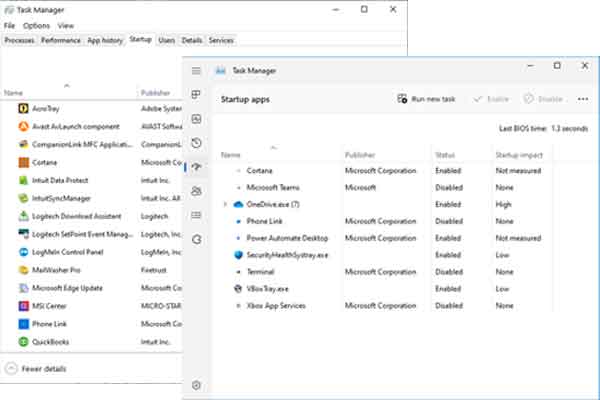
The Startup tab inside of Task Manager
The Startup tab inside of Windows 10 / Windows 11 Task Manager

Using Task Manager is the most comfortable and safest way to enable or disable programs that auto-start with Windows 10 and Windows 11. None of the programs listed here are going to prevent your computer from starting if disabled. You will not find any program listed here that Windows 10 or Windows 11 requires to operate.

Now, for those of you who are not familiar with Task Manager, it's a built-in program that does a lot of different things. It monitors running programs, system performance, and active processes. And it also manages programs that auto-start with Windows.

How to start Task Manager in Windows 10 and Windows 11

  1. Right-click on the Start Windows logo key button to bring up the Power User menu.
  2. Left-click on Task Manager.

or

  1. Press CTRL + ALT + DEL all at the same time.
  2. From the security screen that appears, left-click on Task Manager.

or

  1. Right-click on an empty area of the Taskbar.
  2. On the context menu that appears, left-click on Task Manager.

Sometimes, the first time you run Task Manager, it will only display running apps. You have to left-click the More details arrow to view all the tabs. The location of the tabs varies from Windows 10 (across the top) to Windows 11 (down the left side).

Once the tabs are displayed, left-click on Startup (Windows 10) or Startup apps (Windows 11). From here, all you have to do is highlight the program name and select the Enable / Disable button.

System Configuration (Auto-start services)
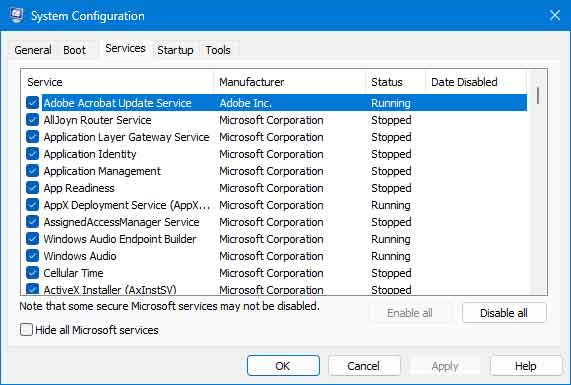
The Services tab inside of System Configuration

This program is used mainly for diagnostics, so there are no splashy graphics. With System Configuration, you can change the services that auto-start with Windows. Be careful about making changes here, as they can have a significant impact on system performance.

How to start System Configuration in Windows 10

  1. Left-click on the Start button Windows logo and scroll down the list of applications to Windows Administrative Tools.
  2. Left-click on Windows Administrative Tools to expand the contents.
  3. Scroll down and left-click on System Configuration.

How to start System Configuration in Windows 11

  1. Left-click on the Start button Windows logo to bring up the Start menu.
  2. In the upper right-hand corner of the Start menu, left-click on All apps.
  3. Scroll down the list of programs and left-click on Windows Tools.
  4. Left-click on System Configuration.

How to start System Configuration in both Windows 10 and 11

  1. Press the Windows logo key Windows logo key + R to bring up the Run dialog box.
  2. Type in MSCONFIG and left-click on OK.

From the default dialog box, select the Service tab. There, you will find all the services that auto-start with Windows. Remember that some of the Microsoft services listed cannot be disabled, so it's always best to select the Hide all Microsoft services checkbox at the bottom of the services section.

Once you have made your changes left-click on the Apply button, then left-click on the OK button. You will get a dialog box prompting you to either Restart or Exit without restart. Left-click on Restart, and you're ready to go. Remember to make changes one at a time and restart in between changes.

Autoruns / Autoruns64 (Auto-start programs, drivers, and services)
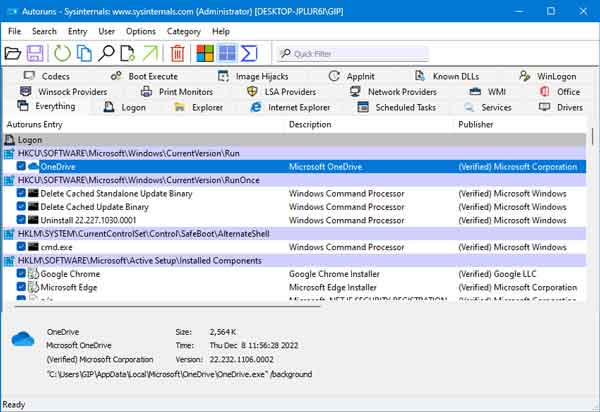
The Everything tab inside of Microsoft Autoruns
The Everything tab inside Microsoft Autoruns

Autoruns.exe (32-bit) and Autoruns64.exe (64-bit) are part of Microsoft's Sysinternals Suite of troubleshooting utilities and do not come with Windows 10 or Windows 11. But they are free, require no installation, and can be downloaded separately or with the complete suite (see links below).

Now Autoruns.exe will only run on 32-bit versions of Windows 10, and Autoruns64.exe will only run on 64-bit versions of Windows 10 and Windows 11. Windows 11 does not come in a 32-bit version. Most versions of Windows 10 are 64-bit, so if you have any doubt about what version of Windows 10 you have, download Autoruns64.exe first.

This program is the most complex of them all. And the most dangerous! Why do you ask? Besides being able to disable programs, drivers, and services that auto-start, you can also delete their load points altogether. So be careful!

Once you have downloaded the files and extracted them to a permanent location, open that folder with File Explorer. Locate either Autoruns.exe or Autoruns64.exe (depending on your version of Windows 10). Right-click on the release of Autoruns for your version of Windows 10 / Windows 11 and select Run as administrator from the context menu.

When you start Autoruns, it automatically scans your computer for auto-start programs, drivers, and services. Autoruns has multiple tabs for the different Windows auto-start locations (logon, services, drivers, etc.), including one called Everything. And if you select the User pull-down menu on the toolbar on top of the program, you can also select the different user profiles.

If you want to disable/enable a program or driver, left-click on the checkbox on the left-hand side of the entry. You can also delete an entry, but I recommend that you back it up first, just in case. If you find you don't need the backup, you can delete the file later.

To back up an entry in Autoruns, you right-click on it, and a context menu will appear. Left-click on Jump to entry ... and the Registry Editor opens to the location in the registry of that entry. Right-click on the selected entry in the Registry Editor, and a context menu appears. Left-click on Export and select a location and file name for your backup file.

Autoruns
Sysinternals Suite

Navigating Windows 10

Updated June 4, 2020

It seems nowadays everyone is looking for ways to get things done quicker. The same holds for your computer. The faster you can open a program or document, the better. So here are my favorite tips for navigating Windows 10.

Navigating Windows 10

Since I do computer repair for a living, I've had to find ways to navigate Windows' different versions. With Windows 10, Microsoft keeps some of the cooler features while adding some new ones. And they even brought back one feature from previous versions. Let's take a look at my favorite ways to get around inside of Windows 10.

Power User menu

This little pop-up menu is a fast way to find some of the core features inside of Windows 10. It first appeared in Windows 8 to supplement the loss of the Start Menu. It never got the publicity it deserved, and only real geeks knew it existed. My customers are still amazed the first time I use it in front of them.

Lucky for us, Microsoft decided to keep the Power Users menu in Windows 10. It is still the fastest way to get to features like the Apps and Features, Network Connections, and Computer Management. Here's how to display the Power User menu in Windows 10.

Windows 10 Power User menu

There are two (2) ways of displaying the Power User menu in Windows 10: Mouse or Keyboard.

Using your mouse to display the Power User menu in Windows 10

Right-click on the Windows logo Windows logo key on the Start Menu

Using your keyboard to display the Power User menu in Windows 10

Press the Windows logo key Windows logo key + X

If you use the keyboard to bring up the Power User menu, you'll find that the programs/features listed have a single letter in their name underlined. These are also keyboard shortcuts to that particular program/feature. Here's a link to the complete list of the Power User menu keyboard shortcuts for Windows 10.

Power User menu keyboard shortcuts

Windows logo key shortcuts for Windows 10

Here's is another handy feature that nobody knows about, the Windows logo key. I have customers ask me, "What does that key with the Windows logo do?". Well, its primary use is to bring up the Start Menu, but it does more. Allot more.

The Windows logo key was introduced over twenty-five (25) years ago alongside Windows 95 and the new Start Menu. There were only a handful of Windows logo key shortcuts at that time, and you had to purchase a Windows 95 compatible keyboard to use them. Now you can't find a Windows-compatible keyboard without it.

There are now close to forty (40) Windows logo key shortcuts in Windows 10. Once you try them out, you'll wonder how you lived without for so long. Here's a link to the complete list of Windows logo key shortcuts.

Windows logo key shortcuts for Windows 10

Shortcut keys in Windows 10

Here is one of those 'old school' features that I love to use. Did you know that you can open almost any shortcut with just your keyboard? By simply editing a shortcut, you open it with a combination of three (3) keys.

Now, if you have used Windows for a while, you know what a shortcut is. And if not, no biggie. Here's how to create a shortcut in Windows 10.

Allot of people don't know that they can edit a shortcut and change how it works, including adding a keyboard shortcut to it. The keyboard shortcut for your shortcut needs to be a combination of three (3) keys, and the first two (2) keys have to be CTRL and ALT. The third key is your choice, but I try to use either the first letter of the program/file or a letter close to CTRL and ALT keys.

The shortcut key field inside of the properties a shortcut
The shortcut key field inside of the properties of a shortcut

How to add a keyboard shortcut to an existing shortcut

  1. Right-click on the shortcut you want to modify and from the context menu that appears select Properties.
  2. When the properties dialog box appears, make sure the Shortcut tab is selected.
  3. Go down to the Shortcut key field and left-click inside the area (the cursor will blink).
  4. Press the CTRL key and the key you want to be assigned to the shortcut simultaneously (Windows will automatically add the ALT).
  5. Left-click on Apply and you are done.

Start Menu

And last but not least is the Start Menu. After a brief disappearance in Windows 8, Microsoft decided to bring it back. It's now got a slightly different look and feel, but it still does what it is supposed to do: Navigate.

How to clean up an old joystick or game controller

Do you have an old PC joystick or game controller you haven't used in a long time? Did the buttons or the gamepad start to stick? Here's how to clean up old PC joysticks and game controllers.

If you're like me, you hate to get rid of anything that still works. So when I wrote the DosBox and Internet Archive articles, I started to think about the old game controllers I have. There is nothing wrong with them, just a little dirt and grime.

And how much fun would it be to play the original DOS version of Doom with an original Gravis Gamepad Pro from the mid-'90s? Gravis made a couple of variations of the gamepad with a couple of different connectors (USB and joystick port). I had both types but only have the USB version now.

After a little research, I found I could use a Gravis Gamepad Pro, as long as it had a USB connection. Microsoft still includes support for the Gravis Gamepad Pro inside of Windows 10.

The Gravis Gamepad Pro icon inside of Windows 10 Devices and Printers

And to top it off, DosBox does support USB game controllers, so I am almost ready to start playing games with my gamepad. But first, I need to clean it up, as some of the buttons have gotten sticky.

Now when you start talking about disassembling and reassembling any piece of electronics, always remember to never work on anything that is plugged in (energized). Always disconnect the device from any connection and de-energize it before working on it. Never work on a device that is connected and energized!

The following procedures are the same for almost any computer device, except for Hard Disk Drives (HDD). HDD's have to be disassembled/reassembled in an environment free of contaminants, like a cleanroom.

Now before I start tearing down my gamepad, I will need some necessary tools. First and foremost is a digital camera or smartphone w/ camera and a notepad. Remember the old saying 'A picture is worth a thousand words'? The same holds here. With no service manual or online instructions, I'll be tearing down the gamepad blind. The photos and notes will be my guide for reassembly.

The teardown will be simple, and I'll only need a Philips head screwdriver (Ph.1), a couple of brushes, some cleaning solution, paper towels, and some compressed air. Tweezers or needle-nose pliers may also come in handy but are not required.

The first thing I'll do is take photos of the top, bottom, and sides of the gamepad. That way, I have a record of how the wholly assembled gamepad should look. Next, I'll start removing the screws on the bottom and checking to see if all of them are the same size. If any are different, I'll note it and place them separate from the rest.

Screw hole locations on bottom of Gravis Gamepad Pro
Screw hole locations on the bottom of Gravis Gamepad Pro

Once I have all of the screws out of the bottom, I can carefully separate the top and bottom of the gamepad chassis. I can see there are two (2) screws that hold the main circuit board in place. After I remove the two (2) screws, I carefully remove the main circuit board from the chassis. Remember to take photos of everything you do!

Main circuit board screw locations inside of the Gravis Gamepad Pro
Central circuit board screw locations inside of the Gravis Gamepad Pro

Now I can access all of the buttons and the rubber castle switch tops. I first inspect the heads of castle switches for any damage. They have no physical damage and appear to be pretty clean. Since they are almost twenty (20) years, I've decided they don't need cleaning.

The Gravis Gamepad Pro completely disassembled

Now on to the buttons. As I remove them, I can see some gunk built-up around the sides of the buttons and the adjacent holes in the chassis. Quick cleaning of the button and frame will take care of this and should fix the sticky button problem.

A gunked up button from a Gravis Gamepad Pro

When it comes to drying all of the parts off, I usually use paper towels to get the majority of moisture off and then use some compressed air to get any moisture out from the cracks and crevices.

Once all of the parts are clean and dry, refer to your photos and notes to reassemble. Remember not to overtighten any screw or nut; you can always make a second pass around and snug up any screws and nuts that need it.

Free computer diagnostics

Repairing a PC can sometimes be expensive, and that is why we offer free basic in-shop diagnostics. Give one of our professional and experienced technicians a call at (602) 795-1111, and let's see what we can do for you.

Check out our reviews

Geeks In Phoenix LLC, BBB Business Review

Customer service is #1

Here at Geeks in Phoenix, we take pride in providing excellent customer service. We aim to give the highest quality of service  from computer repair, virus removal, and data recovery.

Bring your computer to us and save

Repairing a computer can be time-consuming. That is why we base our in-shop service on the time we work on your computer, not the time it takes for your computer to work! From running memory checking software to scanning for viruses, these are processes that can take some time.

Contact us

If you have any questions, please feel free to give us a call at (602) 795-1111  and talk with one of our Geeks. Or you can send us a message from our contact page contact page , and one of our Geeks will get back to you as soon as possible. Or you can stop by and see us. Here are our hours and location.

Like Geeks in Phoenix on Facebook

Follow Geeks in Phoenix on Twitter

Watch Geeks in Phoenix on YouTube