Geeks in Phoenix

Geek Blog


My four favorite free programs I always recommend

Being a computer repair technician, I get asked a lot of questions. Quite a few of them are about what software do I recommend. And since I am frugal, I will usually suggest free ones. So here are my four (4) favorite free programs I always suggest.

My 4 favorite free programs I always recommend

Free graphic programs

When it comes to graphics, everyone knows about Photoshop. And you have probably heard the phrase 'photoshopped' before. Photoshop has become the leading image editor.

But what if you cannot afford Photoshop? Well, there are other alternatives for image editing. And it just so happens that they are free too.

Paint.NET

The user interface inside of Paint.NET 4

Paint.NET started as a free replacement for the Paint program that comes with Windows. But it has grown to be a top-line graphics editor that compares to Photoshop for all of its useful features.

Paint.NET has quite the intuitive interface and includes support for layers, special effects, and hundreds of plugins. Paint.NET runs only on the Windows platform and does require the latest version of the .NET framework.

Click here for more information on Paint.NET

GIMP

The GIMP user interface

GIMP (GNU Image Manipulation Program) is another alternative image editor for Photoshop. It has a full set of editing tools, including layers, channels and over 100 plugins.

GIMP is part of the GNU Project, which is open-source, so you are encouraged to participate in its development. GIMP will run on Windows, OS X, and GNU/Linux operating systems.

Click here for more information on GIMP

Free productivity programs

OpenOffice

The main screen inside of OpenOffice 4

When it comes to productivity software, there is one question I regularly get, "Is there an alternative to Microsoft Office?". I always respond with "Yes, Apache OpenOffice. And it is free.".

Apache OpenOffice is another open-source project that is comparable and compatible with Microsoft Office. You can open, edit, and save all Microsoft Office file formats with OpenOffice.

It has Writer, a word processor equivalent to Microsoft Word, Calc, a spreadsheet program comparable to Microsoft Excel and Impress, a multi-media slide-show presentation program equivalent to Microsoft PowerPoint.

It also includes Draw, a graphic program equivalent to Microsoft Paint and Base, a database program comparable to Microsoft Access. There are versions of OpenOffice for Windows, OS 10 and Linux operating systems.

Click here for more information on OpenOffice

Free anti-spam program

MailWasher Free

E-mail is the most popular way right now for hackers to attack your computer. All they have to do is get you to open a bogus e-mail in a web browser or e-mail client.

But with MailWasher Free, you can check your mail securely. MailWasher Free downloads nothing but the text of your e-mail. It will not download attachments or display HTML formatted mail by default. It will render HTML e-mail, but only after you get a security warning.

Now, you cannot use MailWasher Free as an e-mail client, since it does not have an e-mail editor. It is just for deleting unwanted mail on your mail server—that way, the unsolicited mail never makes its way into your browser or mail program.

Now MailWasher Free is supported by ads inside the program itself. If you have more than one e-mail address or want to avoid the advertisements, you may want to think about purchasing MailWasher Pro.

Click here for more information on MailWasher free

My digital toolbox 3

When it comes to repairing computers, every technician has what I call a digital toolbox. It is software that they use for specific tasks, like finding information on hardware or cloning drives. So here is another installment of my digital toolbox.

My digital toolbox 3

CPU-Z

Screenshot of CPU-Z

When it comes to finding the specifications of your motherboard, processor, etc., you could open your computer case and disassemble the components to get that information. Or you could download and run CPU-Z.

CPU-Z will display all of the information on your CPU (Central Processing Unit), motherboard, memory, and GPU (Graphics Processing Unit). It can even benchmark your existing processor against preloaded reference CPU's.

I recently needed to find out what specific memory a laptop was running. Instead of tearing it down to look at the memory modules, I just ran CPU-Z. If you need to know the specifications of your computer's hardware, CPU-Z is a great way to do it.

Click here for more information on CPU-Z

Samsung Data Migration

Screenshot of Samsung Data Migration

Now upgrading your HDD (Hard Disk Drive) to an SSD (Solid State Drive) can be tricky. But if you purchase specific Samsung SSD's, you can utilize their free cloning software, Samsung SSD Data Migration.

I have used this software before, and it does work pretty flawlessly. All you have to do is download and install the Samsung Data Migration software on your computer. The only thing you will need is a drive adapter or docking station to attach the Samsung SSD to your system.

Once you have the Samsung Data Migration software installed, you attach your new Samsung SSD via an adapter or docking station and then start up the Samsung Data Migration software.

Now you have to keep in mind that you want to have a Samsung SSD that is relatively the same size or larger (in gigabytes) than your existing drive (HDD or SSD). That way, you don't have any issues with shrinking any of the partitions. Expanding them is easy, shrinking them can cause problems.

Another thing to keep in mind is if your cloning a 3.5" desktop HDD to a 2.5" Samsung SSD and your computer case does not have a 2.5" mounting bracket, you will need to have a 2.5" to 3.5" adapter bracket.

As I mentioned before, Samsung Data Migration software works with specific Samsung SSD's, so check the user manual first for the list of supported Samsung drives.

Click here for more information on Samsung Data Migration

Acronis True Image WD Edition Software

Screenshot of Acronis True Image WD Edition Software

Now when it comes to free drive cloning software, nobody can beat Western Digital. They offer a stripped-down version of Acronis True Image for use with any Western Digital HDD or Sandisk SSD.

The beautiful thing about this software is that besides drive cloning, it will also backup the entire system, individual partitions, or just folder/files. You have to have a qualifying drive (Western Digital or Sandisk).

Now, this software will clone to either a physically installed drive or one connected via a drive adapter or docking station. It has its boot loader in which it boots to when cloning a drive.

Just remember that when using any drive cloning software, you will need to turn the computer off after the cloning process is finished and change the new cloned drive out for the old existing drive.

Click here for more information on Acronis True Image WD Edition

How to tell if your desktop computer power supply has failed

Updated March 18, 2024

There may be a time when your desktop computer does not start. There could be a few reasons why it does not start. The first thing that comes to mind is a failed power supply. Here's how to test your desktop power supply.

How to tell if your desktop computer power supply has failed

Living in Phoenix, we have one thing that takes a toll on a desktop computer. No, it is not the heat; it is the dust. Since our environment here is so dry, we get a lot of dust.

How to clean the dust out of your computer

And since dust conducts electricity, power supplies tend to fail. Even if you routinely clean your desktop computer, it only has a life span of 3 to 5 years. So, if you press the power button, your desktop computer does not start, and there are no lights that light up, you may have a failed power supply. Now, if you do not feel comfortable working around electricity or inside your desktop computer, please contact a local computer technician.

How to test your desktop computer power supply

  1. Disconnect the power cord that comes from the outlet to the power supply.
  2. After you have disconnected the power cord, open up the case and touch any metal part of the power supply or case to discharge any remaining energy.
  3. Make a note or take pictures of the connections that lead from the power supply to the devices. Once you have documented all of the power leads, then remove all of the connectors (SATA, Molex, PCI-e, ATX, ATX12V, etc.) that lead to all of the different devices and motherboard.
  4. Create a jumper from a piece of thin gauge wire or paper clip.
  5. Using the jumper you created,
    Motherboard power supply connectior
    connect Pin 16 to either Pin 17 or Pin 18 on the ATX 24-PIN (20+4) connector.
  6. Make sure the power supply is turned on and then plug the power cord back into the jack on the back of the power supply. If the power supply fan starts to run, the power supply has an output voltage and is in good condition. If the power supply fan does not spin, it is time to replace it.

If your power supply has failed, make a note of what type and how many connectors your existing power supply has.
Common desktop power supply connections
Also, check the stated output of your existing power supply from the label on the side.

I also recommend that you use a tape measure or ruler to measure the dimensions of the power supply, (Width x Height x Depth) as you will want to get as close as possible to these for the replacement power supply.

How to get to and use the Run dialog box in Windows

Updated April 15, 2024

There may be a time when you need to run a program in Windows that does not have a shortcut to it. Usually, this program is not often used. So here is how to start an application using the Run dialog box.

How to get to and use the Run dialog box in Windows

The Run dialog box is for running programs that you don't necessarily use that often and do not have a shortcut. These programs may be system applications or downloaded installation programs.

There are two (2) ways to use the Run dialog box. If you know the name of the application you want to start, type it into the Run dialog box and click OK.

For example, if you have Microsoft Word installed on your computer, you can type Winword (the actual name of Microsoft Word) in the Run dialog box and click OK. Microsoft Word will then start. That is because the program directory is in the Path (it is an environmental variable). The Windows system directory is in the Path by default.

If your program is not in the Path (the system variable used to locate executable programs), you must click Browse and manually find the program you want to start. Once you have the program's name in the Run dialog box, click on OK.

Now, bringing up the Run dialog box is relatively simple. The way you get to it is different in each version of Windows, but there is one keyboard shortcut that works for all versions.

Windows logo key Windows logo key + R

Here are all the ways to access the Run dialog box in the different versions of Windows.

How to bring up the Run dialog box in Windows 11

The Run dialog box in Windows 11

  1. Left-click on the magnifying glass to the right of the Start button to bring up the Search dialog box.
  2. Type Run into the Search box and left-click on the app Run.

Or

  1. Left-click on the Start button to bring up the Start menu.
  2. In the upper right-hand corner of the Start menu, left-click on All apps.
  3. Scroll down the list of programs and left-click on Windows Tools.
  4. Left-click on Run.

Or

  1. Right-click on the Start menu to bring up the Power User menu.
  2. Left-click on Run.

Or

  1. Press the Windows logo key Windows logo key + X to bring up the Power User menu.
  2. Press the R key.

Or

  1. Press the Windows logo key Windows logo key + R.

How to bring up the Run dialog box in Windows 10

The Run dialog box in Windows 10

  1. Type Run in the Search box (Cortana) on the right side of the Start button.
  2. Left-click on Run in the search results.

Or

  1. Left-click on the Start menu.
  2. Scroll down the list of programs until you come to the Windows System folder.
  3. Left-click on the Windows System folder to expand it.
  4. Left-click on Run.

Or

  1. Right-click on the Start menu to bring up the Power User menu.
  2. Left-click on Run.

Or

  1. Press the Windows logo key Windows logo key + X to bring up the Power User menu.
  2. Press the R key.

Or

  1. Press the Windows logo key Windows logo key + R.

How to bring up the Run dialog box in Windows 8.1

The Run dialog box in Windows 8.1

  1. Left-click on the Start button.
  2. When the Start screen appears, type Run. It will automatically bring up the Search dialog box with Run in the search field, and the results will appear below it.
  3. Left-click on Run.

Or

  1. Right-click on the Start button to bring up the Power User menu.
  2. Left-click on Run.

Or

  1. Press the Windows logo key Windows logo key + X to bring up the Power User menu.
  2. Press the R key.

Or

  1. Press the Windows logo key Windows logo key + R.

How to bring up the Run dialog box in Windows 7

The Run dialog box in Windows 7

  1. Left-click on the Start menu.
  2. Navigate to All Programs > Accessories.
  3. Left-click on Run.

Or

  1. Left-click on the Start menu.
  2. Type Run in the search box right above the Taskbar.
  3. Left-click on Run in the search results.

Or

  1. Press the Windows logo key Windows logo key + R.

Things to keep in mind when building a custom-built computer

Updated January 10, 2024

So, you are thinking about building a computer. There are a lot of things you have to choose. So here are a few things to keep in mind when assembling your custom-built computer.

Things to keep in mind when building a custom-built computer

Building your system can be pretty satisfying, like being able to say, "I built it myself". And you can also perform any service on it since you know the location of all the components.

But if you do not plan it out, it can be a nightmare. For instance, if you have to return incorrect components. It can be a real headache if you order them online and have to ship them back.

So, let's take a look at some of the details you have to consider before purchasing the components for your custom-built computer.

Form vs. Function

It is an age-old problem: Form vs. Function. Do you want a system that is incredible looking or takes up very little space (Form)? Or maybe a system that can run intense graphic games or can hold a ton of components (Function)?

Over the years, I have built both types of computers for my personal use. My first few were made purely for function, playing games, and a ton of storage using a RAID (Redundant Array of Independent Disks).

They were big and not very pretty to look at, but they served the purpose. But systems like that have one big issue: cooling. Trying to keep all of the components at a reasonable temperature was tough.

Now a few years ago, I decided that I was tired of having to leave the side panel of my computer case off and having a fan blowing air into it. It just didn't look right to me or others that I might have come into my office.

I wasn't playing the games anymore, and the capacity of drives had increased, so I did not need to have a RAID anymore. So, I decided to start using a case that was more appealing to the eyes.

A custom-built computer based on Form

If you are thinking about building your custom-built computer based on form, then the first thing you have to decide on is the case. They come in all sorts of sizes, ranging from the ultra-small mini-ITX to an ATX benchcase.

You can go with a conventional-looking case or something unique, like clear Plexiglass. You can get computer cases with a ton of LEDs or just plain.
A computer case with a faux stone and chalkboard finish
You can find them in all sorts of colors, or you can finish it yourself.

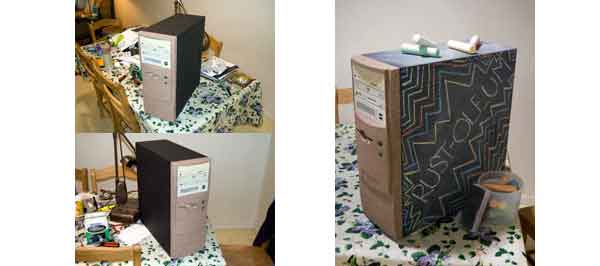
Custom cases: Faux Stone and Chalkboard
Custom cases: Back in Black
Custom Cases: The Antec Skeleton

Or you can go with something utterly open like an Antec Skeleton.
An orginal Antec Skeleton case
It comes down to how you want your custom-built computer to look. Once you have decided on a case, the case will dictate what components you can put inside (motherboard, graphics card, power supply, etc.).

If the case you want to use can hold a micro-ATX or standard ATX motherboard, follow the Function factor instructions below. If the case you want to use is a mini-ITX or mini-ATX Form factor, finding a motherboard is the next step.

Since mini-ITX and mini-ATX cases are small, the motherboards for them will have limited CPU (Central Processing Unit) options. Remember that the faster the CPU runs, the more heat it will make.

And with smaller mini-ITX and mini-ATX cases, CPU cooling options may be limited to just air-cooled heatsinks. It just depends on how much space inside the computer case you have available.

When it comes to GPUs (Graphics Processing Unit), you may or may not have room for one. But if you are not using your system for graphic-intensive programs like Photoshop or games, and your CPU/motherboard supports onboard graphics, you can easily use it for your video output.

In some mini-ITX and mini-ATX cases, you can use a GPU if you use a riser board that comes up off of the motherboard. But keep in mind that some cases can use full-height expansion cards, and some can use only half-height expansion cards, so double-check the computer case specifications.

When it comes to drives, you may want to go with an M.2 SSD (Solid State Drive) as a primary drive and an HDD (Hard Disk Drive) as a secondary drive. Of course it all depends on what drive connections your motherboard has and what size drive(s) you can mount inside the case. The same holds for a CD / DVD / BD optical drive.

You will also need a power supply that fits the case size. Some cases come with them, but most do not. And be prepared to pay a little more for the smaller form factor, mini-ITX, and mini-ATX power supplies than micro-ATX or standard ATX ones.

You will need to make sure the power supply has enough of the proper connectors (ATX12V, SATA, PCIe, Molex) for all of the different components. If you are going to use a GPU, make sure you have enough PCI-e (6-pin, 8-pin, or 16-pin) power connectors.

And lastly, you are going to need some memory modules. Just check the motherboard specifications to determine what type of memory and how many it can handle. You can usually install one memory module, but I always recommend installing them in pairs (2, 4, 6, 8, etc.). You can get a better price on memory modules if you buy them in twin-packs and quad-packs.

A custom-built computer based on Function

If you are thinking about building your custom-built computer based on its Function, then the first thing you have to decide is what CPU (Central Processing Unit) you are going to use (AMD or Intel).

As strange as it may sound, the CPU will dictate everything else in your computer. For example, let's say you want to build a high-end gaming or 3d rendering machine, and you want to run an Intel Xeon or Intel I9 processor.

First, you will need to find a motherboard with all of the features, like PCI-e slots, you want, and the correct socket type for the processor you have chosen to use. Always check the motherboard's specifications to make sure that the processor you want to use is supported.

Remember that even if a motherboard has the correct socket type, the BIOS (Basic Input/Output System) may not support the CPU you have selected. I always go to the manufacturer's website and double-check the supported CPUs.

Now that you have the CPU and motherboard selected, how are you going to cool the CPU? Air or liquid? Air-cooled heatsinks sit on top of the CPU and can get large (tall), so you will have to have a case that has enough room for it.

The same thing holds for liquid coolers, but they utilize radiators that must be mounted inside the case, either on the rear, top, or front. I preferred the top or front-mounted liquid CPU coolers, as the radiators have far more surface area for cooling the liquid than ones that mount in the rear of the case.

And if you are thinking about overclocking your CPU, then go with a large, top-mounted liquid CPU cooler. But remember that overclocking will, in some cases, void the CPU manufacturer's warranty, so be careful and keep it cool.

The next thing to consider is the GPU (Graphics Processing Unit) / graphics card(s). Most high-end GPUs require more space inside of the case, and if you want to use multiple GPUs, then you will need a computer case that is large enough to hold them all.

By now you have a good idea of what size of computer case you will need. You are probably looking for a mid-size or full-size tower. Keep in mind that proper airflow inside the case is essential. So, having at least one fan in the front and rear of the computer case is recommended.

The next thing to look at is the power supply. Since you are looking at a mid to full-size case, a standard ATX-type power supply is what you are going to need. You need to know how many watts all of the components you want to use will require. A 600 to 1000-watt power supply should be sufficient.

You will need to make sure the power supply has enough of the proper connectors (ATX12V, SATA, PCIe, Molex) for the motherboard and components you want to use. Keep in mind what additional power the GPU (6-pin, 8-pin, or 16-pin PCI-e) might require. Each 6-pin PCI-e connection for the GPU is roughly 75 watts.

And of course, you are going to need some memory modules. Just check the motherboard specifications to determine what type of memory and how many it can handle. You can usually install one memory module, but I always recommend installing them in pairs (2, 4, 6, 8, etc.). You can get a better price on memory modules if you buy them in twin-packs and quad-packs.

As far as drives are concerned, you can usually go with either an M.2 or 2.5" (Solid State Drive (SSD)) or 3.5" (Hard Disk Drive (HDD)) drives. If you are building a high-end system, you will want to go with one of each (an SSD as the first (boot) drive with an HDD for storage as the second drive). A CD / DVD / BD optical drive is entirely optional.

With all of that said, you should be ready to assemble your custom-built computer. And if you feel overwhelmed with it all, go ahead and contact a local computer technician, like Geeks in Phoenix, for assistance.

For more information on building your own computer, check out the following articles.

How to build a computer

How to find compatible computer parts online

Common problems to avoid when building your own computer

Tips for choosing the perfect case for your computer

Free computer diagnostics

Repairing a PC can sometimes be expensive, and that is why we offer free basic in-shop diagnostics. Give one of our professional and experienced technicians a call at (602) 795-1111, and let's see what we can do for you.

Check out our reviews

Geeks In Phoenix LLC, BBB Business Review

Customer service is #1

Here at Geeks in Phoenix, we take pride in providing excellent customer service. We aim to give the highest quality of service  from computer repair, virus removal, and data recovery.

Bring your computer to us and save

Repairing a computer can be time-consuming. That is why we base our in-shop service on the time we work on your computer, not the time it takes for your computer to work! From running memory checking software to scanning for viruses, these are processes that can take some time.

Contact us

If you have any questions, please feel free to give us a call at (602) 795-1111  and talk with one of our Geeks. Or you can send us a message from our contact page contact page , and one of our Geeks will get back to you as soon as possible. Or you can stop by and see us. Here are our hours and location.

Like Geeks in Phoenix on Facebook

Follow Geeks in Phoenix on Twitter

Watch Geeks in Phoenix on YouTube