Geeks in Phoenix

Geek Blog


Download old software and play old video games at the Internet Archive

Have you ever wanted to play an old video game from your past? Maybe play Pitfall on the Atari 2600 or Super Donkey Kong on a Colecovision? You can all that and more at the Internet Archive.

The Internet Archive logo

The Internet Archive (IA) is an online digital library with free ebooks/text, videos, audio recordings, software, and images. But they are best known for their history of websites for over 20 years.

Websites

The IA has an impressive archive of websites going back over twenty (20) years. Search the Way Back Machine for Microsoft.com or Facebook.com, and you can find their very first websites. I found one of the early versions of my first website from 1998.

But since these pages are cached versions of the originals, some elements might be missing. Photos, videos, and Flash / Java elements have a tendency not to get cached. But it's still fun to see what the Internet looked like a couple of decades ago.

eBooks and Text

With over ten million titles in their library, you would be hard-pressed not to find something that interests you. Keep in mind that some of these titles are old, but you can still see all sorts of cool publications. Hey, where else are you going to find a copy of Family Computing from December 1983?

The cover of Family Computing from December 1983

The IA even has the ebooks/texts broken down into collections. I found a copy of The Principle of Relativity from 1920 in the MIT Library. There are all sorts of hidden gems here. All you have to do is search through them. And with over 10 million titles, that may take some time.

Videos

This is my second favorite collection, and I have spent hours going through them. There are films, movies, and videos ranging from old-time movies to classic cartoons. When was the last time you saw an old Popeye or Woody Woodpecker cartoon?

And if you're a computer geek like me, you'll love the Computer & Technology collection. From old episodes of the Computer Chronicles and Net Cafe to made for TV movies like the Pirates of Silicon Valley from 1999. With over 2 million titles, you know I'll be spending more of my free time going through them.

Audio

The collections here range from old-time radio programs like Dragnet from the '50s to Grateful Dead concerts from the '70s. The quality of the audio will vary from file to file, but that is to be expected. Some of these recordings are quite old.

Also mixed into this collection, you'll find audiobooks and poetry readings. I even found some recordings from the Spin Doctors and the Gin Blossoms. With around 3 million audio files, there should be something for everyone.

Software

Now I guess that I don't have to tell you that this is my favorite collection of all. The software here ranges from video game consoles from the '70's - '90's to old DOS and Windows games/programs. Most of the DOS games and video game consoles are emulated, so that you can play these games right from inside your browser.

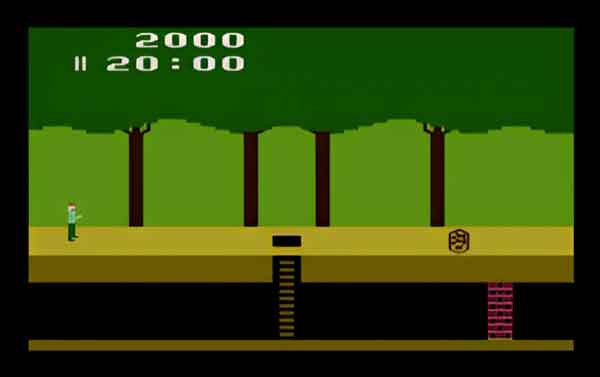
The Atari 2600 version of Pitfall

Does anybody remember Tucows? Tucows was the place in the '90s to go for shareware/freeware software. Well, they donated all of their software titles a decade or so ago to the IA, and they are all here available for download.

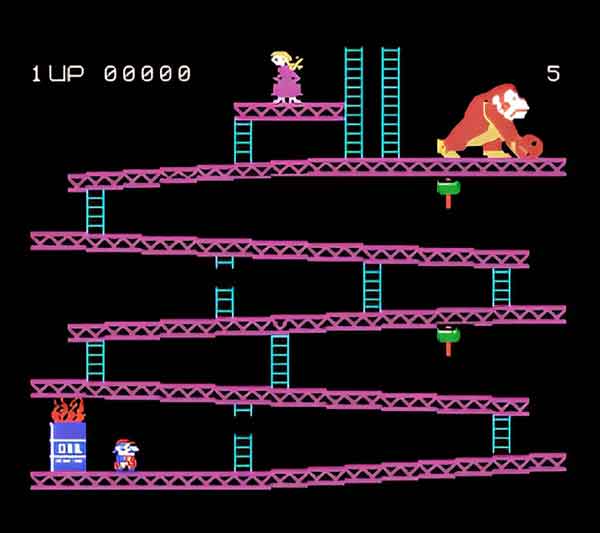
The Colecovision version of Super Donkey Kong

Now you can download most of the Windows software, but be aware that some are 16-bit and will not run on 64-bit operating systems. If you want to run some of the old Windows software, you will need to set up a virtual machine like VirtualBox running that particular operating system.

Images

This collection is a mixed bag. You have images from the USGS (United States Geological Survey), the Metropolitan Museum of Art, and album cover art all in one place.

But the best image collection, I think, is the one from NASA. Some of the images are quite incredible. If you get a chance, check out the Moon - False Color Mosaic image.

Now before you go checking the IA out, I want to let you know that they are a non-profit organization (501C), and all donations are tax-deductible. So if you find it useful and fun as I do, please donate.

To get the most out of the IA, it is recommended that you register for a virtual library card. For more information on the Internet Archive, follow the link below.

Internet Archive: Digital Library of Free Books, Movies, Music & Wayback Machine

How to create ISO files from your software disks

Updated January 20, 2021

So over the years, you've been purchasing software on CD's / DVD's and now have quite the collection. So what do you do with all of the media you are no longer using? How about creating ISO files from them? Here's how to create ISO files from your software CDs / DVDs.

After working with computers for over twenty years, I've managed to amass quite the collection of software disks. One of my biggest problems is that I'm not particularly eager to throw away software disks. You never know when you might need them again.

Now in my book, there are two kinds of disks; Keepers and Tossers. Software that you paid for is a Keeper; software that comes in the mail/paper is usually a Tosser.

I'm old enough to remember the AOL disks used to come in the newspaper (1 gazillion free hours!). The AOL disks were always quite colorful and made a great wall collage or mobile.

Now I realize that properly stored CDs/DVDs can last quite a long time. I have some CDs that are around 20 years old, and I can still read them with my Windows 10 computer. So why would you want to change?

Well, first off, disks can get damaged. You can use a unique tool to buff it out if you scratch the bottom of a disc. But if scratch the top of a disc, you can damage the layer that stores data. Geek Tip: To destroy the data on a CD / DVD before throwing it away, scratch off all of the top layers of the disk with a sharp object, like a nail.

Second, not all devices have nowadays have CD / DVD drives (tablets, netbooks, and ultra-thin laptops). Not having an optical disc drive can make installing older software on a newer computer a bit of a problem. So what is the solution? ISO (International Organization for Standardization) files.

ISO (.iso) files are an archive file format for optical disks, like CDs and DVDs. They contain an exact sector-by-sector, non-compressed copy of a disc. All you need is a computer with a CD/DVD drive, your original disc(s), a program that creates ISO files, and plenty of free space on your hard drive.

Here's a list of a few free programs that create ISO files.

AnyBurn

Casper ISO Creator - CMM Solutions

The Official ImgBurn Website

CDBurnerXP: Free CD and DVD burning software

Once you have created your ISO files, you can do some cool things with them. Archiving your ISO files is the first thing you probably want to consider. External drives (flash, portable, or desktop) are great for storing ISO files. I've taken several small ISO files and burned them on to DVDs for off-site storage.

Now, what can you do with an ISO file? Sure, you can make a new CD / DVD using an ISO file. This feature is built-in to Windows 7, Windows 8.1, and Windows 10. You can use a program like Rufus if you want to burn an ISO file to a USB drive. And if you're using Windows 8.1 or Windows 10, you can even mount (open as a virtual drive) an ISO file and install directly from it. Great for when you don't have a CD/DVD drive.

How to burn an ISO file to disk inside of Windows 7, Windows 8.1 and Windows 10

  1. Open File Explorer
    • Windows 7 - From the desktop, left-click on the File Explorer icon on the Taskbar or press the Windows logo key Windows logo key + E.
    • Windows 8.1 - From the desktop, left-click on the File Explorer icon on the Taskbar, press the Windows logo key Windows logo key + E or right-click on the Start button and left-click on File Explorer from the Power User menu.
    • Windows 10 - From the desktop, left-click on the File Explorer icon on the Taskbar, press the Windows logo key Windows logo key + E, left-clicking the Start button and left-clicking on File Explorer or right-click on the Start button and left-click on File Explorer from the Power User menu.
  2. Locate the ISO file you want to create a disk from.
    The ISO file context menu inside of Windows 7
  3. Right-click on the ISO file and then left-click on Burn disc image.
  4. Insert a blank disk into the CD / DVD drive.
  5. Left-click on Burn.

How to mount an ISO file as a virtual drive inside of Windows 8.1 and Windows 10

  1. Open File Explorer
    • Windows 7 - From the desktop, left-click on the File Explorer icon on the Taskbar or press the Windows logo key Windows logo key + E.
    • Windows 8.1 - From the desktop, left-click on the File Explorer icon on the Taskbar, press the Windows logo key Windows logo key + E or right-click on the Start button and left-click on File Explorer from the Power User menu.
    • Windows 10 - From the desktop, left-click on the File Explorer icon on the Taskbar, press the Windows logo key Windows logo key + E, left-clicking the Start button and left-clicking on File Explorer or right-click on the Start button and left-click on File Explorer from the Power User menu.
  2. Locate the ISO file you want to mount as a virtual drive.
    The ISO file context menu inside of Windows 10
  3. Right-click on the ISO file and then left-click on Mount.
  4. Locate the new drive inside of File Explorer and use it as an actual CD/DVD drive.

How to use DOSBox to run old DOS games and programs

Sometimes it is fun to go back and play the DOS video games I grew up playing. But it can be challenging since Windows doesn't utilize DOS anymore. But you can still run your old DOS games using DOSBox.

How to use DOSBox to run old DOS games and programs

So the other day, I was going through some old CDs and came across a Gravis Gamepad disk from 1996. It has a few DOS shareware games I used to love to play, including Doom.

My first thought was, "Wouldn't it be fun to go through a couple of levels of Doom?". My next idea was, "It's not going to be easy to set up.". Since the DOS games I wanted to play were 16-bit, the 64-bit version of Windows 10 I am running wasn't going to do it.

There were only two (2) solutions that came to mind; an MS-DOS Virtual Machine or a Personal Computer (PC) emulator like DOSBox. Since I just wanted to play a few games, DOSBox was the simplest way to go.

Now DOSBox is not a full-blown version of DOS and lacks many of the features of MS-DOS. DOSBox is designed to facilitate running older DOS games. It will run some DOS programs too, but results will vary.

To get more features, you would need to look at an SVN build. An SVN build is a version of DOSBox that people have made from the latest version of the source code. Additional features you can get with an SVN build include copy/paste and printing support.

Now to get things going, I went through the Gravis disk and found the games I wanted to play. The way DOSBox works is it creates a virtual DOS environment using an existing folder as the root DOS drive. So I created a new folder in File Explorer on my D: drive named DOSStuff to use as the DOS root drive. I then created a sub-folder called Temp and copied all of the DOS game folders I wanted from the Gravis disk to it.

Now just for the sake of argument, I decided to see what would happen if I tried to run one of the install programs/scripts from a 64-bit Windows 10 command prompt. Sure enough, I got an error about running 16-bit applications. I was going to need to install DOSBox first.

16-bit error message inside of Windows 10

So I downloaded and installed the basic version of DOSBox. The installation was quick and straightforward. I made a couple of minor changes to the DOSBox options, so it would automatically mount the D:\DOSStuff folder as the virtual C: drive and change the command prompt drive letter to C:. All of the old DOS commands were coming back to me.

F.Y.I. - I use the term Folder for when I'm in Windows and Directory for when I'm in DOS. They are both the same thing. I'm just old-school when it comes to DOS.

DOSBox running on a 64-bit version of Windows 10

I quickly navigated to the Temp directory in the DOSBox command prompt. I then proceeded to go into each game directory via the DOSBox command prompt and run each of the install programs/scripts. With a little tweaking of the game options, I'm off to relive some of my favorite DOS video games using DOSBox.

Doom running inside of DOSBox on Windows 10

For more information on DOSBox, follow the links below.

DOSBox, an x86 emulator with DOS
DOSBox SVN Builds

How to use Libraries in Windows 10 and Windows 11

Updated October 2, 2022

Remember the old saying, "A place for everything and everything in its place"? The same holds for your files inside of Windows 10 and Windows 11. And managing your data in Windows 10 and Windows 11 can be a breeze when you use Libraries.

One of my favorite Windows file/folder organization features has to be Libraries. Libraries are nothing more than a collection of shortcuts to the original file/folder locations. But the places can be on your local computer or a network drive. Once you add a location to a library, it's just one click away inside of File Explorer.

Now let's not confuse user file folders with Libraries. User file folders are actual folders; Libraries are collections of shortcuts to user file folders. Your user files are already included in the Libraries by default. User file folders must be located on your computer, but Libraries can be shortcuts to both local and network file folders.

It's somewhat ironic that one of the coolest features that I can think of inside of Windows 10 and Windows 11 is hidden by default. But you can un-hide Libraries in just seconds. Here's how:

How to enable the Library view in Windows 10

  1. Open File Explorer by either
    • Left-clicking on the File Explorer icon (manilla folder) on the Taskbar.
    • Left-clicking the Start button, scrolling down and expanding the Windows System folder and left-clicking on File Explorer.
    • Right-click on the Start button and left-click on File Explorer from the Power User menu.
    • Press the Windows logo key Windows logo key + E.
  2. Left-click on the View tab on the top of the Ribbon.
    How to enable the Library view in Windows 10
  3. Left-click on the Navigation pane button and left-click on Show libraries.

How to enable the Library view in Windows 11

  1. Open File Explorer by either
    • Left-clicking on the File Explorer icon (manilla folder) on the Taskbar.
    • Left-clicking the Start button, left-clicking on All apps, scrolling down and left-clicking on File Explorer.
    • Right-click on the Start button and left-click on File Explorer from the Power User menu.
    • Press the Windows logo key Windows logo key + E.
  2. Left-click on the See more three horizontal dots (...) in the upper right-hand corner
  3. In the context menu that appears, left-click on Options.
    Where to find Folder Options in Windows 11 File Explorer
    The Folder Options dialog box will appear.
  4. On the Folder Options dialog box, left-click on the View tab.
    Folder Options inside of Windows 11
    Scroll to the bottom of the Advanced settings, select Show libraries, and then left-click the Apply button.

How to modify Library properties in Windows 10 and Windows 11

We are all familiar with files and folders, but when Windows 7 came out, we got another way to manage them, Libraries. Libraries are where you go to manage your documents, music, pictures, and other files. You can browse your data the same way you would in a folder, or view your files arranged by properties like date, type, and author.

In some ways, a Library is similar to a folder. For example, when you open a Library, you'll see one or more files. However, unlike a folder, a Library gathers data stored in several locations. This is a subtle but significant difference. Libraries don't hold your files, just shortcuts to them. Libraries monitor folders containing your data and let you access and arrange the files differently. For instance, if you have music files in folders on your hard disk and an external drive, you can access all of your music files at once using the Music Library.

Windows 10 and Windows 11 have four (4) default libraries (Documents, Music, Pictures, and Videos) and include links to your user files by default. Remember that you can add up to fifty (50) folders to a Library. And if you like, you can also create your own Libraries. Here are some other ways you can modify an existing Library.

  • Include or remove a folder. Libraries gather content from included folders or Library locations.
  • Change the default save location. The default save location determines where an item is stored when it's copied, moved, or saved to the Library.
  • Change the type of file a library is optimized for. Each Library can be optimized for a specific file type (such as music or pictures). Optimizing a Library for a particular file type changes the available options for arranging your files.

How to add a folder to a Library in Windows 10 and Windows 11

  1. Open File Explorer (see enabling Library view).
  2. Right-click on the Library you'd like to change and select Show more options (Windows 11), Properties.
  3. Below the Library Locations box, click on Add, navigate to and highlight the folder you want to add to the Library, and left-click on Include folder.
  4. Left-click OK.

How to change a Library's default save location in Windows 10 and Windows 11

A Library's default save location determines where an item will be stored when it's copied, moved, or saved to the Library. You will need two or more folders in a Library to change the default save location.

  1. Open File Explorer (see enabling Library view).
  2. Right-click on the Library you'd like to change and select Show more options (Windows 11), Properties.
  3. Select the Library location you want as default, left-click on Set save location, and then left-click Apply.
  4. Left-click OK.

How to change the type of files a Library is optimized for in Windows 10 and Windows 11

Each Library can be optimized for a specific file type (such as music or pictures). Optimizing a Library for a particular kind of file changes the available options for arranging the data in that Library.

  1. Open File Explorer (see enabling Library view).
  2. Right-click on the Library you'd like to change and select Show more options (Windows 11), Properties.
  3. In the Optimize this library for list, select a file type and then left-click Apply.
  4. Left-click OK.

How to create a new Library in Windows 10 and Windows 11

  1. Open File Explorer (see enabling Library view).
  2. Right-click on Libraries and select Show more options (Windows 11), then New, then Library.
  3. Enter a name for the new Library, and then press Enter.

How to remove a folder from a Library in Windows 10 and Windows 11

If you don’t need a folder in a Library anymore, you can remove it. When you remove a folder from a Library location (shortcut), the folder and everything in it is still kept in its original location. Remember that when you delete a folder from a Library (folder), the folder and everything in it is deleted in its original location.

  1. Open File Explorer (see enabling Library view).
  2. Right-click on the Library you'd like to change and select Show more options (Windows 11), Properties.
  3. In the Library Locations dialog box, left-click on the folder you want to remove, left-click Remove, and then left-click OK.

How to add a network folder that is not indexed to a Library in Windows 10 and Windows 11

There will be times when you cannot get a shared network folder added to a Library due to indexing issues, and I found a way to get around this problem by creating a symbolic link.

  1. Open File Explorer (see enabling Library view).
  2. Left-click on This PC and create a folder on your drive for your network folders, for example, c:\share.
  3. Create another folder within that folder, for example, c:\share\music.
  4. Right-click the subfolder you just created and select Show more options (Windows 11), Include in library, and then select the library to which you want to add the folder or create a new Library.
  5. Delete the folder.
  6. Open a Command Prompt with Administrator privileges
  7. Enter mklink /d, and then enter the path of the folder you just deleted and the path of the network folder. For example, mklink /d c:\share\music \\server\music. If either of the folder names has spaces, encase the path(s) inside of quotes. For example, mklink /d "c:\shared files\music" "\\server\shared music". This creates what is called a symbolic link.

Here's how to create a symbolic link in Windows 8. It's the same procedure for Windows 10 and Windows 11.

How to change the default location of user files in Windows 10

User files (documents, music, photos, etc.) can take up a lot of space on your computer. But if you have a second drive inside your computer, you can quickly move your user folders to it. Here's how to change the default location of user files in Windows 10.

Nowadays, a few computers are coming with two drives, a Solid State Drive (SSD) and a Hard Disk Drive (HDD). Since SSD's are generally smaller in size and faster than HDD's, they usually are used just for the operating system and program files. User files should always be moved to the HDD to conserve space on the SSD.

Now there are seven (7) user file folders that you can be relocate: 3D Objects, Desktop, Documents, Downloads, Music, Pictures, and Videos. Before you change the location of the user file/folders, you will need to create new folders for your files.
Recently created new user folders inside of Windows 10
I usually create a folder called User Files in the root of the D: drive and then create the individual folders for each user; for example, D:\User Files\username\Desktop, D:\User Files\username\Documents, etc.

How to change the default location of user files in Windows 10

  1. Open File Explorer by either left-clicking on the File Explorer icon on the Taskbar, left-clicking on the Start button and selecting File Explorer, right-clicking on the Start button and selecting File Explorer from the Power Users menu or by pressing the Windows logo key Windows logo key + E.
  2. In the left-hand column, expand This PC so that the following folders are displayed: 3D Objects, Desktop, Documents, Downloads, Music, Pictures, and Videos.
    The context menu for user folders inside of Windows 10
  3. Right-click on the folder you want to move and from the context menu that appears, left-click on Properties.
  4. On the dialog box that appears, left-click on the Location tab.
    The properties dialog box for a user folder inside of Windows 10
  5. Left-click on the Move button.
    Select the new location of a user folder inside of Windows 10
  6. Navigate to the new location for the folder. Once you have selected the folder you want to use, left-click on the Select Folder button.
  7. Left-click on the Apply button in the lower right-hand corner.
  8. In the confirmation dialog box that appears, left-click on Yes.
  9. Left-click on the OK button in the lower left-hand corner.

How to restore the default location of user files in Windows 10

  1. Open File Explorer by either left-clicking on the File Explorer icon on the Taskbar, left-clicking on the Start button and selecting File Explorer, right-clicking on the Start button and selecting File Explorer from the Power Users menu or by pressing the Windows logo key Windows logo key + E.
  2. In the left-hand column, expand This PC so that the following folders are displayed: 3D Objects, Desktop, Documents, Downloads, Music, Pictures, and Videos.
  3. Right-click on the folder you want to move and from the context menu that appears, left-click on Properties.
  4. On the dialog box that appears, left-click on the Location tab.
  5. Left-click on the Restore Default button.
  6. Left-click on the Apply button in the lower right-hand corner.
  7. In the Create Folder dialog box that appears, left-click on Yes.
  8. In the confirmation dialog box that appears, left-click on Yes.
  9. Left-click on the OK button in the lower left-hand corner.

If encounter any problems changing the default user files location, you may need to manually change the user files location in the registry.

Free computer diagnostics

Repairing a PC can sometimes be expensive, and that is why we offer free basic in-shop diagnostics. Give one of our professional and experienced technicians a call at (602) 795-1111, and let's see what we can do for you.

Check out our reviews

Geeks In Phoenix LLC, BBB Business Review

Customer service is #1

Here at Geeks in Phoenix, we take pride in providing excellent customer service. We aim to give the highest quality of service  from computer repair, virus removal, and data recovery.

Bring your computer to us and save

Repairing a computer can be time-consuming. That is why we base our in-shop service on the time we work on your computer, not the time it takes for your computer to work! From running memory checking software to scanning for viruses, these are processes that can take some time.

Contact us

If you have any questions, please feel free to give us a call at (602) 795-1111  and talk with one of our Geeks. Or you can send us a message from our contact page contact page , and one of our Geeks will get back to you as soon as possible. Or you can stop by and see us. Here are our hours and location.

Like Geeks in Phoenix on Facebook

Follow Geeks in Phoenix on Twitter

Watch Geeks in Phoenix on YouTube