Geeks in Phoenix

Geek Blog


How to speed up Windows 10 using ReadyBoost

Updated May 6, 2024

Are you looking for an inexpensive way to boost the performance of your Windows 10 computer? If you have a USB flash drive and a spare USB port on your computer, ReadyBoost in Windows 10 might be the perfect solution.

How to speed up Windows 10 using ReadyBoost

If you have never heard of ReadyBoost, it is a program that caches files frequently used by Windows 10 and stores the cached data on a USB flash drive(s) or SD memory card.

ReadyBoost utilizes a service called SuperFetch. SuperFetch uses an algorithm to determine which files should be stored in the cache, which can include system files, application files, and user documents.

When Windows 10 needs to access these frequently used files, it goes to the ReadyBoost cache instead of the disk drive. If a file changes on the disk drive, it also changes in the cache, and vice versa.

Now, it is recommended that you use only USB flash drives for ReadyBoost on desktop computers. You can use a USB 2 or USB 3 port, but since a USB 3 port has a faster transfer rate, I recommend using one if you have one. However, you can use an SD memory card for a laptop computer if it has a fast enough transfer rate.

You can use more than one (1) USB flash drive for ReadyBoost. The recommended ratio between the ReadyBoost cache and system memory is 1:1 to 2.5:1.

So, if your computer has 8GB of memory, you could create a ReadyBoost cache between 8GB and 20GB. Alternatively, you could use a 32GB flash drive and allocate all of it to ReadyBoost.

Keep in mind that ReadyBoost was developed for use with Hard Disk Drives (HDD) and not Solid-State Drives (SSD). HDDs are known to have slower read and write times than SSDs.

ReadyBoost requirements for Windows 10

  • Minimum free space per flash drive/memory card: 1 GB
  • Maximum free spade per flash drive/memory card: 32 GB
  • Minimum transfer rate: 3.5 Mbit/s.
  • The flash drive/memory card format: NTFS

To make sure that your computer is ready to use ReadyBoost, you will need to make sure the SuperFetch (Windows 10 version 1803 or earlier) or SysMain (Windows 10 version 1809 or later) service is running. To check the status of the SuperFetch / SysMain service, follow these steps:

  1. Open a Run dialog box by pressing the Windows logo key Windows logo key + R.
  2. In the Open field type services.msc and then click OK.
  3. Scroll down the list of services until you find either:
    • SuperFetch
      The status of the SuperFetch inside of Services console
    • or
    • SysMain
      The status of the SysMain inside of Services console
  4. Make sure it is running and set to start Automatically.

You are now ready to set up a USB flash drive or SD memory card with ReadyBoost. Just insert the drive into a spare USB port or SD card slot and follow the instructions below.

How to turn ReadyBoost on or off inside of Windows 10

  1. Insert the USB flash drive or SD memory card you want to use with ReadyBoost.
  2. Open File Explorer by using one of the following:
    • Left-click on the manila folder icon to the Taskbar.
    • or
    • Press the Windows logo key Windows logo key + E at the same time.
  3. Navigate to the USB flash drive or SD memory card you want to use with ReadyBoost.
  4. Right-click on the drive you want to use for ReadyBoost.
    The context menu for a USB flash drive with Properties highlighted
  5. From the context menu that appears, left-click on Properties.
  6. On the Properties dialog box, left-click on the ReadyBoost tab.
    The ReadyBoost tab inside of USB flash drive Properties dialog box
  7. Once the system has analyzed the drive, select the options you want to use.

Speed up your Windows 8 computer with ReadyBoost

Does your Windows 8 computer take a long time to boot up or open programs? Does it seem like the hard drive light is always on? Then you might be able to speed up your computer by using ReadyBoost inside of Windows 8 and Windows 8.1.
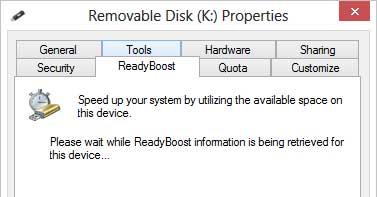
ReadyBoost testing a USB flash drive for capability in Windows 8

ReadyBoost is a disk caching software that allows you to use a compatible storage device (USB flash drive, SD card) as a hard drive cache for increasing the read access time to the hard drive. ReadyBoost will work with Hard Disk Drives (HDDs) and not Solid State Drives (SSD's), as SSD's already have fast read access times.
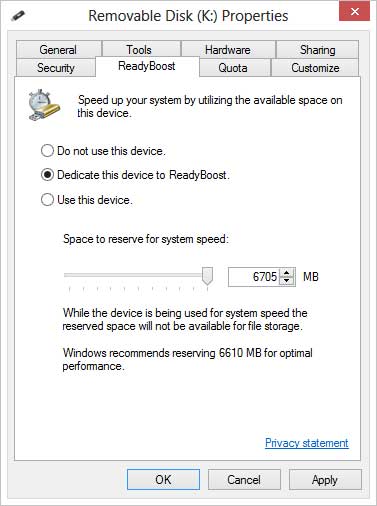
ReadyBoost options for a USB flash drive inside of Windows 8

You can use USB flash drives, SD cards, flash memory, or SSD's with ReadyBoost. Keep in mind that you will need to keep the storage device attached to the computer at all times. For desktops, think about using a spare USB port or two on the back of your system. ReadyBoost supports USB 2.0 or higher, so USB 3.0 port(s) would be preferred. For laptops, think SD card (if you have an SD reader built-in).

You will also need to format your storage device in NTFS or exFAT to get a ReadyBoost cache file larger than 4GB. The maximum ReadyBoost cache size is 32GB, and you can have up to eight (8) storage devices on one (1) system for a maximum total of 256GB. The recommended ratio of ReadyBoost memory to system memory is 1:1 to 2.5:1

Here are some tips for selecting a storage device from Microsoft's website:

The minimum amount of available space recommended for ReadyBoost to effectively speed up your computer is 1 GB.

For best results, use a flash drive or flash memory card with available space of at least double the amount of memory (RAM) in your computer, and preferably four times as much memory. For example, if your computer has 1 GB of RAM and you plug in a 4 GB USB flash drive, set aside at least 2 GB on the flash drive to get the best performance gain from ReadyBoost, and preferably the entire 4 GB. How much memory you need depends on how you use your computer. Keeping a lot of programs open at once uses more memory.

Give ReadyBoost 2 GB to 4 GB of space for the best results on most computers. You can reserve more than 4 GB of space for ReadyBoost on most flash drives and flash memory cards. (Storage devices formatted with the older FAT32 file system can't store more than 4 GB.) You can use a maximum of 32 GB of available space on any single removable storage device with ReadyBoost and up to 256 GB total per computer (by inserting up to eight USB flash drives or flash memory cards into the same computer).

To work with ReadyBoost, a USB flash drive must support USB 2.0 or higher. Your computer must have at least one free USB 2.0 port where you can plug in the flash drive. ReadyBoost works best if you plug the flash drive into a USB port directly on the computer, rather than into an external USB hub shared with other USB devices.

If you want to be sure a USB flash drive works with ReadyBoost, look for a note from the manufacturer that the flash drive is "Enhanced for ReadyBoost." Not all manufacturers list this on their packaging. If there is no mention of ReadyBoost compatibility, the flash drive still might work with ReadyBoost.

There are many different kinds of flash memory cards, such as CompactFlash and Secure Digital (SD) memory cards. Most memory cards work with ReadyBoost. Some SD memory cards don't work well with ReadyBoost due to issues with the SD card interface. ReadyBoost will display a warning message if you attempt to use one of these cards.

How to turn on ReadyBoost in Windows 8 / Windows 8.1

  1. Insert the storage device.
  2. Open the File Explorer:
    A. Swipe in from the screen's right edge or press the Windows logo key Windows logo key + C to bring up the Charms bar and then tap or left-click Search. Enter File Explorer in the search box, and then tap or left-click Apps. Tap or left-click File Explorer in the search results.
    B. On the Desktop, left-click on the File Explorer (manila folder) icon on the Taskbar.
    C. Press the Windows logo key Windows logo key + E.
  3. Right-click on the storage device you want to use with ReadyBoost and select Properties.
  4. From the Properties dialog box, select the ReadyBoost tab.
  5. Select your choice of options and click on Apply.

Improve the performance of Windows Vista and Windows 7 with ReadyBoost

I am always looking for different ways to improve the performance of Windows. One of the methods is to use ReadyBoost that is built into Windows 7 and Windows Vista. ReadyBoost can speed up your computer by caching files that the system frequently accesses on USB flash drives and SD / CF memory cards.

Windows 7 and Windows Vista use an algorithm named Windows SuperFetch to determine which files should be stored in the cache. SuperFetch monitors files that users access (including system files, application files, and documents) and pre-loads those files into the ReadyBoost cache. Because the ReadyBoost cache stores a copy of the files, the flash drive can be removed at any point without affecting the computer; Windows will read the original files from the disk.

When to use ReadyBoost to improve performance

  • The computer has a slow hard disk drive. Computers with a primary hard disk Windows Experience Index (WEI) subscore lower than 4.0 will see the most significant improvements.
  • The flash storage provides fast, random, non-sequential reads. Sequential read speed is less critical.
  • The flash storage is connected by a fast bus. Typically, USB memory card readers are not sufficiently fast. However, connecting flash memory to an internal memory card reader might provide acceptable performance.

Requirements for USB flash drives, SD / CF memory cards

  • Capacity of at least 256 MB, with at least 64 kilobytes (KB) of free space.
  • At least a 2.5 MB/sec throughput for 4-KB random reads
  • At least a 1.75 MB/sec throughput for 1-MB random writes

You must reserve at least 256 MB. Larger caches can improve performance, but the ReadyBoost cache in Windows 7 cannot be greater than 4 GB on a FAT32 file system or greater than 32 GB on an NTFS file system. Windows Vista has a 4 GB limit on both file systems. So, if your USB flash drive or SD / CF memory card is larger than 4 GB, it will need to be formatted in NTFS to create a ReadyBoost cache larger than 4 GB.

How to turn ReadyBoost on or off

  1. Plug a USB flash drive or SD / CF memory card into your computer.

  2. Autoplay dialog box with Speed up my system selected
  3. In the Autoplay dialog box, under General options, click Speed up my system.

  4. Drive options for ReadyBoost
  5. In the Properties dialog box, click the ReadyBoost tab, and then do one of the following:
    • To turn ReadyBoost off, click Do not use this device.
    • To use the maximum available space on the flash drive or memory card for ReadyBoost, click Dedicate this device to ReadyBoost. Windows will leave any files already stored on the device, but it'll use the rest to boost your system speed.
  6. To use less than the maximum available space on the device for ReadyBoost, click Use this device, and then move the slider to choose the amount of available space on the device you want to use.
  7. Click OK.

Free computer diagnostics

Repairing a PC can sometimes be expensive, and that is why we offer free basic in-shop diagnostics. Give one of our professional and experienced technicians a call at (602) 795-1111, and let's see what we can do for you.

Check out our reviews

Geeks In Phoenix LLC, BBB Business Review

Customer service is #1

Here at Geeks in Phoenix, we take pride in providing excellent customer service. We aim to give the highest quality of service  from computer repair, virus removal, and data recovery.

Bring your computer to us and save

Repairing a computer can be time-consuming. That is why we base our in-shop service on the time we work on your computer, not the time it takes for your computer to work! From running memory checking software to scanning for viruses, these are processes that can take some time.

Contact us

If you have any questions, please feel free to give us a call at (602) 795-1111  and talk with one of our Geeks. Or you can send us a message from our contact page , and one of our Geeks will get back to you as soon as possible. Or you can stop by and see us. Here are our hours and location.

Like Geeks in Phoenix on Facebook

Follow Geeks in Phoenix on Twitter

Watch Geeks in Phoenix on YouTube