Geeks in Phoenix

Geek Blog


How to share a folder on a private network in Windows 10

There may come a time when you want to share some files with someone on your private network. Maybe a document, spreadsheet, or a picture of your favorite pet. Here's how to share a folder across your private network in Windows 10.

How to share a folder on a private network in Windows 10

Note: Do not set up a shared folder if your computer is a laptop, and you use public WiFi Internet access at coffee shops, airports, etc.! The risk of being hacked and having the security of your laptop compromised is too high. These instructions are only for computers that are attached to private networks.

It may seem like a fairly easy thing to do to share a folder, but it can quickly become a problem. So what I am going to do is to go the steps of sharing a folder on a private network in Windows 10. Then we'll look at some of the things that may cause a problem. Let's get started.

The first thing we need to do is open File Explorer. There are several different ways to do this. You can:

  • Left-click on the File Explorer icon on the Taskbar (manilla folder).
  • Type File Explorer in the Cortana search box and left-click on File Explorer in the search results.
  • Right-click on the Start button and left-click on File Explorer from the Power User menu.
  • Press the Windows logo key Windows logo key + E.

Once you have File Explorer open, you need to find the folder you want to share. Navigate to This PC in the left-hand column, then to the local disk drive (usually C:\), then to the folder you want to share.

Keep in mind that you cannot share a complete drive (like C:\), only folders on it. You also cannot share mapped network folders either. You can only share folders located on your computer. For this demonstration, I am going to use a folder named Shared Folder.

I have located Shared Folder on my Local Disk C:\ drive, and I'm going to right-click on it and select Properties.
View of context menu for shared folder inside of File Explorer
I'm going to left-click on the Sharing tab
View of sharing tab for shared folder properties
and left-click on the Share button.
View of network access dialog box for shared folder
This brings up a Network access dialog box.

Your username should already be there with Owner permissions. You can keep just your username in the permissions box, but anyone trying to access that folder will need to have your username and password get into it. And if you don't use a password to log into your computer (local account), then you'll have to create a new user on your computer.

But if you just want to share the files and aren't worried about anybody seeing them, you can just let Everyone have access. By giving Everyone access, you don't have to have a password to get into the folder. But you will have to choose if you want Everyone to have Read or Read/Write permissions.

Either way, left-click on the pull-down menu and select either Everyone or Create a new user. If you decide to create a new user, the User Account dialog box appears. Left-click on Manage another account. On the next dialog box that appears, select Add a new user in PC settings. Then left-click on the plus (+) sign next to Add someone else to this PC and fill out the forms that follow.

Once you have another username in the Network access dialog box and have chosen the permission level,
View of network access dialog box for shared folder with everyone selected
left-click on the Share button in the lower right-hand corner. Then you will get a confirmation that the folder is now shared. Left-click on the Done button in the lower right-hand corner.

You are ready to go. You can either close the folder properties dialog box or add more sharing options like multiple share names or custom permissions using the Advanced Sharing button. But for basic folder sharing, you are all set.

Now let's find out if we can see the shared folder on your private network. You will need the name of your computer for this next step. Right-click on the Start menu and left-click on System on the Power User menu. Make a note of the device name in the right-hand column.

Next, go to another computer that is on the same private network and bring up File Explorer using the steps outlined earlier in this article. This time, instead of expanding the This PC folder in the left side column, we want to go down and left-click on the Network folder.

If you get a warning across the top of the File Explorer that says Network discovery is not turned on, left-click on it to activate it. Sometimes Windows 10 will mistakenly classify a private network as public. If you get a warning that the network you are on is not a private network, select the Make this network private.

The name of your computer should now show up under the Computer category of Network. If it does, double left-click on it, and you should now see the folder you shared and all of the files inside of it.

If you don't see your computer listed under Network, there are a couple of things you might want to check on your computer. The first thing to look for is a third-party firewall, like Norton or McAfee, that might be blocking access.

If you granted Everyone access to your shared folder, you can turn off password protected sharing under advanced sharing settings. Just right-click on the Start menu and left-click on Network Connections on the Power User menu. In the right-hand column left-click on Network and Sharing Center. On the screen that appears, left-click on Change advanced sharing settings.

Under All Networks find Password protected sharing and select Turn off password protected sharing. Go back to the other computer and try to access the shared folder on your computer under Networks. You should be able to view and open all of the files inside of it.

How to repair Windows 10 by doing an in-place upgrade

Updated May 14, 2020

Are you getting lots of errors when you log into Windows 10? Are you not able to get the Start menu or File Explorer to open? If so, it may be time to repair Windows 10 by doing an in-place upgrade.

Sometimes repairing Windows 10 can be a challenging endeavor. One time I had a Windows 10 system that the right-click mouse function would only work in certain situations.

Another time, I had a Windows 10 system that File Explorer and the Start menu would not work. This was one of those times when you think that you are going to just have to wipe the drive and do a clean installation of Windows 10.

But in both cases, I was able to repair Windows 10 while keeping all of the user's documents, settings, and installed programs. I just performed an in-place upgrade of Windows 10.

Remember that if you start the in-place upgrade by booting your computer up on the Windows 10 installation media, you will only get the option of saving your documents. To also preserve the installed programs, you need to start the in-place upgrade from inside of Windows 10.

Now performing an in-place upgrade is not hard. The only thing you need to do is make the Windows 10 installation media. If you can access the Internet and download the Windows 10 Media Creation Tool, great, if not, you will need to use another computer to make the Windows 10 installation media.

You do not have to be upgrading to a newer version of Windows 10 (1809 to 1903, 1903 to 1909) for this to work. You can perform an upgrade to the same version (1909 to 1909).

Now you never want to use an older version of the Windows 10 media, like the one you created a couple of years ago, to do an in-place upgrade. You will always want to download the latest version directly from Microsoft using the Windows 10 Media Creation Tool.

To make the media, you will need either a blank DVD or a USB flash drive that is at least 8GB in size. Remember that if you use a USB flash drive, it will be reformatted and everything on it will be erased. So, if you have used the USB drive for anything else, you may want to copy the data off of it before using it for the Windows 10 installation media.

Once you get the Windows 10 Media Creation Tool downloaded, all you have to do is double-click the file to run it. It is a stand-alone program, and it does not require any installation.

The first screen that comes up is the legal stuff, just click on Accept. On the next screen, you will have to choose what you want to do.
Windows 10 installer what do you want to do screen
Select Create installation media for another PC and click on Next.

On the next screen, you will select the language, architecture, and edition.
Windows 10 installer select language and edition screen
Since you are creating the media for another computer, make sure the Use the recommended options for this PC checkbox is deselected. The majority of users in the US will select the following settings:

  • Language: English (If you use a different language, select it from the pull-down menu)
  • Edition: Windows 10
  • Architecture: 64-bit (x64)

When you are finished selecting the language, architecture, and edition, click on Next. The next screen will ask you what media do you want to use.
Windows 10 installer choose which media to use screen
If you select the USB flash drive option, make sure you have the USB flash drive inserted into a USB port on the computer.

If you want to make a DVD, you will need to choose the ISO file option and then burn it onto a blank DVD. Here is how to go about burning the ISO file to a DVD.

Once you have the media created, either a DVD or USB flash drive, you will need to insert it in the computer that you want to repair.
Windows 10 setup program in File Explorer
Then just open File Explorer, navigate to the DVD or USB flash drive, and right-click on the setup.exe program and select Run as administrator.
Windows 10 installation start up screen
The Windows 10 installer will then startup.

You will be prompted to download Windows 10 updates, drivers, and optional features. Since you are doing an in-place upgrade, I recommend waiting until the installation is finished before doing any updates.

The next screen you will get is the license agreement. Just click Accept in the lower right-hand corner and continue with the in-place upgrade. Finally, you will get to the screen that asks what you want to keep. Make sure that Keep personal files and apps are selected and then select Install in the lower right-hand corner.

The in-place upgrade will take some time, and your computer could restart a few times before it is complete. When it is done, your version of Windows 10 should be completely repaired and good as new.

Now in the examples I talked about earlier, I could not get either the right-click function to work or could not get the Start menu or File Explorer to open at all. But there is another way of starting the in-place upgrade using Task Manager.

How to start a program using Task Manager

Sometimes the only way to run a program is to use Task Manager. It is a simple, down, and dirty way of running a program with administrative privileges. And we want to use admin privileges to run the setup.exe program.

  1. Press the Ctrl + Alt + Delete keys all at the same time (the 3-finger salute).
    The Windows 10 Ctrl Alt Delete screen
    You will get a screen that has several selections on it. Click on Task Manager.
  2. The Task Manager program will appear next.
    The basic Windows 10 Task Manager screen
    If it shows says There are no running apps, click on the More details arrow in the bottom left-hand corner. This will bring up all of the running processes.
  3. Click on the File drop-down menu in the upper left-hand corner of Task Manager
    The advanced Windows 10 Task Manager screen with Run new task
    and select Run new task.
  4. The Create a new task dialog box will appear.
    The Windows 10 Create new task dialog box
    Click on the Browse .. button in the lower right-hand corner.
  5. Using the Browse dialog box, navigate to the drive with the Windows 10 installation files (either DVD or USB flash drive),
    The Windows 10 Task Manager Browse screen
    select setup.exe and then click Open.
  6. This will bring you back to the Create new task dialog box, and the path to the setup.exe program will be in the Open field.
    The Windows 10 Create new task dialog box with file path
    Make sure that the Create this task with administrative privileges checkbox is selected. Then click on OK.
  7. The Windows 10 installer will now start. Just follow the steps outlined previously in this article for the rest of the in-place upgrade.

How to get a free Windows 10 upgrade for Windows 7 and Windows 8.1

Updated May 15, 2020

Many people took advantage of the Get Windows 10 upgrade promotion, and some did not. If you are one of those who did not get your version of Windows 7 / Windows 8.1 upgrade for free, you still have an opportunity to do so. Here is how to get a free Windows 10 upgrade for Windows 7 and Windows 8.1.
How to get a free Windows 10 upgrade for Windows 7 and Windows 8.1

It has been a few years since Microsoft ran the Get Windows 10 promotion, and now you think you might like to get your version of Windows 7 or Windows 8.1 upgraded to Windows 10. The question is now, should you upgrade your computer to Windows 10?

If you think so, I will let you know a little secret. You can still get the upgrade for free. But there is a particular way you have to go about doing it. And there are some prerequisites you have to meet first.

First, your computer needs to be running a legally licensed, not pirated version of Windows 7 Service Pack 1 or Windows 8.1. The key here is running, as you will need to start the upgrade process from inside of Windows. In essence, you will perform what we call an in-place upgrade.

And since this is an in-place upgrade, you will need to know what edition of Windows you have. Just open a Run dialog box, type Winver and left-click on OK. It will list the Windows edition in the About Windows screen that appears. Here are the upgrade paths.

  • If you have Windows 7 Starter, Windows 7 Home Basic, Windows 7 Home Premium, or Windows 8.1 Home Basic, you will upgrade to Windows 10 Home.
  • If you have Windows 7 Professional, Windows 7 Ultimate, or Windows 8.1 Professional, you will upgrade to Windows 10 Professional.
  • If you have Windows 7 Enterprise or Windows 8.1 Enterprise, you will upgrade to Windows 10 Enterprise.

Second, your computer needs to meet the hardware requirements for Windows 10. Most computers running Windows 7 / 8.1 already meet the requirements, but there are exceptions. There are specific graphics processors known to be incompatible.

But the only way you will find out is by starting the upgrade process. The Windows 10 installer will run a check for hardware that will not work with Windows 10 and will allow you to stop the upgrade or continue.

If it turns out that the on-board graphics processor in your desktop computer is incompatible, you can always install an inexpensive (under $50) PCI-e graphics card (if you have an open PCI-e slot). Here is how to add an expansion card to your desktop computer. If your laptop has an incompatible graphics processor, you cannot upgrade it to Windows 10.

But there are a few things I recommend doing before starting the upgrade process. Checking for drive errors, cleaning up your drive, and uninstalling third-party anti-virus/malware software are just a few. And I recommend creating a full backup only in case something goes wrong. Just follow steps #2 through #6 in this article, seven things to do before and after upgrading to Windows 10.

Now there is a dirty little secret about upgrading to Windows 10 that nobody ever talks about, and that is the recovery media. Almost every computer comes with a hidden partition that has the original software that came pre-loaded with the machine.

When you perform an upgrade to Windows 10, the setup program will replace it with a copy of Windows 10. So, if you ever want to go back to the Windows version that came with your computer, you will need to create the recovery media before doing the upgrade. Check out the section 'Make the recovery media' in the following article, five things you should do first when you get a new computer.

Now, you have everything you need to take care of, and you are ready to start the Windows 10 upgrade. Since this will be an 'in-place upgrade', you will need the Windows 10 installation media. Let's make it.

The first thing you have to do is download and run the Windows 10 Media Creation Tool. This program can do a direct upgrade or create the Windows 10 media (USB or ISO file).
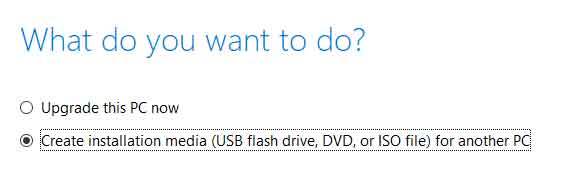
Windows 10 installer what do you want to do screen
I recommend creating the media (either USB or ISO). That way, you will have a copy of Windows 10, just in case you need it in the future.

The next thing you need to do is select what language, architecture, and edition you want to install.
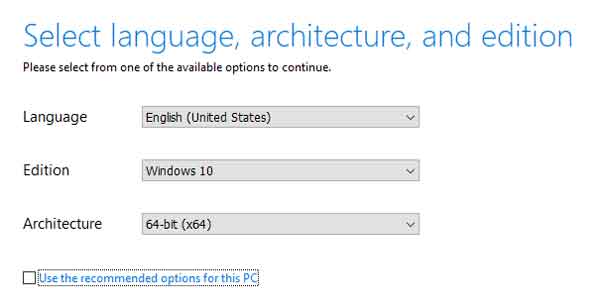
Windows 10 installer select language and edition screen
If the Use the recommended options for this PC checkbox is on the bottom, make sure it has a checkmark inside it. If not, refer to the edition information you collected earlier.

You will need either a blank DVD or a USB drive that is 8GB or larger. The Windows 10 Media Creation Tool will format a USB drive and make it ready to use.
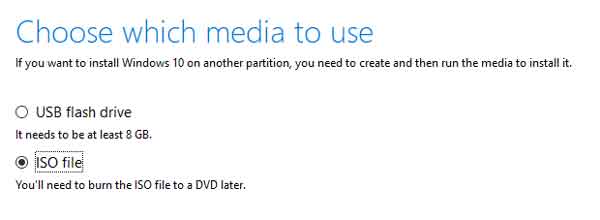
Windows 10 installer choose which media to use screen
If you download an ISO file, you will need to burn it to a DVD. Here is how to burn an ISO file to a disk.

There are a couple of reasons to install from media (USB or DVD) and not the Windows 10 Media Creation Tool. The #1 reason is you can always restart the installation if you need to take care of an issue or two.

Once you have the installation media created, you will have to start the upgrade by running the setup program located at the root of the installation media.
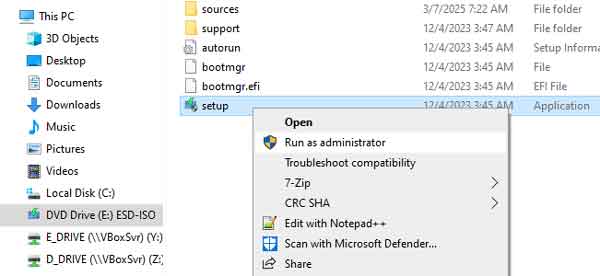
Windows 10 setup program in File Explorer
I recommend opening File Explorer and right-clicking on setup.exe and selecting Run as administrator.

The first screen that appears tells you that Windows 10 is going online to get updates, drivers, and optional features.
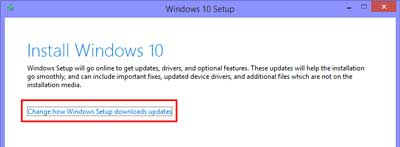
Windows 10 setup program prompting to download updates
If you click on the Change how Windows Setup downloads updates link, you can choose to download the updates or wait until later.
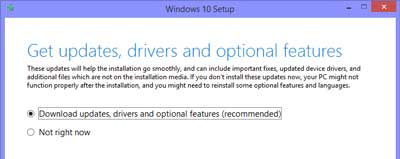
Windows 10 setup program update download options
You will be downloading the updates either way, so it is strictly your call. But I have found that a lot of the errors associated with the upgrade process can be avoided by waiting until the upgrade is complete before downloading and installing updates.

At some point, the installation will check the hardware and software installed. If it finds any incompatible software, like an anti-virus program, you may have to cancel the upgrade and remove the software.

If the installation finds incompatible hardware, you may have to cancel the upgrade to resolve the issue. Either way, you may be able to continue the update, but that depends on how critical the Windows 10 installer finds the software/hardware issue to be.

Once the upgrade is in process, it may take a couple of hours to complete. When the Windows 10 upgrade is complete, the original product key for your old version of Windows will be converted and uploaded to the cloud. It is called digital entitlement.

And if you ever need to reinstall Windows 10, all you have to do is download the latest version using the Windows 10 Media Creation Tool. It is the one Windows 10 feature you hope you never have to use.

Things to consider when replacing or upgrading computer components

Updated May 16, 2020

When doing computer repair for a living, there is one thing I do quite often: replacing and upgrading computer components. Whether it be replacing a hard drive or installing a new graphics card, there is always something you need to consider. So here are a few things you should ask yourself when selecting computer components.

Things to consider when replacing or upgrading computer components

Things to consider when replacing or upgrading your motherboard

    Form factor
  • What form factor size does your existing case support?
    If the motherboard you are looking at getting is ATX and your present case only has space and stand-offs for a mini-ATX motherboard, you will not be able to install the new motherboard.
  • Do you have any of the extra parts that came with the case, including stand-offs for the motherboard?
    If you are replacing a mini-ATX motherboard with an ATX motherboard and your case is large enough for it, do you have the stand-offs and screws for the extra mounting points that the new ATX motherboard will require?
  • Do you have the installation media for the operating system and all of your programs?
    When you change out a motherboard, unless it is from the same manufacturer and same model line, odds are you will need to perform a clean installation of the operating system and your apps. If you try and use the existing operating system currently installed with a new motherboard, you more than likely to get all sorts of errors. Be prepared to reinstall the OS and apps.
    CPU socket
  • What is the socket type of your existing CPU?
    You cannot use an LGA1150 processor in an LGA1151 socket.
  • Will the new motherboard your thinking about getting support your existing processor?
    You will need to do your research on the motherboard you are thinking about getting. If you cannot find the information online, give the manufacturer a call. There is nothing worse than getting a motherboard that you cannot use.
    Memory slot(s)
  • Does the motherboard your thinking about getting support your existing memory modules?
    Again, do your research. You have to make sure that everything is going to go smoothly when you do the upgrade.
  • Or are you going to need to get new memory modules?
    If you find out that you will need new memory modules, buy them in pairs (twin-pack, quad-pack). Try to avoid mixing different memory modules if you can. You will also find it cheaper to buy them in twin-packs or quad-packs than as single modules.
    Expansion slots (PCI-e)
  • What do you currently have for expansion cards?
    These include graphic card(s), RAID controller card(s), M.2 adapter card(s), Wi-Fi / ethernet card(s), etc..
  • And what type of expansion slot(s) do they use (PCI-e x16, PCI-e x4, PCI-e x1)?
    Make a note about all of the different PCI-e slots that are used on your existing motherboard and reference it when you are looking at a new motherboard.
    M.2 Slot(s)
  • If your existing mother has M.2 slot(s) and you use them, what form factor, key notches, and interface do they utilize?
    M.2 2242, M.2 2260, M.2 2280? B key, M key, or both? SATA 3, PCI-e 3, or NVMe?
    Internal USB connections
  • What type of USB headers does your current motherboard have?
    USB 2.0, USB 3.0, USB 3.1 Gen 1 or USB 3.1 Gen 2.
    Internal drive connectors
  • What type of internal drive connectors does your current motherboard have?
    SATA, SATA Express or U.2?
    Power connector
  • What type of power connectors does the motherboard your thinking about getting have (4-pin or 8-pin ATX 12V)?
    Does your existing power supply have the correct connector?

Related articles
Things to keep in mind when building a custom-built computer

Things to consider when replacing or upgrading your processor / CPU

    Socket type
  • What socket type does your current motherboard have (LGA 1151, LGA 2011, AMD AM3+, etc.)?
    Remember that you cannot use an LGA1150 processor in an LGA1151 socket.
    Motherboard compatibility
  • What processors does your current motherboard support?
    You will need to do your research on your existing motherboard. If you cannot find the information online, give the manufacturer a call. You may need to update the BIOS on your current motherboard to run the new processor you are thinking about getting.

Things to consider when replacing or upgrading your CPU cooler

    The space inside of case
  • Does your present case have the room for an upgraded CPU cooler?
    If you are thinking of air-cooled, do you have enough space on top of the CPU for it? If your thinking about liquid-cooled, do you have the correct mounting holes for it? And are you going to need to replace any of the existing case fan(s) to accommodate a new CPU cooler?
  • Does your motherboard have all of the connectors for running a liquid CPU cooler?
    Some liquid-coolers require power from an onboard USB header. Also, does your motherboard have any special liquid-cooler fan headers?

Things to consider when replacing or upgrading your graphics card / GPU

    Slot version
  • What version PCI-e slot (2.0, 3.0, 4.0) does your current motherboard have?
    To answer this question, you will need to reference the motherboard manual or specifications online. If you have a problem finding this information, just contact the motherboard manufacturer.
  • What PCI-e version is the graphics card you are looking at getting?
    Again, to answer this question, reference the graphic card manual or specifications online. If you have a problem finding this information, just contact the motherboard manufacturer.
    If the PCI-e slot on your motherboard is version 3 and the graphics card you are looking at getting is version 4, you will have a problem.

Related articles
How to add an expansion card to your desktop computer

    Power connection(s)
  • Does the graphics card you are looking at getting require a separate PCI-e power connector(s)? If so, are they 6-pin or 8-pin PCI-e connector(s), and how many does it need?
    You should be able to find this information on the vendors or manufacturers website. Even the box should have the information on the outside.
  • Does your current power supply have all of the proper PCI-e connector(s) for it?
    Some lower wattage power supplies have only 6-pin PCI-e connectors. Visually check your existing power supply for the type and quantity of PCI-e power connectors.

Things to consider when replacing or upgrading your memory

    Slot type and speed
  • What slot type and memory speed does your existing motherboard support (DDR3 2400, DDR4 4200, etc.)?
    To answer this question, you will need to reference the motherboard manual or specifications online. If you have a problem finding this information, just contact the motherboard manufacturer.
    Existing memory compatibly
  • Are you going to added more memory to your current memory?
    The one thing you want to try and avoid when adding memory is incompatibility with existing memory. If you plan on adding a couple of more memory modules, try to use the exact make and model of your current memory. Even though memory from different manufacturers may be the same slot and speed type, their clock timings can be different. So, it is always recommended to use the same make and model of memory in all of the slots.

Related articles
How to upgrade or add more memory to your computer

Things to consider when replacing or upgrading your drive

    Form factor and size
  • What size and form factor drive(s) are you looking at getting?
    If you are replacing an existing drive, you should go with one that is the same form factor (3.5", 2.5", M.2, or U.2) and the same size (GB's, TB's) or larger than your existing drive. If you are upgrading your drive to a different form factor (SSD, HDD, or U.2), you need to make sure your current case has a place to mount the other kind of drive (3.5" or 2.5"). If you are upgrading your drive to a different form factor (M.2, mSATA), you need to make sure your existing motherboard has the correct form factor (M.2 2242, M.2 2260, M.2 2280), key notches (B key, M key or both) and interface (SATA 3, PCI-e 3 or NVMe) as the drive you are looking at getting. If you are looking at getting an M.2 or mSATA and your motherboard does not have the appropriate slot, you will need to use an expansion card.

Related articles
How to upgrade the hard drive in your computer

Things to consider when replacing or upgrading your case

    Motherboard Form Factor (micro-ATX, ATX, ITX, etc.)
  • What is the form factor of your existing case?
    If the case you are looking at getting is designed for a mini-ATX motherboard, you will not get a standard ATX motherboard to fit in it. Check the case manufactures website to verify the motherboard form factors that will fit in it.
    CPU fan
  • Does the case you are looking at getting have enough space for your existing CPU fan?
    There is nothing worse than getting the motherboard, CPU, and cooler installed in a new case only to find out that you cannot get the side of the case on. Double-check all dimensions.
    Peripheral/expansion
  • Does it have enough front panel connectors for the onboard headers of the motherboard?
    It sucks having USB 3.0 header(s) on the motherboard and not having any or enough connectors on the front of the case.
  • If you have a DVD or BD drive, does it have a 5.25" drive bay in front for it?
    A lot of cases nowadays do not have 5.25" drive bays. If you have a 5.25" drive or drives (CD, DVD, BD), you will need to double-check the case you are looking at getting.

How to power reset your laptop computer

Updated May 16, 2020

Did you turn off your laptop, and now it will not start up again? Maybe you closed the lid, and now it will not come out of sleep mode? If so, you may need to power reset your laptop computer.

How to power reset your laptop computer

This has to be one of the most frustrating problems with laptops, you press the start button, and nothing happens. No lights, no sounds, no display. It seems like it is entirely dead. And in a way, it is. If your laptop computer turned off while you were using it, a power reset would not help. That would be a completely different problem.

The problem is that the system has built-up residual electrical charge in the capacitors. And the only way to get it to run again is to discharge the electrical load. The majority of the time, it is a quick fix. But there are times when it is not a quick fix. Let me explain. This procedure requires that you completely disconnect all power sources, ac adapter, and battery.

If you can remove the battery in your laptop from the bottom of the case, this will be pretty quick. If the battery is inside the laptop case, then it can be tricky, as you will have to disassemble the laptop to get to the internal battery. If you feel uncomfortable about taking your computer apart, please contact a local computer repair specialist like Geeks in Phoenix.

  1. Disconnect all devices from your laptop. This includes docking stations, USB devices, external displays, etc..
  2. Disconnect the ac adapter.
  3. Remove/disconnect the battery. The following steps require access to the battery.
    A laptop computer with a battery that is accessible from the bottom
    If the battery for your laptop is accessible from the bottom, remove it and proceed to the next step.
    A laptop computer with a battery that is accessible by removing the base
    If the battery is not accessible from the bottom, you would need to disassemble your laptop to gain access to it. Before you or a technician takes the computer apart, try step #4 first. If, after trying step #4, your laptop still does not startup, then you may need to disassemble it to get to the battery.
    A typical internal battery connection inside of a laptop computer
    Some batteries connect directly to the motherboard, and some connect via a cable. Depending on the type of battery your laptop has, you may or may not have to remove it.
  4. Hold down the Power button for 15 - 30 seconds. By holding down the Power button, you release all of the residual power left in the laptop. If you had to remove the base to get to the battery connection, place the bottom back on the computer and put it back in the standard operating position. Do not worry about screwing the base back on yet. Once you have discharged the laptop, you will reassemble it.
  5. Connect the ac adapter and plug it into an ac jack. Most instructions for releasing the residual electrical charge will have you reinstall/reconnect the battery first, then connect the ac adapter. If you leave the battery removed/disconnected, you avoid any issue that the battery might have, like low output.
  6. Press the power button. If the problem was a built-up residual electrical charge, your laptop should startup. The only error you might encounter is a warning about the battery missing.
  7. Shut down the laptop. If all went well, your computer started up and booted up the operating system. Just turn it off as you usually would.
  8. Disconnect the ac adapter.
  9. Reinstall/reconnect the battery. If you had to remove the base to get to the battery connection, you can reconnect it and screw the base back on to the laptop.
  10. Reconnect the ac adapter and start the laptop up again.

Free computer diagnostics

Repairing a PC can sometimes be expensive, and that is why we offer free basic in-shop diagnostics. Give one of our professional and experienced technicians a call at (602) 795-1111, and let's see what we can do for you.

Check out our reviews

Geeks In Phoenix LLC, BBB Business Review

Customer service is #1

Here at Geeks in Phoenix, we take pride in providing excellent customer service. We aim to give the highest quality of service  from computer repair, virus removal, and data recovery.

Bring your computer to us and save

Repairing a computer can be time-consuming. That is why we base our in-shop service on the time we work on your computer, not the time it takes for your computer to work! From running memory checking software to scanning for viruses, these are processes that can take some time.

Contact us

If you have any questions, please feel free to give us a call at (602) 795-1111  and talk with one of our Geeks. Or you can send us a message from our contact page contact page , and one of our Geeks will get back to you as soon as possible. Or you can stop by and see us. Here are our hours and location.

Like Geeks in Phoenix on Facebook

Follow Geeks in Phoenix on Twitter

Watch Geeks in Phoenix on YouTube