Geeks in Phoenix

Geek Blog


How to manually upgrade Windows 10 to Windows 11

Are you thinking about upgrading your computer from Windows 10 to Windows 11? Does your computer meet the Windows 11 hardware requirements? If you answered yes to both questions, consider performing a manual in-place upgrade from Windows 10 to Windows 11.

How to manually upgrade Windows 10 to Windows 11

Upgrading Windows has never been a really popular undertaking, but rather a chore that we put off as long as we can. In the corporate IT world, you usually do not deploy a new operating system until the second version is released.

The reasoning behind waiting for the second version is that all of the major bugs should be worked out by then. And it also gives software developers more time to perfect their software for Windows 11.

With the release of Windows 11 22H2, we now have the second version of Windows 11, which should be ready for the corporate environment. And if it is good enough for corporate, it should be good enough for you and me.

Microsoft recommends using Windows Update to perform the upgrade, but some people like myself want to decide when it will happen. I don't particularly appreciate getting an alert from Windows Update about an update waiting to be installed, only to find out that it is to Windows 11 (it has happened twice to me now).

When I started working with computers, upgrading your version of Windows was an all-day ordeal. Insert the floppy disk, read the floppy disk, eject the floppy disk, and repeat until complete. I still have the thirteen (13) floppy disks for upgrading to Windows 95.

Yes, in the past, upgrading the versions of Windows has been tedious. At least the process has gotten a little easier, but the steps to getting there are still the same. I still follow the same procedures upgrading Windows now as I did years ago; check for hardware compatibility, backup the drive that contains Windows, clean up Windows, check the Windows drive for errors, and then upgrade.

Since Windows 11 was built on the code of Windows 10, all of the programs you have currently installed in Windows 10 should work perfectly fine in Windows 11. But remember that there may be apps presently installed that you would not be able to reinstall on Windows 11, Quickbooks 2021, and earlier versions, for example.

Consider taking note of a few things that have changed in Windows 11 before upgrading. If you use pinned apps/websites or tablet mode, these features have been removed from Windows 11.

Check for hardware compatibility

The PC Health Check app running on Windows 10

The minimum hardware requirements for Windows 10 and Windows 11 are similar but do have differences. The significant hardware requirement for Windows 11 is TPM (Trusted Platform Module) version 2.0. If your computer was manufactured between 2018 and now, it probably has TPM 2.0 and may need to be enabled. Motherboard manufacturers disabled this feature by default before the release of Windows 11.

Since then, manufacturers now enable TPM by default. If your computer fails the PC Health Check (link below), and is only a couple of years old, check with the manufacturer of your system/motherboard on how to enable the TPM, as each platform uses a different name for TPM (Intel has PTT, AMD has fTPM) .

Also, if your computer has less than 4 GB of memory or is running a 32-bit version of Windows 10, you will not be able to upgrade to Windows 11. A good rule of thumb is that any computer built before 2018 will not be compatible with Windows 11.

To be on the safe side, Microsoft has a tool called PC Health Check that you can use to check Windows 11 compatibility. Once you verify compatibility, you can proceed to the next step.

PC Health Check

Backup your Windows 10 drive

The Backup and Restore app running on Windows 10

As I said before, the upgrade from Windows 10 to Windows 11 is pretty simple, but you never know what can happen. So as the old saying goes, "An ounce of prevention is worth a pound of cure," so backing up the drive where Windows 10 is installed is suggested but not required.

Backup your files with File History and Windows Backup in Windows 10

Clean up Windows 10

The Disk Cleanup app running on Windows 10

A little general cleaning is highly recommended to help to ensure nothing goes wrong with the upgrade and to facilitate a faster upgrade process. Clearing out temp files, Internet caches, and Windows Update can also free up some disk space.

Clean up your Windows 10 computer using the Storage feature

Clean up Windows 10 with Disk Cleanup

Check your Windows 10 drive for errors

A quick check of the disk with Windows installed on it is recommended to ensure the upgrade goes without any problems. It is better to find any errors now instead of during the upgrade. Remember, taking a few minutes now to check the drive can save you from having to use the backup you created earlier.

How to check your drive for errors in Windows 10

Upgrade Windows 10 to Windows 11

Windows 10 upgrading to Windows 11

Microsoft currently has two (2) ways to upgrade Windows 10 to Windows 11 manually; the Installation Assistant or installation media. The Installation Assistant is the easiest way to go, but the complete instructions on using both methods are on the Windows 11 download page.

Download Windows 11

How to get a free Windows 10 upgrade for Windows 7 and Windows 8.1

Updated May 15, 2020

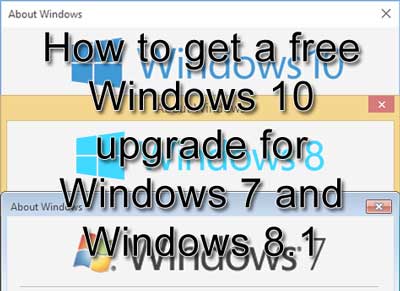
Many people took advantage of the Get Windows 10 upgrade promotion, and some did not. If you are one of those who did not get your version of Windows 7 / Windows 8.1 upgrade for free, you still have an opportunity to do so. Here is how to get a free Windows 10 upgrade for Windows 7 and Windows 8.1.

How to get a free Windows 10 upgrade for Windows 7 and Windows 8.1

It has been a few years since Microsoft ran the Get Windows 10 promotion, and now you think you might like to get your version of Windows 7 or Windows 8.1 upgraded to Windows 10. The question is now, should you upgrade your computer to Windows 10?

If you think so, I will let you know a little secret. You can still get the upgrade for free. But there is a particular way you have to go about doing it. And there are some prerequisites you have to meet first.

First, your computer needs to be running a legally licensed, not pirated version of Windows 7 Service Pack 1 or Windows 8.1. The key here is running, as you will need to start the upgrade process from inside of Windows. In essence, you will perform what we call an in-place upgrade.

And since this is an in-place upgrade, you will need to know what edition of Windows you have. Just open a Run dialog box, type Winver and left-click on OK. It will list the Windows edition in the About Windows screen that appears. Here are the upgrade paths.

  • If you have Windows 7 Starter, Windows 7 Home Basic, Windows 7 Home Premium, or Windows 8.1 Home Basic, you will upgrade to Windows 10 Home.
  • If you have Windows 7 Professional, Windows 7 Ultimate, or Windows 8.1 Professional, you will upgrade to Windows 10 Professional.
  • If you have Windows 7 Enterprise or Windows 8.1 Enterprise, you will upgrade to Windows 10 Enterprise.

Second, your computer needs to meet the hardware requirements for Windows 10. Most computers running Windows 7 / 8.1 already meet the requirements, but there are exceptions. There are specific graphics processors known to be incompatible.

But the only way you will find out is by starting the upgrade process. The Windows 10 installer will run a check for hardware that will not work with Windows 10 and will allow you to stop the upgrade or continue.

If it turns out that the on-board graphics processor in your desktop computer is incompatible, you can always install an inexpensive (under $50) PCI-e graphics card (if you have an open PCI-e slot). Here is how to add an expansion card to your desktop computer. If your laptop has an incompatible graphics processor, you cannot upgrade it to Windows 10.

But there are a few things I recommend doing before starting the upgrade process. Checking for drive errors, cleaning up your drive, and uninstalling third-party anti-virus/malware software are just a few. And I recommend creating a full backup only in case something goes wrong. Just follow steps #2 through #6 in this article, seven things to do before and after upgrading to Windows 10.

Now there is a dirty little secret about upgrading to Windows 10 that nobody ever talks about, and that is the recovery media. Almost every computer comes with a hidden partition that has the original software that came pre-loaded with the machine.

When you perform an upgrade to Windows 10, the setup program will replace it with a copy of Windows 10. So, if you ever want to go back to the Windows version that came with your computer, you will need to create the recovery media before doing the upgrade. Check out the section 'Make the recovery media' in the following article, five things you should do first when you get a new computer.

Now, you have everything you need to take care of, and you are ready to start the Windows 10 upgrade. Since this will be an 'in-place upgrade', you will need the Windows 10 installation media. Let's make it.

The first thing you have to do is download and run the Windows 10 Media Creation Tool. This program can do a direct upgrade or create the Windows 10 media (USB or ISO file).
Windows 10 installer what do you want to do screen
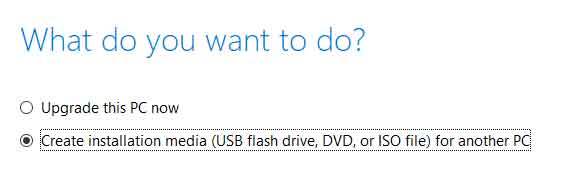
I recommend creating the media (either USB or ISO). That way, you will have a copy of Windows 10, just in case you need it in the future.

The next thing you need to do is select what language, architecture, and edition you want to install.
Windows 10 installer select language and edition screen
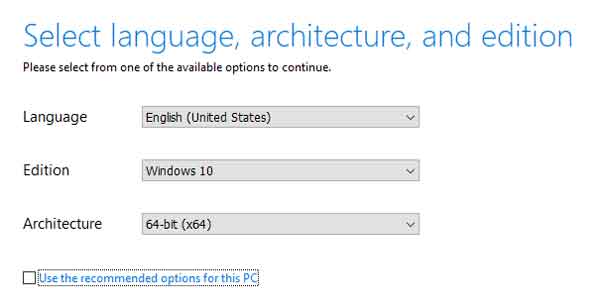
If the Use the recommended options for this PC checkbox is on the bottom, make sure it has a checkmark inside it. If not, refer to the edition information you collected earlier.

You will need either a blank DVD or a USB drive that is 8GB or larger. The Windows 10 Media Creation Tool will format a USB drive and make it ready to use.
Windows 10 installer choose which media to use screen
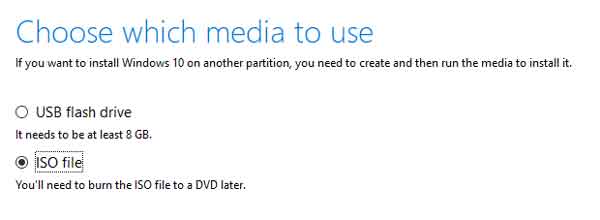
If you download an ISO file, you will need to burn it to a DVD. Here is how to burn an ISO file to a disk.

There are a couple of reasons to install from media (USB or DVD) and not the Windows 10 Media Creation Tool. The #1 reason is you can always restart the installation if you need to take care of an issue or two.

Once you have the installation media created, you will have to start the upgrade by running the setup program located at the root of the installation media.
Windows 10 setup program in File Explorer
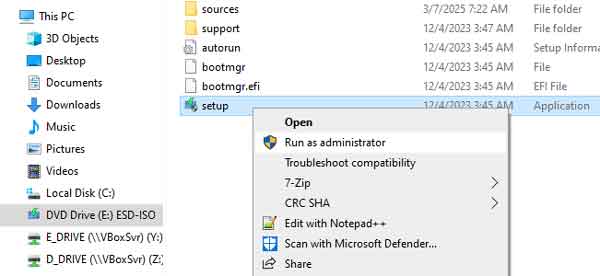
I recommend opening File Explorer and right-clicking on setup.exe and selecting Run as administrator.

The first screen that appears tells you that Windows 10 is going online to get updates, drivers, and optional features.
Windows 10 setup program prompting to download updates
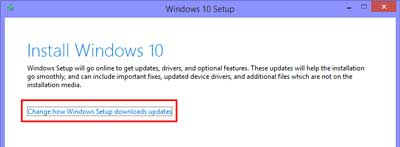
If you click on the Change how Windows Setup downloads updates link, you can choose to download the updates or wait until later.
Windows 10 setup program update download options
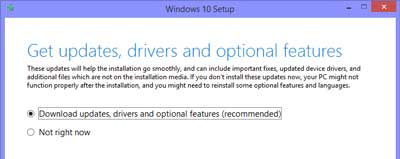
You will be downloading the updates either way, so it is strictly your call. But I have found that a lot of the errors associated with the upgrade process can be avoided by waiting until the upgrade is complete before downloading and installing updates.

At some point, the installation will check the hardware and software installed. If it finds any incompatible software, like an anti-virus program, you may have to cancel the upgrade and remove the software.

If the installation finds incompatible hardware, you may have to cancel the upgrade to resolve the issue. Either way, you may be able to continue the update, but that depends on how critical the Windows 10 installer finds the software/hardware issue to be.

Once the upgrade is in process, it may take a couple of hours to complete. When the Windows 10 upgrade is complete, the original product key for your old version of Windows will be converted and uploaded to the cloud. It is called digital entitlement.

And if you ever need to reinstall Windows 10, all you have to do is download the latest version using the Windows 10 Media Creation Tool. It is the one Windows 10 feature you hope you never have to use.

7 things to do before and after upgrading to Windows 10

Updated August 17, 2020

With the release of Windows 10 comes the inevitable upgrade from Windows 7 or Windows 8.1, And with the upgrade being free, why not upgrade to Windows 10? But before you do, there are some things you should do before. Here are seven (7) things to do before and after upgrading to Windows 10.

7 things to do before and after upgrading to Windows 10

1. Run Window 10 Upgrade Advisor

Update 8/1/16: Microsoft ended the Get Windows 10 (GWX) promotion, and the Windows 10 Upgrade Advisor is no longer available. If you perform an in-place upgrade using Windows 10 media, the installer will check your computer for incompatible hardware and software.

Update 8/17/20: Even though the Get Windows 10 promotion has ended, you can still upgrade Windows 7 and Windows 8.1 for free.

How to get a free Windows 10 upgrade for Windows 7 and Windows 8.1

Doing an in-place upgrade has its pros and cons. Even though Microsoft claims that if the software runs on Windows 7 or Windows 8.1, it will run on Windows 10, there will be exceptions to the rule. The same can be said about hardware too. Remember that Windows 10 will only come with generic drivers for a good portion of the equipment. Running the upgrade advisor will tell what issues you may have, and then you can find a fix before performing the upgrade. Download any hardware-specific drivers that you will need and save them to a flash drive or network folder.

The Get Windows 10 icon

    1. Left-click the Get Windows 10 icon on the Taskbar

The Get Windows 10 PC check

  1. Left-click on the three horizontal bars in the upper left corner to expand the menu and select Check your PC.

2. Check your drive for errors

One of the last things you want is to have the upgrade fail because of errors on the system drive. This is especially so if the failure were to happen while copying new files and left your system un-bootable. To be on the safe side, run Windows disk checking utility CHKDSK.

Check your hard disk for errors in Windows 7
Check your hard drive for errors in Windows 8

3. Clean up the junk

It's now time to clean the system up. Uninstall any program you don't need or want and then run Windows built-in Disk Cleanup utility. You can also use a program like CCleaner, but be careful not to go too far with it.

Windows 7 Disk Cleanup
Windows 8 Disk Cleanup
Clean up and optimize your computer with CCleaner

4. Backup everything

As the old saying goes, "An ounce of prevention is worth a pound of cure", so a complete backup of your system is the next thing to do. Windows 7 and Windows 8.1 both have a built-in File Recovery program that can do a full system image to an external drive, network folder, or DVDs. You will also need to create a system repair disk to boot the system so that you can restore the system image you create, just in case. Links to both are located on the left-side column of the File Recovery program screen.

Now the File Recovery program can be kind of hard to find, especially in Windows 8.1. To make sure you are running it with the correct privileges, I suggest just running the program using an administrative command prompt.

How to open a Command Prompt with Administrator privileges in Windows 7
How to open a Command Prompt with Administrator privileges in Windows 8

To open the File Recovery program, type the following into an admin command prompt and hit enter.

sdclt.exe

5. Perform an inventory with Belarc

Having a complete list of all of the hardware and software inside your computer can come in handy if anything were to go wrong. Belarc Advisor is an excellent program for creating an inventory of your computer software and hardware, including software installation keys. Once it is done creating an inventory, it opens the results in a web browser. Print or save the results to a flash drive, just in case you might need it down the road.

Belarc Advisor

6. Uninstall system utilities

This is not mandatory, but I recommend uninstalling any anti-virus, anti-malware, EMET, etc. program before the upgrade. These programs look for malicious activity geared toward the operating system and could create a massive headache during the upgrade. It's better to be safe than sorry.

Time to upgrade to Windows 10

Grab a drink and have a seat; it'll take a little while.

7. Update drivers and reinstall software

It's now time to install any device-specific drivers you downloaded in Step #1. Once that is done, it's time to download the latest version of all the software you removed in Step #6. If you're unsure what version of a program you had installed, go through the inventory you created in Step #5.

Upgrading to Windows 7 from Windows XP

Windows XP is currently the most popular operating system, with Windows 7 quickly catching up. As more and more people are moving from Windows XP to Windows 7, I thought I would spotlight a series of articles that I wrote a little while back. My move from Windows XP to Windows 7 was a 'side-by-side' migration, with two separate systems.

I, believe it or not, never used Windows Vista on any of my production systems. I ran Windows XP up until Windows 7 was released. I did run Windows 7 Release Candidates on a test system for several months before its release and was very happy with it. I even wrote a series of articles about it too. Here they all are.

Upgrading to Windows 7 from Windows XP

Upgrading from Windows XP to Windows 7 (Part 1)

Upgrading from Windows XP to Windows 7 (Part 2 - Drive Imaging)

Upgrading from Windows XP to Windows 7 (Part 3 - Hardware / Software Inventory)

Upgrading from Windows XP to Windows 7 (Part 4 - Windows 7 Installation)

Upgrading from Windows XP to Windows 7 (Part 5 - Applications and Settings)

Upgrading from Windows XP to Windows 7 (Part 6 - Epilogue)

Beta testing Windows 7

Beta testing Windows 7 - Part 1

Beta testing Windows 7 - Part 2

Beta testing Windows 7 - Part 3

Beta testing Windows 7 - Part 4 (Antec cases)

Beta testing Windows 7 - Part 5 (BIOS and installation)

Beta testing Windows 7 - Part 6 (software overview) (Video)

Beta testing Windows 7 - Part 7 (Photoshop Benchmark)

Migrating from Windows XP to Windows 7 (Part 6 - Epilogue)

In writing this series of articles about migrating from Windows XP to Windows 7, I have been slowly moving my production time from my old system to the new one (I use a KVM (keyboard, video, and mouse switch)). My old system had some issues and needed to be retired. But as fate would have it, my old system's time had started to run out.

In the middle of last week, I found the old system had lost its ability to recognize USB keyboards and mice. I had to take it off-line and set it up with a PS2 keyboard and mouse. The only item I had left to migrate was my PIM (Personal Information Manager). I use Microsoft Outlook as my PIM and have a Palm TX handheld and an LG Chocolate cell phone to synchronize to Outlook.

But this did allow using Windows Easy Transfer differently. I need to get some of my settings back in-place fast. I had read about pulling the settings from the old system to the new system when they are both on the same network, so I decided to give it a try. I started Windows Easy Transfer on my old computer from the DVD just like I had done before, but this time I choose A Network, and then followed the instructions (basically, starting Windows Easy Transfer on my new computer and entering a key). The Windows Easy Transfer key acts like a password to help protect files and settings when you transfer them over the network. I selected the settings I needed and started the process.

It worked beautifully! It did a great job of bringing in my application settings, especially Microsoft Outlook, as the custom toolbars came right back. But it did not bring it my e-mail addresses or data files. But I did expect at least that, so I had to put the databases in the right locations and set up my e-mail accounts manually.

Also, moving to the 64-bit platform, I knew I would run into driver issues, and sure enough, it did. This problem did not affect me but might be an issue to others who own a Palm handheld or smartphone and use HotSync. I have been using a Bluetooth connection to sync my Palm TX for years, but when I installed the Palm Desktop and HotSync to get the Microsoft Outlook conduits, it wanted a driver for the cable connection. Come to find out that there is no 64-bit USB driver for Palm handhelds and smartphones. Palm recommends using a Bluetooth connection to sync when running 64-bit versions of Windows.

Free computer diagnostics

Repairing a PC can sometimes be expensive, and that is why we offer free basic in-shop diagnostics. Give one of our professional and experienced technicians a call at (602) 795-1111, and let's see what we can do for you.

Check out our reviews

Geeks In Phoenix LLC, BBB Business Review

Customer service is #1

Here at Geeks in Phoenix, we take pride in providing excellent customer service. We aim to give the highest quality of service  from computer repair, virus removal, and data recovery.

Bring your computer to us and save

Repairing a computer can be time-consuming. That is why we base our in-shop service on the time we work on your computer, not the time it takes for your computer to work! From running memory checking software to scanning for viruses, these are processes that can take some time.

Contact us

If you have any questions, please feel free to give us a call at (602) 795-1111  and talk with one of our Geeks. Or you can send us a message from our contact page contact page , and one of our Geeks will get back to you as soon as possible. Or you can stop by and see us. Here are our hours and location.

Like Geeks in Phoenix on Facebook

Follow Geeks in Phoenix on Twitter

Watch Geeks in Phoenix on YouTube