Have you ever wanted to add more USB ports to your desktop computer? Or maybe a video card or wireless (Wi-Fi) network adapter? Here's how to add an expansion card to your desktop computer.
One of the coolest things about desktop computers is that you can add more functionally to it by installing an expansion card. Expansion cards range from video cards and RAID controllers to USB ports and wireless (Wi-Fi) network adapters. But before you can do anything, you will need to know a few things:
- What expansion slots you have available in your computer?
- What is the height (full or half) of your computer case?
- What are the power requirements for the expansion card you want to install?
But before you can do anything, you need to know what expansion card slots your desktop computer may have available. The most common expansion slot is the PCI Express (Peripheral Component Interconnect Express (PCIe, PCI-e)) bus type. See #1 and #2 in the installation instructions at the bottom of this article to find out how to open up your computer case to check.
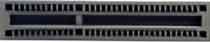
The different PCI-e bus types
Now PCI-e slots and expansion cards come in different bus sizes, varying in the number of connectors and bus speed. Generally, the more connectors, the faster the transfer rate.

PCI Express x16 slot (82 connectors per side x 2 sides = 164 connectors)
PCI Express x4 slot (32 connectors per side x 2 sides = 64 connectors)
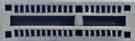
PCI Express x1 slot (18 connectors per side x 2 sides = 36 connectors)
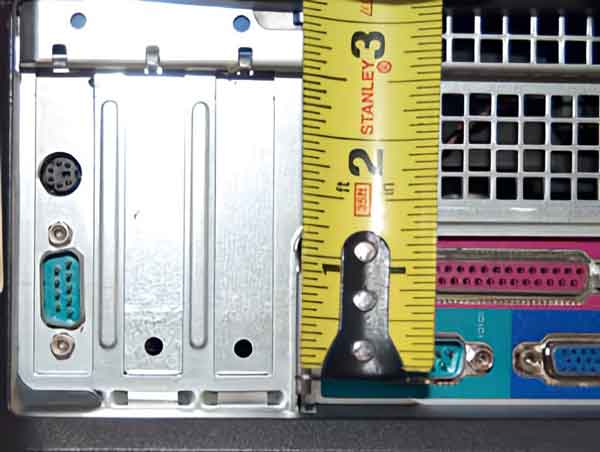
The two different computer case heights
Once you know what expansion slot(s) your desktop computer has available, you need to find out what height (full-size or half-size) your computer case is.

Full-height expansion slot
Half-height expansion slot
Now a full-size case can use either full or half size expansion cards. If the expansion card you are looking at installing is low profile, the manufacturer usually includes full-size and half-size mounting brackets. If the expansion card is full height, you will not be able to put it in a half-size case, so double check it before purchasing.
Check the expansion card power requirements
Now everything that you plug into your motherboard requires power. The drives, processor, and even the memory modules require a certain amount of energy. Check the specifications for the expansion card you want to install and determine how much power it requires.
The next thing you need to check is how many watts your power supply delivers. The power output is crucial. Typically there is a power output table on the side of the power supply inside of your desktop computer that tells you what the maximum DC output is.
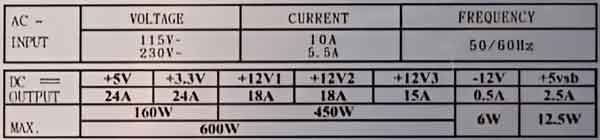
A typical desktop power supply output table
If your computer is a low-profile or Small Form Factor (SFF), knowing what the power output is critical. Most SFF computers have smaller power supplies (physical size) that have lower power output. Generally, the output of an SFF power supply is less than 300 watts, which may or may not have enough power to run an additional expansion card.
And to top it off, the expansion card you want to install might even require more power than it can get through the PCI-e bus, thus requiring an additional connection or two from the power supply.
High-end video cards are known to require an additional PCI-e power plug(s) from the power supply. If your power supply doesn't have enough PCI-e (6 or 8 pins), Molex (4 pins), or SATA (15 pins) connections, you will need to upgrade your power supply.
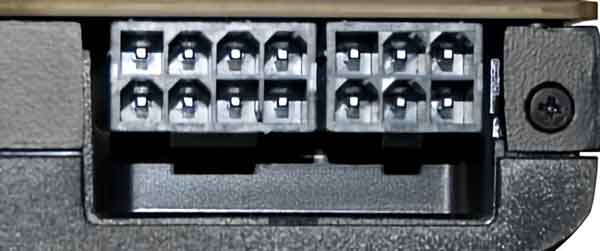
A video card that has both 8-pin and 6-pin PCI-e power connections
Now that you have the required information and purchased your expansion card, it is time to install it.
Installing an expansion card in a desktop computer
Installing an expansion card is relatively easy. You may or may not require tools, as some computer cases are tool-free. At the most, you might need a Philips head screwdriver to get the side of the case open and to secure the expansion card to the computer case.
- Disconnect the power cord from the computer. After disconnecting the power cord, place your hand on any metal part of the case to discharge any residual energy. Never work on a system that is plugged in and energized.
- Open the computer case. This step usually requires taking the side or top panel off. Look at the back of the computer case and determine what side the motherboard connections are on. The side panel you need to remove is on the opposite side of these.
- Remove the expansion slot cover panel on the backside of the case. Some expansion slot panels have a screw holding them in-place; some are stamped right into the metal back of the case. If it is a stamped panel, you will have to work it back and forth to break it off, so be careful not to cut your fingers.
- Install the expansion card. Most cards will slip right in, but make sure the notched edge of the mounting bracket slides down into the slot in the case. Sometimes you have to give it a little push from the outside of the case to get it in. Once it is in place, secure it down.
- Replace the side of the case, connect the power cord, and power your computer up.
If Windows doesn't automatically install the driver for the expansion card, you may have to use the installation disk that came with it. If the expansion card did not come with installation media, go to the manufacturer's website and download it.
63ed7031-1681-4695-8cb2-2147f59c47ad|3|4.0|96d5b379-7e1d-4dac-a6ba-1e50db561b04