Geeks in Phoenix

Geek Blog


Upgrading to Windows 7 from Windows XP

Windows XP is currently the most popular operating system, with Windows 7 quickly catching up. As more and more people are moving from Windows XP to Windows 7, I thought I would spotlight a series of articles that I wrote a little while back. My move from Windows XP to Windows 7 was a 'side-by-side' migration, with two separate systems.

I, believe it or not, never used Windows Vista on any of my production systems. I ran Windows XP up until Windows 7 was released. I did run Windows 7 Release Candidates on a test system for several months before its release and was very happy with it. I even wrote a series of articles about it too. Here they all are.

Upgrading to Windows 7 from Windows XP

Upgrading from Windows XP to Windows 7 (Part 1)

Upgrading from Windows XP to Windows 7 (Part 2 - Drive Imaging)

Upgrading from Windows XP to Windows 7 (Part 3 - Hardware / Software Inventory)

Upgrading from Windows XP to Windows 7 (Part 4 - Windows 7 Installation)

Upgrading from Windows XP to Windows 7 (Part 5 - Applications and Settings)

Upgrading from Windows XP to Windows 7 (Part 6 - Epilogue)

Beta testing Windows 7

Beta testing Windows 7 - Part 1

Beta testing Windows 7 - Part 2

Beta testing Windows 7 - Part 3

Beta testing Windows 7 - Part 4 (Antec cases)

Beta testing Windows 7 - Part 5 (BIOS and installation)

Beta testing Windows 7 - Part 6 (software overview) (Video)

Beta testing Windows 7 - Part 7 (Photoshop Benchmark)

Migrating from a Palm TX to a Google Android

With the purchase of Palm by HP, I am reminded that the Palm Pilot is dead. For years I had been using a Palm Pilot, starting with a Vx, then an M505, and finally a TX. It was all of the applications available for the Palm OS platform that keep me there. So when my cellular phone provider, Verizon Wireless, had a great deal on a Google Android, I decided to go for it.

Palm TX & Google Android - Side by side (vertical view)
Palm TX and Google Android side by side (vertical and horizontal views)
Palm TX & Google Android - Side by side (horizontal view)

The first thing I had to look at was getting the same functionally from the Android as I did from the Palm. I started with the existing applications I used on the Palm. Sure enough, Dataviz, creators of Documents To Go, had a version for the Android. It has almost all of the same functions as the Palm version.

Next was synchronizing Microsoft Outlook with the Android. I was using the conduits in the Palm Desktop to sync with Outlook, so I had to look around to see what I could find. I came across CompanionLink, makers of DejaOffice. It has all of the same functions as the Palm conduits.

And last but not least, since the SD card in the Android appears as a removable disk in Windows 7, it is just a matter of synchronizing between the two. For this, I am using SyncToy 2.1 from Microsoft to work just right for me.

Migrating from Windows XP to Windows 7 (Part 6 - Epilogue)

In writing this series of articles about migrating from Windows XP to Windows 7, I have been slowly moving my production time from my old system to the new one (I use a KVM (keyboard, video, and mouse switch)). My old system had some issues and needed to be retired. But as fate would have it, my old system's time had started to run out.

In the middle of last week, I found the old system had lost its ability to recognize USB keyboards and mice. I had to take it off-line and set it up with a PS2 keyboard and mouse. The only item I had left to migrate was my PIM (Personal Information Manager). I use Microsoft Outlook as my PIM and have a Palm TX handheld and an LG Chocolate cell phone to synchronize to Outlook.

But this did allow using Windows Easy Transfer differently. I need to get some of my settings back in-place fast. I had read about pulling the settings from the old system to the new system when they are both on the same network, so I decided to give it a try. I started Windows Easy Transfer on my old computer from the DVD just like I had done before, but this time I choose A Network, and then followed the instructions (basically, starting Windows Easy Transfer on my new computer and entering a key). The Windows Easy Transfer key acts like a password to help protect files and settings when you transfer them over the network. I selected the settings I needed and started the process.

It worked beautifully! It did a great job of bringing in my application settings, especially Microsoft Outlook, as the custom toolbars came right back. But it did not bring it my e-mail addresses or data files. But I did expect at least that, so I had to put the databases in the right locations and set up my e-mail accounts manually.

Also, moving to the 64-bit platform, I knew I would run into driver issues, and sure enough, it did. This problem did not affect me but might be an issue to others who own a Palm handheld or smartphone and use HotSync. I have been using a Bluetooth connection to sync my Palm TX for years, but when I installed the Palm Desktop and HotSync to get the Microsoft Outlook conduits, it wanted a driver for the cable connection. Come to find out that there is no 64-bit USB driver for Palm handhelds and smartphones. Palm recommends using a Bluetooth connection to sync when running 64-bit versions of Windows.

Migrating from Windows XP to Windows 7 (Part 5 - Applications and Settings)

With our installation of Windows 7 complete, it's time to move on to the applications and settings. We will use the Belarc Advisor report we printed earlier to ensure we do not forget any application as we reinstall them.

With the UAC (User Access Control) in Windows 7, it may be necessary to run some of the application installations as administrator. If when you insert the installation media into a removable drive (CD or DVD), and it does not automatically start, I would do the following:

  1. Open Windows Explorer by right-clicking the Start menu, and then clicking Explore.
  2. Browse to the CD/DVD drive on your computer and right-click setup.exe (as an example) in the root directory.
  3. Select Run as Administrator.

You may have an older application that just doesn't run quite right after you install it on Windows 7. In that case, you may want to try running it in Compatibility Mode. The following video shows you how.

Now the applications are installed, we will need to start each one and allow them to create any special folders and files before restoring our settings. Now we are ready to go back to the Microsoft instructions:

Copy files to the destination computer

  1. If you saved your files and settings in an Easy Transfer file on a removable media such as a UFD rather than on a network share, insert the removable media into the computer.
  2. Click Start, click All Programs, click Accessories, click System Tools, and then click Windows Easy Transfer. The Windows Easy Transfer window opens.
  3. Click Next.
  4. Click An external hard disk or USB flash drive.
  5. Click This is my new computer.
  6. Click Yes, open the file.
  7. Browse to the location where the Easy Transfer file was saved. Click the file name, and then click Open.
  8. Click Transfer to transfer all files and settings. You can also determine which files should be migrated by selecting only the user profiles you want to transfer, or by clicking Customize.
  9. Click Close after Windows Easy Transfer has completed moving your files.

Now that we have restored our files and settings using Windows Easy Transfer, we will need to verify they are there. There will be items (fonts, scripts, etc.) that you will have to access the drive image to restore. Any custom item, like backgrounds in the Windows/Web/Wallpaper directory in Windows XP, will also need to be restored.

Within the first few weeks of migrating to Windows 7, you will find yourself going back to the drive image to restore items. A missing font here, a file there. But within a month, you should have everything worked out. Within three months, you should be completely migrated to Windows 7 and be able to delete the drive image.

Migrating from Windows XP to Windows 7 (Part 4 - Windows 7 Installation)

Now that we have performed the necessary procedures (drive imaging and software/hardware inventory and downloading drivers) I usually do before a clean install, it's time to get into the installation details. Remember to put your drivers on media that you can access after the installation is complete (CD, USB drive, or external drive). Network drives may not be accessible until you install the correct network card driver(s). Kind of a catch 22, sort of speak.

I went over to Microsoft's website and found an article on how to Upgrade from Windows XP to Windows 7. From here, we will follow Microsoft's instructions, with a little change here and there.

The Upgrade option is not available in Windows 7 Setup when installing Windows 7 on a computer running Windows XP. However, you can use Windows Easy Transfer to migrate files and settings from Windows XP to Windows 7 on the same computer. To do this, you must first copy files to a removable media, such as an external hard drive or UFD, or to a network share. Next, you will install Windows 7 and then migrate your files back from the removable media onto your computer. When you are finished, you must install your software programs again, but your files and settings will have been copied from Windows XP.

Copy files using Windows Easy Transfer

  1. Insert the Windows 7 DVD while running Windows XP. If the Windows 7 installation window opens automatically, close it.
  2. Open Windows Explorer by right-clicking the Start menu, and then clicking Explore.
  3. Browse to the DVD drive on your computer and click migsetup.exe in the Support\Migwiz directory. The Windows Easy Transfer window opens.
  4. Click Next.
  5. Select An external hard disk or USB flash drive.
  6. Click This is my old computer. Windows Easy Transfer scans the computer.
  7. Click Next. You can also determine which files should be migrated by selecting only the user profiles you want to transfer, or by clicking Customize.
  8. Enter a password to protect your Easy Transfer file, or leave the box blank, and then click Save.
  9. Browse to the external location on the network or to the removable media where you want to save your Easy Transfer file, and then click Save.
  10. Click Next. Windows Easy Transfer displays the file name and location of the Easy Transfer file you just created.

It's at this point I am going to change the way I install Windows 7. Instead of starting Windows 7 setup by browsing to the root folder of the DVD in Windows Explorer and then double-clicking setup.exe (in-place), I am going to restart the computer and start the installation at boot (clean) and delete the partition that Windows XP is installed on. The following video shows the differences between the two types of installations (clean vs. in-place).

Note: This video was captured at 2048x768 (using dual monitors)

Since I am going from a 32-bit operating system to a 64-bit operating system, an in-place installation is impossible. I have to delete the partition that Windows XP is installed on to get that. Once I restart my computer and boot up on the Windows 7 DVD (64-bit version), I get a few standard setup dialog boxes. Then I am asked where I want to install Windows 7. I select Advanced Options. This gives me the option of deleting the partition where Windows XP is installed.
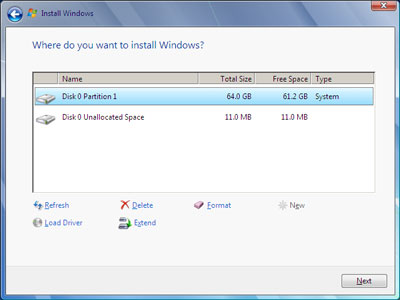
Windows 7 Installatiob Screen Shot

I select Delete, then click Next, and the installation continues, restarting a couple of times during the process. Remember that once the installation of the operating system is complete, that's when the drivers will need to be installed.

*** Note: The chipset driver is the first driver to be installed and will require a reboot when complete.***

Once the computer restarts, continue to install the rest of the drivers (audio, video, network, etc.), starting with on-board devices (built-in to the motherboard). Then go to the drivers for any expansion cards (they're connected directly into the motherboard inside the computer), and then comes the Plug and Play (PnP) devices (they connect directly to the outside of the computer). Devices like keyboard, mouse, printer, etc. would be PnP devices.

Next, we start installing our applications and settings.

Free computer diagnostics

Repairing a PC can sometimes be expensive, and that is why we offer free basic in-shop diagnostics. Give one of our professional and experienced technicians a call at (602) 795-1111, and let's see what we can do for you.

Check out our reviews

Geeks In Phoenix LLC, BBB Business Review

Customer service is #1

Here at Geeks in Phoenix, we take pride in providing excellent customer service. We aim to give the highest quality of service  from computer repair, virus removal, and data recovery.

Bring your computer to us and save

Repairing a computer can be time-consuming. That is why we base our in-shop service on the time we work on your computer, not the time it takes for your computer to work! From running memory checking software to scanning for viruses, these are processes that can take some time.

Contact us

If you have any questions, please feel free to give us a call at (602) 795-1111  and talk with one of our Geeks. Or you can send us a message from our contact page , and one of our Geeks will get back to you as soon as possible. Or you can stop by and see us. Here are our hours and location.

Like Geeks in Phoenix on Facebook

Follow Geeks in Phoenix on Twitter

Watch Geeks in Phoenix on YouTube