Now that we have performed the necessary procedures (drive imaging and software/hardware inventory and downloading drivers) I usually do before a clean install, it's time to get into the installation details. Remember to put your drivers on media that you can access after the installation is complete (CD, USB drive, or external drive). Network drives may not be accessible until you install the correct network card driver(s). Kind of a catch 22, sort of speak.
I went over to Microsoft's website and found an article on how to Upgrade from Windows XP to Windows 7. From here, we will follow Microsoft's instructions, with a little change here and there.
The Upgrade option is not available in Windows 7 Setup when installing Windows 7 on a computer running Windows XP. However, you can use Windows Easy Transfer to migrate files and settings from Windows XP to Windows 7 on the same computer. To do this, you must first copy files to a removable media, such as an external hard drive or UFD, or to a network share. Next, you will install Windows 7 and then migrate your files back from the removable media onto your computer. When you are finished, you must install your software programs again, but your files and settings will have been copied from Windows XP.
Copy files using Windows Easy Transfer
- Insert the Windows 7 DVD while running Windows XP. If the Windows 7 installation window opens automatically, close it.
- Open Windows Explorer by right-clicking the Start menu, and then clicking Explore.
- Browse to the DVD drive on your computer and click migsetup.exe in the Support\Migwiz directory. The Windows Easy Transfer window opens.
- Click Next.
- Select An external hard disk or USB flash drive.
- Click This is my old computer. Windows Easy Transfer scans the computer.
- Click Next. You can also determine which files should be migrated by selecting only the user profiles you want to transfer, or by clicking Customize.
- Enter a password to protect your Easy Transfer file, or leave the box blank, and then click Save.
- Browse to the external location on the network or to the removable media where you want to save your Easy Transfer file, and then click Save.
- Click Next. Windows Easy Transfer displays the file name and location of the Easy Transfer file you just created.
It's at this point I am going to change the way I install Windows 7. Instead of starting Windows 7 setup by browsing to the root folder of the DVD in Windows Explorer and then double-clicking setup.exe (in-place), I am going to restart the computer and start the installation at boot (clean) and delete the partition that Windows XP is installed on. The following video shows the differences between the two types of installations (clean vs. in-place).
Note: This video was captured at 2048x768 (using dual monitors)
Since I am going from a 32-bit operating system to a 64-bit operating system, an in-place installation is impossible. I have to delete the partition that Windows XP is installed on to get that. Once I restart my computer and boot up on the Windows 7 DVD (64-bit version), I get a few standard setup dialog boxes. Then I am asked where I want to install Windows 7. I select Advanced Options. This gives me the option of deleting the partition where Windows XP is installed.
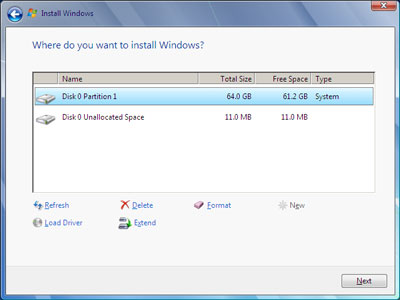
I select Delete, then click Next, and the installation continues, restarting a couple of times during the process. Remember that once the installation of the operating system is complete, that's when the drivers will need to be installed.
*** Note: The chipset driver is the first driver to be installed and will require a reboot when complete.***
Once the computer restarts, continue to install the rest of the drivers (audio, video, network, etc.), starting with on-board devices (built-in to the motherboard). Then go to the drivers for any expansion cards (they're connected directly into the motherboard inside the computer), and then comes the Plug and Play (PnP) devices (they connect directly to the outside of the computer). Devices like keyboard, mouse, printer, etc. would be PnP devices.
Next, we start installing our applications and settings.
bd85ff61-d313-41bf-b545-2d966ac6c0fc|0|.0|96d5b379-7e1d-4dac-a6ba-1e50db561b04