Keeping your web browser clean and free of adware and junk can be a daunting process. With malicious extensions and corrupt website ads, maintaining the safety of your browser can be tough. So here is how to clean up and reset Microsoft Edge.
Microsoft recently decided to revamp its Edge browser and start all over completely. Well, kind of. The original Edge browser was not well received and did not get very much support from third-party developers. It had problems all the way around.
Everyone has heard the phrase "If you can't beat them, join them," and Microsoft did just that with Edge. Since Google is using the open-source browser project Chromium as a base for Chrome, Microsoft decided to the same thing with Edge.
Cleaning up and resetting Edge
Some of the settings inside of Edge are the same as Chrome. You can even use extensions from the Chrome Web Store (more about this later in this article). But there are some differences between the two browsers.
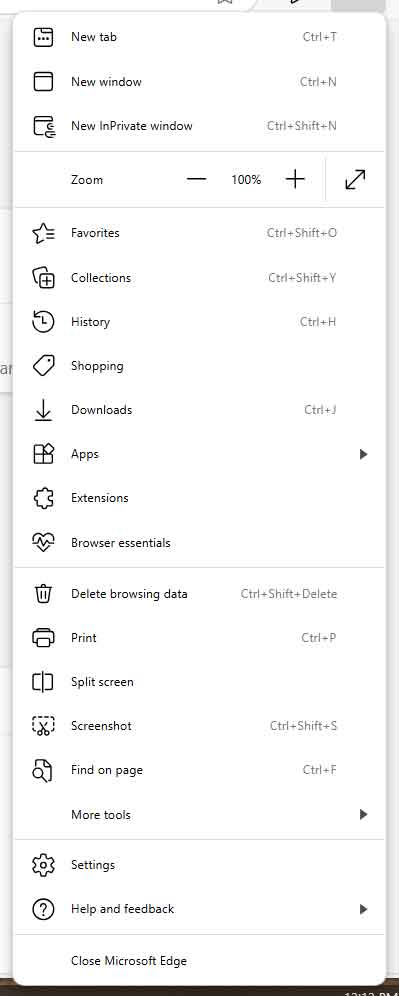
All settings for cleaning up and resetting Edge are located in the Settings and more pull-down menu in the upper-right hand corner (three horizontal dots).
The first place we want to go to is Settings. You will find fifteen (15) categories; Profiles, Privacy and services, Appearance, On startup, New tab page, Site permissions, Default browser, Downloads, Family safety, Languages, Printers, System, Reset settings, Phone and other devices, and About Microsoft Edge.
The first category is Profiles and is where you set up synchronizing your data across devices. As with other browsers, you can sync your data like passwords, payment information, address, etc. You can also import data from another browser here.
The second category is Privacy and services and has several essential sections. These include Tracking prevention, Clear browsing data, Privacy, Help improve Microsoft Edge, Personalize your web experience, and Services. Let take a look a each separately.
Tracking prevention. This is how Edge handles cookies, and the default settings are recommended. You can turn off tracking prevention or completely block all cookies; it is your choice. You can also view the sites you block / allow tracking and enable or disable tracking prevention when using InPrivate mode.
Clear browsing data. As the name implies, this is where you clear the data from Edge. Like other browsers, you have a choice of what to delete immediately and when you close Edge.
On the right-hand side of Clear browsing data now is a button labeled Choose what to clear. When you click on it, a dialog box appears with several choices.

I go here when a customer calls and tells me that they are having issues with a website not displaying correctly.
On the top is the Time range, and below it are all of the different options. I usually set the time range to All time and leave the default selections checked. That often gets a website to working correctly again. Remember that if you clear any passwords or autofill data, it is gone for good, so be careful.
When you click on Clear browsing data on close, you bring up a page with several selections. These are personal preferences, but I like to clear out the cookies and cache when I close a browser. It is your choice.
Privacy. There are three (3) selections here; Send "Do Not Track" requests, Allow sites to check if you have payment methods saved and Manage certificates. Again, these are personal preferences, but I would enable the Do Not Track and disable the payment feature. The certificates are part of Windows, not Edge, so just leave that one alone.
Help improve Microsoft Edge / Personalize your web experience. The settings in these sections allow Microsoft to collect data from Edge. They are disabled by default, and I would keep it that way.
Services. The default settings for almost all of these sections should be perfectly fine. The only one I would look at is the Address bar. Malicious websites and extensions will try and change the default search engine used by a browser. If you do not recognize the search engine being used, or just want to change it, go into the Manage search engines section and make the changes.
The third category is Appearance and is mainly for personal preference. The only area I would look at is the URL under Show home button in the Customize toolbar section. If there is a web page you do not recognize there, Edge may have been hijacked. Go ahead and remove any unwanted URL's.
The next category is On startup. Here we have some more personal preferences. The one place I would look at for browser hijacking is the Open a specific page or pages section. Again, if you do not recognize or remember adding a page listed there, delete it.
The next category is New tab page. You can customize the new tab page here—another personal preference.
The next category is Site permission. This where you set the default actions for different media (Flash, JavaScript, etc.), hardware (camera, microphone, etc.), and other miscellaneous settings. The default settings are recommended.
The next category is Default browser. As the name implies, you can set Edge as your default browser here. Two settings might be of interest if you still use Internet Explorer (IE); Let Internet Explorer open sites in Microsoft Edge and Allow sites to be reloaded in Internet Explorer mode. A lot of people still use IE because a website they go to requires ActiveX and since Edge has an IE mode built-in, you just have to enable it.
The next category is Family safety. This is part of the Microsoft Family Safety program. You can find out more about it in the blog I wrote; How to setup Family Safety for Windows 10 using Microsoft accounts.
The next two categories are Languages and Printers. Pretty run-of-the-mill stuff here. Personal preferences again.
The next category is System, and there is one significant setting here. As with Google Chrome, Edge can continue to run in the background even after you close it. It can also run background apps when Windows starts up. I have seen adware/malware use this setting to run the browser when Windows starts up.
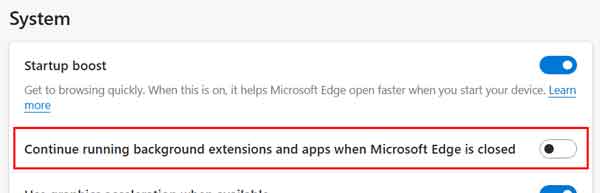
I recommend you turn off the Continue running background apps when Microsoft Edge is closed feature until you get prompted by an app to enable it.
The next category is Reset settings. With a couple of clicks, you can reset Edge back its original default settings. Everything but your favorites, history, and saved passwords will be deleted. Remember, if you reset the settings, you will have to go back and do all of the customizing all over again.
The second to the last category is Phone and other devices. This just elaborates on the synchronizing feature discussed in the Profiles category.
The last category is About Microsoft Edge. When you open this category, Edge will check for updates. Other than what version Edge you are running, that is all in this category.
The last place we want to check for browser corruption is the Extensions. Go back to the Settings and more pull-down menu and select Extensions. This will open a new tab. Extensions extend the functionality of Edge and usually are perfectly safe. You can install extensions from either the Microsoft Store or the Chrome Web Store (you have to enable Allow extensions from other stores).
But there are malicious extensions that want to use your browser for other things, like crypto-mining, for example, behind your back. If there are any extensions listed the Installed extensions that you do not recognize or do not remember installing, go ahead and disable them. If you find you do not need or want them, you can click on the Remove link under the extension name.
The last option to get Edge back to default and work correctly is to uninstall and reinstall it. I only use this option when all else fails to get it back to full functionality. It can take a little time to do, but if you need to get Edge fully reset, this may be the only option. There are two (2) ways to uninstall programs in Windows 10; the Settings app or the Control Panel.
Uninstall a program using the Settings app
- Click on the Start
 menu, then Settings (the gear icon), then Apps, then Apps & Features.
- Scroll down the list of apps in the right-hand column until you find Microsoft Edge.
- Highlight Microsoft Edge and click on the Uninstall button.
Uninstall a program using the Control Panel
- In the search box next to the Start button, type Control Panel, and click on it from the results.
- Select Uninstall a program (if viewing by category) or Programs and Features (if viewing by icons).
- Highlight Microsoft Edge and click on the Uninstall button.
Once Microsoft Edge is uninstalled, restart your computer. When your computer has rebooted and you are logged back in, you will need to remove any traces of Edge before reinstalling it. There are two (2) places where you will need to look for any leftover files; inside your user profile and inside the program files directory. The files inside your user profile are hidden by default, but you can get there quickly by bringing up a Run dialog box (Windows Logo key + R) and typing or copy / paste the following code:
%userprofile%/AppData/Local/Microsoft
This will open the File Explorer to the location of your Microsoft user settings. If there is a folder named Edge, go ahead and delete it. Next, you will have to navigate to the location of the Program Files directory and check under the folder named Microsoft. Its location is usually C:\Program Files (x86)\Microsoft, but it may be different if you installed Edge on a different drive. Once you get there, if you find a folder named Edge, go ahead and delete it. Now you can download and reinstall Microsoft Edge.