Geeks in Phoenix

Geek Blog


Inside the Windows 8.1 Update

Microsoft recently released the Windows 8.1 Update (actual name), the latest refinement of Windows 8.1. Most of the changes are targeted at keyboard/mouse users, like me. The update comes only months (10/17/13) after the initial release of Windows 8.1 and includes user interface enhancements and security fixes. Here's a look inside Windows 8.1. Update.

The update builds on the previous Windows 8.1 changes geared towards keyboard/mouse users: the return of the Start button, smaller tile size on the Start screen, and booting directly to the Desktop. But the overall focus was still on touch-sensitive devices. The Windows 8.1 Update changes all of that.

The first thing you'll notice is the default behavior of Windows 8.1 has changed. Windows 8.1 now checks to see if there is a touch-sensitive display attached to the computer and modifies the way it runs. For example, if your computer doesn't have a touch screen, the default programs that open pictures, videos, and music files go back to the familiar Desktop apps that Windows 7 used. Here's a complete list of the changes to Windows 8.1 behavior:

Windows 8.1 defaults before update Windows 8.1 defaults after update
  • Boots to Start Screen
  • Closing App takes user back to Start Screen
  • Pictures, Music, and Video files open with Modern App
  • Boots to Desktop
  • Closing App takes user to the previously used App.
  • After closing all Apps the user ends in the Desktop
  • Pictures, Music, and Video files open with Desktop applications

New Windows 8.1 Update Start screen features

The Start screen has seen some Desktop friendly revisions too. Microsoft has finally added a Power button, so you no longer have to log-off to turn off or restart your computer. Also added are familiar Desktop style content menus for the Tile properties. There are also a new set of tiles that are added for new users; This PC, PC Settings, Documents, and Pictures. They won't appear for existing users but can easily be recreated if you want them.

New Metro app Title Bar with Minimize and Close buttons

Microsoft also made some changes to the Metro (Windows RT) interface. In an effort to make it more Desktop friendly, Metro apps now have a drop-down Title Bar on top, similar to Desktop programs, with Minimize and Close buttons. Metro apps can now be pinned to the Taskbar (the Store is automatically pinned with the update).

For more information on the Windows 8.1 Update, just follow the link below.

Exploring Windows 8.1 Update

How to move from Windows XP to Windows 7, Windows 8 or Windows 8.1

The end of life for Windows XP has been and still is a major headache for consumers. You've got your old computer set up just the way you like it, and it's running fine. But there comes a time when you need to move to a newer and more secure operating system. Here's a couple of ways to move from Windows XP to Windows 7, Windows 8, or Windows 8.1.

A screenshot of the website AmIRunningXP.com

Upgrade the operating system on your existing computer

The biggest problem with this scenario is that there is no way to do an in-place upgrade from Windows XP to Windows 7 or Windows 8 / 8.1. First is the different partition, folder, and file architecture. The second is that the majority of Windows XP installations in-use are 32-bit. Almost all versions of Windows 7 and Windows 8 / 8.1 in use are 64-bit. You can still get 32-bit versions of them, but with the 4GB memory limit, they are not very popular. If your computer was built within the last 5-7 years, it might be compatible with Windows 7 or Windows 8 / 8.1.

Windows 7 / Windows 8 / Windows 8.1 hardware requirements:

  • Processor: 1 gigahertz (GHz) or faster
  • RAM: 1 gigabyte (GB) (32-bit) or 2 GB (64-bit)
  • Free hard drive space: 16 GB (32-bit) or 20 GB (64-bit)
  • Graphics card: Microsoft DirectX 9 graphics device with WDDM driver

How to upgrade your existing computer from Windows XP to Windows 7, Windows 8, or Windows 8.1

  1. Download the Windows Upgrade Assistant to check to see if the hardware in your existing system meets the minimum hardware requirements.
    Windows Upgrade Assistant
  2. Check your existing hard drive for errors.
    Detecting and repairing disk errors in Windows XP
  3. Defragment your existing hard drive.
    Using Disk Defragmenter in Windows XP
  4. Do a complete backup of your existing computer to an external hard drive or network drive.
    Using Backup in Windows XP
  5. Download and install PCmover Express. Transfer all of the users' documents and settings to an external hard drive or network drive.
    PCmover Express
  6. Perform a clean installation of Windows 7, Windows 8, or Windows 8.1, erasing the existing partition(s)
  7. Set up your new user account(s) with the same name(s) as your old user account(s).
  8. Attach your hardware (printers, scanners, etc.). To get the full functionality of your devices, you may have to install the manufacturer's software.
  9. Install all of the programs you had installed on your previous version of Windows. This way, when you transfer your documents and settings, the file associations for your documents will be already set up.
  10. Download and install PCmover Express to your new version of Windows.
    PCmover Express

Migrate from your old computer to a new computer

This, by far, is the easiest way to go. The only problem might be if your existing programs are not compatible with the version of Windows on your new computer. If you find that a program won't run right out of the box, you may be able to run it in 'Compatibility Mode' for another version of Windows.

How to migrate from Windows XP to Windows 7, Windows 8, or Windows 8.1

  1. Download the Windows Upgrade Assistant to check to see if the hardware attached to your existing system meets the minimum hardware requirements.
    Windows Upgrade Assistant
  2. Do a complete backup of your existing computer to an external hard drive or network drive.
    Using Backup in Windows XP
  3. Download and install PCmover Express. Transfer all of the users' documents and settings to an external hard drive or network drive.
    PCmover Express
  4. Set up your new user account(s) with the same name(s) as your old user account(s).
  5. Attach your hardware (printers, scanners, etc.). To get the full functionality of your devices, you may have to install the manufacturer's software.
  6. Install all of the programs you had installed on your previous version of Windows. This way, when you transfer your documents and settings, the file associations for your documents will be already set up.
  7. Download and install PCmover Express to your new version of Windows.
    PCmover Express

Also, here's a series of articles I wrote a few years ago on my personal experience upgrading from Windows XP to Windows 7.

Upgrading from Windows XP to Windows 7 (Part 1)

Upgrading from Windows XP to Windows 7 (Part 2 - Drive Imaging)

Upgrading from Windows XP to Windows 7 (Part 3 - Hardware / Software Inventory)

Upgrading from Windows XP to Windows 7 (Part 4 - Windows 7 Installation)

Upgrading from Windows XP to Windows 7 (Part 5 - Applications and Settings)

Upgrading from Windows XP to Windows 7 (Part 6 - Epilogue)

How to use layered security to protect your computer

Updated June 22, 2023

It seems whenever I tell someone that I repair computers for a living, I almost always get asked the question, "What do you recommend for anti-virus software?". I tell them I use a layered approach to security, not relying on just one program for protection. I'm not particularly eager to use all-in-one security suites. It's not that I don't trust any particular software; I don't like having only one piece of software protecting my computer. Here's how to use layered security to protect your computer.

How to use layered security to protect your computer

Software firewall

Windows has had a good firewall built-in since Windows Vista, and it's turned on by default. It comes pre-installed inside of Windows and is ready to go. There are also some great free and paid firewall products. And you will also find software firewalls included in most security suites, like McAfee or Norton. It's your choice.

Always remember that when you connect to the Internet, do it through a router or hotspot. Never connect a wired network connection directly to the Internet jack on your modem. With a router or hotspot, some form of Network Address Translation (NAT) happens, so you are not directly connected to the Internet.

Anti-virus software

This one is a no-brainer. Microsoft has included a built-in anti-virus program inside of Windows since Windows 8.1 and has worked hard to make it a top-rated program. And if you install a different anti-virus program, Windows Security will detect it and turn its real-time protection off. But you can still have it run periodic scans.

There are plenty of free and paid anti-virus programs on the market, and I have used quite a few different ones over the years. Some internet service providers like Cox Communications even offer free security suite software.

The only thing to remember when picking an anti-virus program is the system's performance you're installing it on. I would not install a full-blown security suite like Norton or McAfee on a laptop.

Anti-malware / anti-adware software

Anti-virus software typically looks for, you guessed it, viruses. I've cleaned out several pieces of malware and adware that anti-virus programs missed because it wasn't a virus. Quite a few anti-malware programs are meant to be run side-by-side with anti-virus software.

When it comes to anti-malware programs, Malwarebytes is the most popular. If you want real-time scanning, you will need a license. If you want to periodically manually scan your computer, the free version will work just fine.

Now with the rise of pop-up bogus security warnings, adware is becoming the biggest threat to consumers. Malwarebytes has a great program called AdwCleaner for finding and removing adware in all popular browsers (Chrome, Edge, Firefox, etc.).

Using anti-virus software together with anti-malware and anti-adware programs creates excellent layered security. As the old saying goes, "Never put all of your eggs in one basket.".

Creating stunning documents, spreadsheets and slide-shows with OpenOffice 4

With the cost of Microsoft Office going up, not to mention the subscription / non-subscription thing, it's nice to know there are alternatives out there. One of the best office alternatives has to be OpenOffice. And it just so happens that the Apache Software Foundation recently released a new version of their free productivity software, OpenOffice 4.

The main screen inside of OpenOffice 4

For those who are not familiar with it, OpenOffice is a suite of office productivity programs that rivals Microsoft Office. It has everything you could need for creating great-looking documents, spreadsheets, and slideshow presentations. Here's a complete list of all of the programs included in OpenOffice 4.

Program Equivalent to Program type
Writer Microsoft Word Word processor
Calc Microsoft Excel Spreadsheet
Impress Microsoft PowerPoint Multi-media slideshow presentation
Draw Microsoft Paint Graphic design
Base Microsoft Access Database
Math Design Science Mathtype Formula creation

OpenOffice 4 has some significant improvements over previous versions. A new Sidebar contains the most commonly used functions for that program, which can be docked, floating, or completely hidden. There is also much improved compatibly with Microsoft Office documents. The drawing, graphics, and gallery functions have also been enhanced, along with the copy & paste and drag & drop functionality.

The new Sidebar inside of OpenOffice 4 shown docked and floating

OpenOffice does use Java, but it's not required for installation, as it can be added later on. Compatibility with other document formats is pretty impressive, but Star Office is no longer supported. OpenOffice can automatically load/convert and convert/save Microsoft Office (Word, Excel, and PowerPoint) and Design Science Mathtype documents. The only file types that it cannot save to is the Microsoft Office 2007 - 2019 .???x formats.

And since OpenOffice is open-source, there are hundreds of third-party extensions to expand on the functionality of the applications. Add in a copy of GIMP or Paint.NET, and you have a complete and free desktop publishing package.

OpenOffice 4 is available for Windows, Linux, and Mac operating systems. For more information on OpenOffice 4, just follow the links below:

Apache OpenOffice Open Source Project

Download OpenOffice 4

Six ways to make Windows 8 easier to use

Repairing computers for a living requires working on different versions of Windows. Windows 8 must have the most changes out of all the Windows releases I've seen in the last decade or so. It seems like what worked in previous versions of Windows doesn't work in Windows 8. So here are six ways to make Windows 8 easier to use.

1. Create Shutdown, Restart, and Logoff shortcuts

Microsoft made shutting down and restarting Windows 8 kind of hard. You have to go to the Start screen and log-off before you can get to these options. It just seemed like too many steps for me, so I just created my own shortcuts and toolbar for shutting down, restarting, and logging off.

How to create log-off, restart, and shutdown shortcuts on the Start screen in Windows 8.

2. Start menu replacements

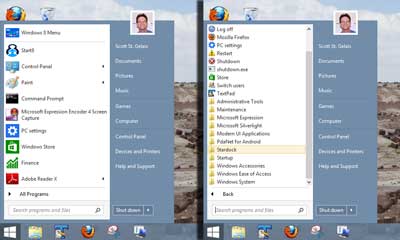
Windows 7 style Start menu in Windows 8 using Start8

If you're a die-hard Windows user and find the Start screen just doesn't work for you, there is hope. There are numerous third-party shell menus out there like Start8, Open Shell, and Pokki's Windows 8 Start Menu. Get one, and Windows 8 will feel just like Windows 7.

3. Power users command menu

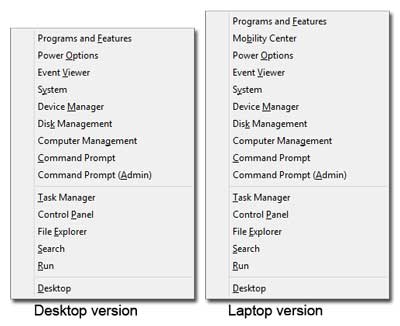
The desktop and laptop versions of the Windows 8 Power User command menu

This is one of the Windows logo key shortcuts for Windows 8 (see below), but I think it deserves to be listed separately. It contains links to some of the most used programs inside of Windows. From the Control Panel, Computer Management, and an Admin Command Prompt, if it's a commonly used Windows program, you'll probably find it here. Add it works on both the Desktop and Start screen.

Press To
Windows logo key + X Open the Power User command menu. There are over a dozen different apps you can run from this menu.

4. Start screen hidden search feature

Most people find it hard to find programs on the Start screen (Windows RT). But there is one cool feature that actually will help you search for programs. If you go to the Start screen and just type the first couple of letters of the name of the program you're looking for, Windows RT will bring up the Search charm with Apps pre-selected. Remember that there is no box or form field associated with this feature; you just type.

5. Windows 8 Keyboard shortcuts

The Windows logo key Windows logo key has been around since Windows 95, and with every new version of Windows, Microsoft just adds more key combinations. There are now forty (40) different Windows logo key shortcuts in Windows 8.

Windows logo key shortcuts for Windows 8.

6. Windows 8 restart options

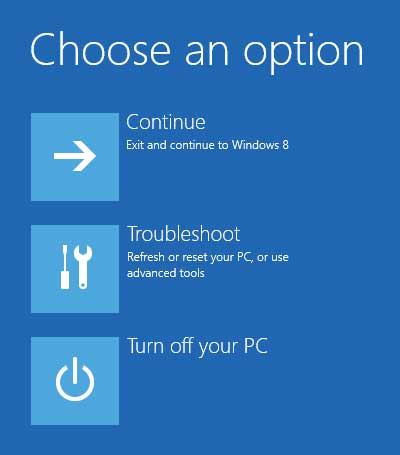
Windows 8 restart option screen

It used to be when you had a problem with Windows, you could press F8 at startup and get to the boot options. This was the primary way to start Windows in Safe Mode or boot to other media. But with newer computers using Unified Extensible Firmware Interface (UEFI) and Windows 8 booting faster, pressing F8 at boot is hard, if not impossible. But there are a couple of ways to get there once Windows 8 is started. Note: If you want to boot from removable media, make sure that the media you want to boot to is attached (USB) or inserted (CD/DVD) before proceeding.

If you are logged off:

  1. On the logon screen, in the lower right-hand corner, tap or left-click the Power Icon. Hold the Shift key down while you tap or left-click on Restart.
  2. On the restart options screen, tap or left-click Troubleshoot.
  3. Tap or left-click on Advanced options.
  4. From here, you can choose what startup settings you want to use or boot to a bootable CD/DVD or USB drive.

If you are logged on:

  1. Press the Windows logo key Windows logo key + C to bring up the Charms bar.
  2. Tap or left-click Change PC Settings.
  3. Tap or left-click General.
  4. Scroll down to Advanced startup and tap or left-click Restart now.
  5. On the restart options screen, tap or left-click Troubleshoot.
  6. Tap or left-click on Advanced options.
  7. From here, you can choose what startup settings you want to use or boot to a bootable CD/DVD or USB drive.

And if you would like to enable the Advanced Boot Options menu, you can do that too. Just remember that there is no timer on the Advanced Boot menu anymore. If enabled, Windows 8 will wait for user input every time the system starts. How to enable the Advanced Boot Options menu at start up in Windows 8.

Free computer diagnostics

Repairing a PC can sometimes be expensive, and that is why we offer free basic in-shop diagnostics. Give one of our professional and experienced technicians a call at (602) 795-1111, and let's see what we can do for you.

Check out our reviews

Geeks In Phoenix LLC, BBB Business Review

Customer service is #1

Here at Geeks in Phoenix, we take pride in providing excellent customer service. We aim to give the highest quality of service  from computer repair, virus removal, and data recovery.

Bring your computer to us and save

Repairing a computer can be time-consuming. That is why we base our in-shop service on the time we work on your computer, not the time it takes for your computer to work! From running memory checking software to scanning for viruses, these are processes that can take some time.

Contact us

If you have any questions, please feel free to give us a call at (602) 795-1111  and talk with one of our Geeks. Or you can send us a message from our contact page contact page , and one of our Geeks will get back to you as soon as possible. Or you can stop by and see us. Here are our hours and location.

Like Geeks in Phoenix on Facebook

Follow Geeks in Phoenix on Twitter

Watch Geeks in Phoenix on YouTube