Are you getting random errors while using Windows 11? Do you think your computer has gotten compromised? A clean installation of Windows 11 may be just the ticket. Here is how to perform a clean installation of Windows 11.
When it comes to repairing Windows 11, trying to fix Windows may take more time than it is worth. At this point, you might want to look at performing a clean installation of Windows 11.
As a computer technician, I constantly have to weigh whether my time is better spent trying to fix Windows or using that time to perform a clean installation. It is usually six of one and a half-dozen of another.
Now I have had customers that had to get their current installation of Windows to work. It usually is because they have programs that they cannot reinstall because they do not have the original installation media anymore.
But if you have all of the installation media or links to download it and are okay with reinstalling all of your apps, then performing a clean installation of Windows 11 may be just right. Now there are a few things that have to be done before proceeding with a clean install.
1. Backup up all of your data. If you store your files on your local drive, use a good backup program, like the built-in Windows Backup. If you keep your data on the cloud, verify that you can access it from a browser.
How to backup your Windows 11 computer using Windows Backup and File History
On an external drive, you can also make a copy of your special folders (Desktop, Documents, Downloads, Music, Pictures, and Videos). The benefit is that you can access your files from any Windows-based computer. Once your data is backed up, you will need to get the installation media.
2. Download the Windows 11 installation media. To perform a clean Windows 11 installation, you will need the Windows 11 installation media. If you installed Windows 11 from a USB drive, it is a good bet that it may be a different version of Windows 11.
Or if your computer came preloaded with Windows 11, you will need to download the install media. Microsoft has a tool aptly named the Media Creation Tool that will create the installation media for Windows 11. All you need is a blank USB drive that is 8GB or larger. If you have an optical drive in your computer, you can also create an ISO image and burn it to a blank DVD.
Create Windows 11 Installation Media
What you can do with an ISO file
3. Make sure you have your Microsoft Account information. When the installation is complete, and Windows 11 starts up for the first time, you will need your Microsoft account username and password to complete the setup.
If you need help remembering your Microsoft account password (and it happens), this is the time to reset it. Follow the link below to go over to the Microsoft account webpage, enter your username, and when prompted for a password, select Forgot password?.
4. Inventory the software that is installed. To ensure that you can reinstall all the software currently installed on your computer, you should take a software inventory of your computer. Belarc Advisor is an excellent program for collecting the hardware and software inside of your computer, and it is free for personal use. Make sure you print out or save a copy of the report so you can use it after the reinstallation.
Belarc Advisor
5. Make a note of what edition of Windows 11 you have installed on your computer. When the time comes to reinstall Windows 11, you will be prompted for what edition (Home, Education, Pro, etc.) you want to install. If you select and install the wrong edition, Windows 11 not activate, and you will have to go through the installation process again.
To find out what edition of Windows you have, bring up a Run dialog box by pressing the Windows logo key  + R. In the Run dialog box, type winver and select OK. Follow the link below for more ways to bring up the Run dialog box.
How to get to and use the Run dialog box in Windows
6. Prepare to wipe your drive. There are several ways to erase the contents of your computer's drive, and I will cover three (3) of them. Note: If you have more than one (1) drive in your computer, you must ensure you are erasing the correct drive. Turn your computer off and disconnect the power or remove any drive you do not want to get accidentally wiped clean.
I like performing a DoD (Department of Defense) wipe when clearing drives. The Ultimate Boot CD (UBCD) has a few disk-wiping programs included. I like using Darik's Boot and Nuke inside of the UBCD.
Now the UBCD has some significant hurdles to overcome to use it, like changing the BIOS settings to allow your computer to boot from it. But if you want to ensure that your drive is completely clean before reinstalling Windows 11, this is the way to go.
Diagnose computer hardware issues with the Ultimate Boot CD
The second and third option for wiping your drive is using the built-in utility Diskpart or the actual Windows 11 installer. The following two (2) ways of drive wiping require you to boot your computer up on the installation media. You can do this using the Advanced Boot Options. Make sure you have the Windows 11 installation media connected to your computer before proceeding so that it will appear as a bootable device listed in the Advanced Boot Options.
How to get to and use the Advanced Boot Options inside of Windows 11
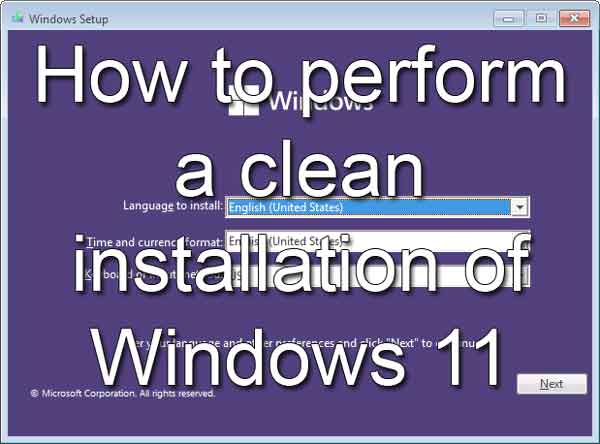
Once you get to the Advanced Boot Options, select Use a device and choose the media you created earlier. Your computer will restart and boot from the installation media. The first screen that appears in the Windows Setup dialog box. Ensure the language, time, and keyboard method are correct, and click on Next. The Install now screen will appear.
To use Diskpart: Select the Repair your computer link in the lower-left-hand corner and then Choose an option screen will appear. Select Troubleshoot, then Command Prompt and then type diskpart in the command prompt and then press Enter.
First, list the disk(s) currently attached to your computer by typing list disk and pressing Enter. From the list that appears, the disk with Windows should be disk 0. Type select disk 0 and press Enter.
To verify that this drive is the one with Windows installed on it, we need to list the partitions on the disk by typing list partition and then press Enter. From the list that appears, you should see at least three (3) partitions (system, primary, and recovery).
If disk 0 has these partitions listed, then this is the drive you need to wipe. If not, check any other drive listed using the list disk, select disk, and list partition commands.
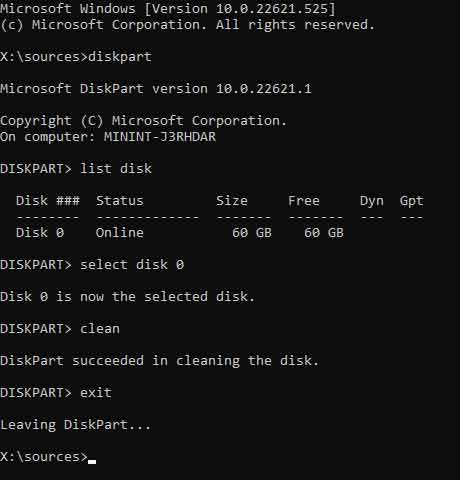
Once you select the correct disk, type clean and press Enter. All partitions will be erased, and you will be ready to proceed with the reinstallation of Windows 11. Type exit and manually restart your computer to continue the installation.
To use the Windows Installer: During the installation process, you will be prompted to select the drive you want to install Windows 11 on. Usually, you would have only one (1) drive (Drive 0 Unallocated Space) that appears. But since you are performing a clean install, you will see all of the partitions that are on that drive (Drive 0).
Starting at the top, select each partition and then select Delete.
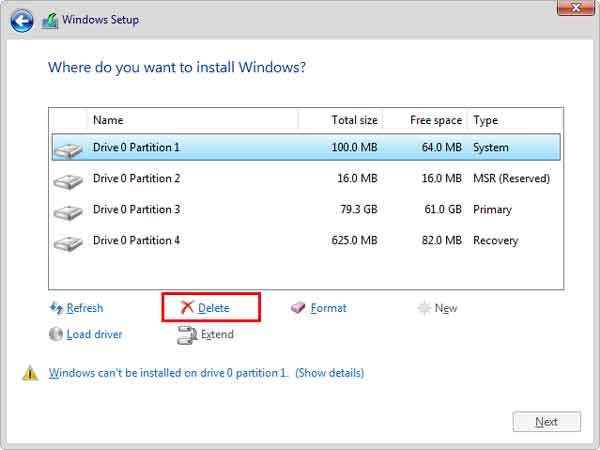
You will be warned about deleting all of the data on that partition. Click on OK and continue deleting all of the rest of the partitions until you end up with Drive 0 Unallocated Space. Select that drive and continue with the installation.
7. Install Windows 11. Boot your computer from the installation media, and at the Install now dialog box, select Install now. The Activate Windows dialog box will appear, prompting you for your Windows 11 product key. Since you previously activated Windows 11 on this computer, select I don't have a product key link at the bottom and select Next.
Since Windows 11 has been activated before on this computer, the first time you connect to the Internet after the installation completes, Windows will automatically activate. It is called Digital Entitlement.
On the next screen, you will be prompted to select the edition of Windows 11 you want to install. Highlight the edition and select Next. The next screen will be the EULA (End User License Agreement). Just check the acceptance box and select Next to continue.
The next screen will ask you what type of installation you want to perform. Select Custom: Install Windows only (advanced). The next screen will ask you where you want to install Windows 11. Select Drive 0 Unallocated Space and then click on Next.
At this point, Windows will start the installation. Once all of the files are copied over and the installation finishes, your computer will restart. From here, you will go through the steps to set up your clean installation of Windows 11. Remember to check the computer manufacturer's website for any system-specific drivers, and you should be good to go.