Did you know that Windows 11 includes two (2) programs for backing up your computer? And when used together, they can provide excellent backup protection. Here is how to use Windows Backup and File History to back up your Windows 11 computer.
Backing up your computer has never been glamorous, and most people tend just to put it off. But without a good backup plan, you could be heading for a huge problem. Windows 11 includes two (2) programs to help you back up your system; Windows Backup and File History. Each of them performs a specific type of backup and use different methods of backing your computer. But when used together, they can be a pretty robust backup plan.
Now Windows Backup has been around since Windows 7. In fact, the name of the shortcut is Backup and Restore (Windows 7). File History has been around since Windows 8. They work differently but complement each other in backing up your computer and data.
By default, Windows Backup and File History like to back up to external or network drives. In fact, using a drive inside your computer is not recommended because if you have any problems with your computer, you may not be able to access any of the data. But you can use the same external or network drive for both programs if you like.
Now a typical backup scenario would use Windows Backup for complete system (bare metal) backup once a week and File History set to back up personal files every hour. Bare metal refers to restoring your computer to a new drive using a Recovery Drive and a Windows Backup image.
If you frequently make software changes (installing, uninstalling, updates, etc.) to your computer, you may want to have Windows Backup run more often. Remember that Windows Backup typically includes all your personal files (Desktop, Documents, Downloads, Music, Pictures, and Videos).
Windows 11 File History
File History creates time-stamped versions of your personal files; Libraries (Camera Roll, Documents, Music, Pictures, Saved Pictures, and Videos), Desktop, Contacts, and Favorites. It saves your files on a regular schedule, from 10 minutes to daily (every hour is the default), adding the date and time to the file name.
File History saves backup file versions from 1 month to forever or until space is needed (forever is the default). It does not use any compression or encryption when saving files, so you can easily navigate through them and preview or open any that you want to view. You also access the backup files from another computer, and no special software is required.
Now you can exclude folders from being backup by File History, but you cannot add folders. The only way to add folders to the list of items to be backed up is by creating a new library, But for most Windows 11 users, the default libraries are more than enough.
Windows 11 Windows Backup
Windows Backup creates an encrypted and compressed backup image of your computer that can only be accessed through Windows Backup or a Recovery Drive. Windows Backup can restore individual folders and files, and a Recovery Drive can restore a complete drive image.
You can set up Windows Backup to run on a set schedule, or you can run it on demand. Windows Backup, by default, is set to perform incremental backups, which means that every time you run it, it backs up only files that have changed since the last backup.
You can customize which files and folders it backs up, but I recommend using the Let Windows choose (system image) option. I have restored numerous failed drives using a Recovery Drive and a system image, and it works great and can be a lifesaver.
How to access and configure Windows Backup and File History
The Control Panel is the only way to get to Windows Backup or File History. There are several ways to get to the Control Panel inside of Windows 11, so here is an article on all the different ways to get there. The following is the most straightforward way of doing it.
- Left-click on the Start
 button to bring up the Start menu.
- In the upper right-hand corner of the Start menu, left-click on All apps.
- Scroll down the list of programs and left-click on Windows Tools.
- Left-click on Control Panel.
- If viewing the Control Panel by Category, left-click on either Save backup copies of your files with File History or Backup and Restore (Windows 7) under System and Security. If viewing by Large/Small Icons, left-click on either Backup and Restore (Windows 7) or File History.
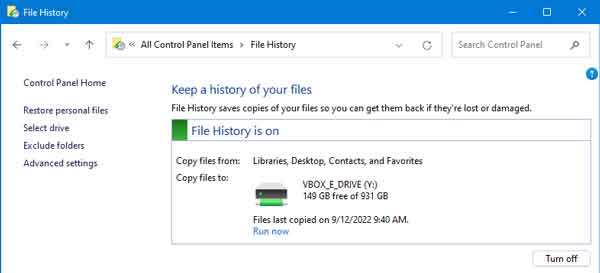
How to configure File History
Once File History is open, you will find four (4) options in the left-hand column; Restore personal files, Select drive, Exclude folders, and Advanced settings. You first need to select the drive you want to use for backing up files. Remember, you can only use external or network drives, so make sure you can access that drive before you start to set up File History.
Once you select your backup drive, you can omit any of your personal folders (Exclude folders) you do not want to backup (Camera Roll, Documents, Music, Pictures, Saved Pictures, and Videos). You can also change how often your files get backup and how long to keep saved versions (Advanced settings).
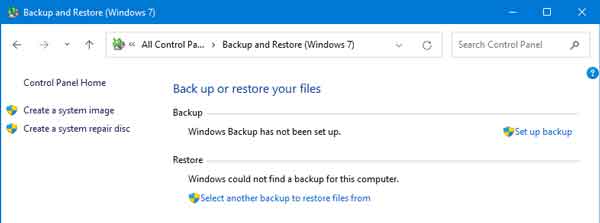
How to configure Windows Backup
Once you have Windows Backup (Backup and Restore (Windows 7)) open, select the Set up backup link in the right column.
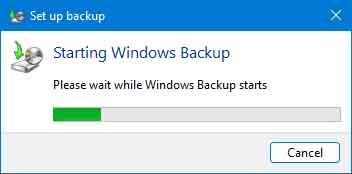
This will start Windows Backup, and you will be prompted as to where you want to save your backup.
After selecting where to save your backup, you will be prompted for what to backup.
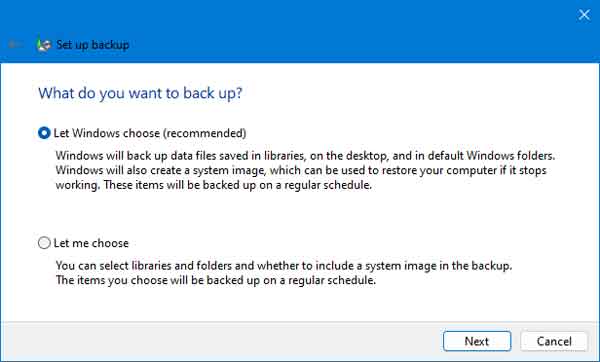
You will get two (2) choices; Let Windows choose (recommended) or Let me choose. I highly recommend the Let Windows choose option, as it will create a system image that can be used for bare metal recovery.
Once you have selected what to backup, you will be prompted to review your backup settings.
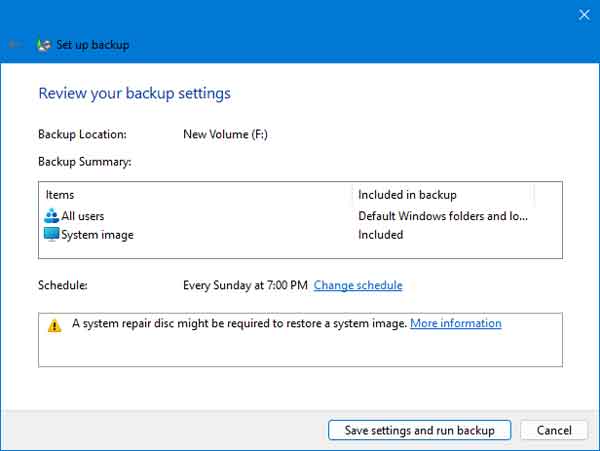
Next, you will need to set up a backup schedule. Quite often, the default once a week on Sunday at 7:00 PM will work but can be changed to fit your schedule.
After you set the schedule, left-click on the Save settings and run backup button, and Windows Backup will perform the first backup. Remember that you need to be connected to the drive you have chosen for Windows Backup to use before the scheduled time.