Geeks in Phoenix

Geek Blog


Diagnose computer hardware issues with the Ultimate Boot CD

Updated March 14, 2024

Every computer repair technician has a handful of software they regularly use to diagnose computer hardware issues. They are usually bootable drives and have their operating system included (FreeDOS or Linux). But carrying around all of these drives can be a nightmare. But luckily, there is a solution to this problem called the Ultimate Boot CD (UBCD).

The Ultimate Boot CD main menu

UBCD is a bootable disk image (ISO) containing the most complete computer hardware diagnostic tools I have ever seen. It includes diagnostic tools for testing BIOS, memory, and everything in between. It includes programs like Memteset86 and Windows Memory Diagnostics for testing memory and Data Lifeguard (Western Digital) and SeaTools (Seagate) for testing drives. In fact, it has an extensive collection of drive utilities.

All of the software inside the UBCD is non-commercial (freeware) and free to download. It comes as an ISO image from which you can create a bootable USB drive (see Rufus below) or burn it to a CD. You can even add more programs to it if you like. The UBCD is like the Swiss Army knife for computer hardware diagnostics.

Note: Some of the programs inside of the UBCD can render your drive unreadable or completely erase the data from it. The following is a list of the program categories inside of the UBCD. Please visit their website for a complete list of utilities included in the UBCD (see link below).

  • BIOS (Basic Input Output System)
  • CPU (Central Processing Unit)
  • HDD (Hard Disk Drive)
    • Boot Management
    • Data Recovery
    • Device Info and Management
    • Diagnosis
    • Disk Cloning
    • Disk Editing
    • Disk Wiping
    • Installation
    • Partition Management
  • Memory
  • Others
  • Peripherals
  • System

Now, for all of the Geeks out there, here's the technical information on the UBCD. The UBCD is formatted using the FAT (File Allocation Table) file system and operates one of two Linux boot loaders: SYSLINUX (default) or GRUB4DOS. From there, you can start either a Linux-based or DOS-based utility. UBCD is also customizable, so you can add any floppy or ISO image or FreeDOS-based application to it (see link below).

To boot your computer using the UBCD, you may have to change some settings in the BIOS. Turning off secure boot and enabling legacy boot options in the BIOS will ensure you can boot your computer on the UBCD.

The UBCD is a privately funded project, and donations are encouraged. Please donate if you find the UBCD as helpful as I do (see link below). For more information on the UBCD, follow the links below.

Ultimate Boot CD (UBCD)

Create a bootable USB drive with Rufus

How to customize the Ultimate Boot CD

Donate to support the UBCD project

How to fix a computer that cannot wake up from sleep or standby mode

Doing computer repair, I fix a wide range of problems. One problem that I see more often are systems that go into sleep/standby mode and cannot come out of it. The cause varies from computer to computer, but the fix is usually a change in the software and/or hardware settings. Here's a couple of ways to fix a computer that goes to sleep/standby and won't wake up.

Your computer uses a standard for power management called Advanced Configuration and Power Interface (ACPI). There are six (6) different 'sleep' states that your computer can use. The following is a portion of the Wikipedia article on ACPI.

The ACPI specification defines the following four Global "Gx" states and six Sleep "Sx" states for an ACPI-compliant computer-system:

  • G0 (S0): Working. "Awaymode" is a subset of S0, where monitor is off but background tasks are running.
  • G1, Sleeping subdivides into the four states S1 through S4:
    • S1: All processor caches are flushed, and the CPU(s) stops executing instructions. Power to the CPU(s) and RAM is maintained; devices that do not indicate they must remain on may be powered down.
    • S2: CPU powered off. Dirty cache is flushed to RAM.
    • S3: Commonly referred to as Standby, Sleep, or Suspend to RAM (STR). RAM remains powered
    • S4: Hibernation or Suspend to Disk. All content of main memory is saved to non-volatile memory such as a hard drive, and is powered down.
  • G2 (S5), Soft Off: G2/S5 is almost the same as G3 Mechanical Off, except that the PSU still supplies power, at a minimum, to the power button to allow return to S0. A full reboot is required. No previous content is retained. Other components may remain powered so the computer can "wake" on input from the keyboard, clock, modem, LAN, or USB device.
  • G3, Mechanical Off: The computer's power has been totally removed via a mechanical switch (as on the rear of a PSU). The power cord can be removed and the system is safe for disassembly (typically, only the real-time clock continues to run - using its own small battery).

Changing the power management options in the operating system

General power options in Windows 8

Sometimes just changing the software settings in the operating system power options will fix the issue. Access to the power options in Windows can be done thru the Control Panel. Depending on your version and view by settings, you may or may not see a power option link. In that case, look for power options under the hardware category.

Editing advanced power settings in Windows 8

Once there, create a new plan or modify an existing plan, changing the advanced settings as needed.

Advanced power option settings in Windows 8

You can also disable S4 hibernation and make it unavailable quickly and easily using an administrator command prompt.

How to open a Command Prompt with Administrator privileges in Windows Vista and Windows 7

How to open a Command Prompt with Administrator privileges in Windows 8

How to open a Command Prompt with Administrator privileges in Windows 10

How to disable Windows hibernation

Changing power management options in the BIOS

Power management settings in a typical computer BIOS

If changing the operating system's power options does not fix the problem, you can try changing the APCI setting to the computer's Basic Input/Output System (BIOS). To access the BIOS, you will need to do so at the time the computer boots up. When the computer starts up, it usually displays a 'splash' screen with the manufacturer's name and logo. On this screen, you typically see something like 'Press F2 or Del or F10 for setup' (it varies from manufacturer to manufacturer). The 'splash' screen may only appear for a second or two and may take a few reboots to get into the BIOS. Once there, you need to look for Power Management Options. There you will find the different ACPI standby states.

Windows 8.1 Preview - user interface enhancements

Note: Since Windows 8.1 was released on August 27, 2013, the Windows 8.1 Preview is no longer available for download.

Microsoft recently released the Windows 8.1 Preview, the future upgrade to Windows 8. Some of the changes are subtitle and are quite quickly overlooked; others are not. Changes included in Windows 8.1 are B.Y.O.D. (Bring Your Own Device), mobility, security, and user interface enhancements. With the promise of better user interaction on personal computers, Microsoft made some tweaks to Windows RT and Windows 8. Let's take a closer look into the user interface changes inside of Windows 8.1 Preview.

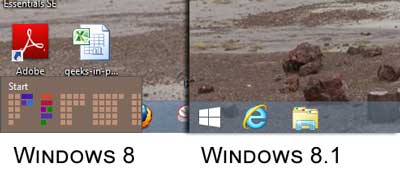
The Start button returns to Windows 8.1 Preview

The first thing you'll notice is that nothing appears to have changed. Right out-of-the-box, the only thing that caught my eye was the return of the Start button on the Desktop. You no longer have to hover your cursor in the lower left-hand corner of the screen. If you left-click on the Start button, it brings up the Start screen, not the Start menu from previous versions of Windows. If you right-click on it, the power user command menu appears without keyboard shortcuts. Pressing the Windows logo key Windows logo key + X does the same thing but has the keyboard shortcuts (the underlined letter in the program's name). If you want a Start menu, you'll need a third-party app like Start8.

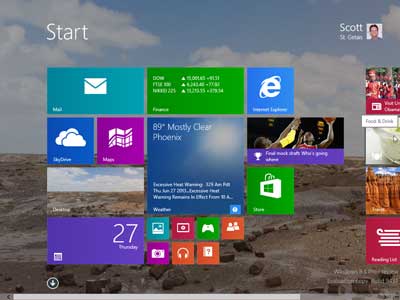
Smaller tile size on the Start screen inside of Windows 8.1 Preview

The Start screen has also undergone some changes. The tiles can now be resized smaller for non-touch devices like personal computers. You currently have four different tile sizes to choose from: large (8x8), wide (8x4), medium (4x4), and small (1x1). There is now a button at the bottom of the Start screen to toggle between it and the Apps screen. You no longer have to right-click the Start screen to bring up the Apps command bar. When you right-click on the Start screen, you get a customize button for adding names to groups of tiles. You no longer have to zoom out to do it. And now, if you zoom out, all you can do is select a group of tiles to zoom in on.

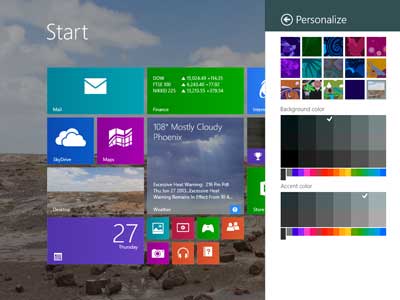
The Personalize options for the Start screen in Windows 8.1 Preview

The customization options for the Start screen have also been expanded. You can now use one of your images for the lock screen or play a slide show on it. You can now also change the accent color along with the background color. Not as many options as some third party programs like Decor8, but it's an improvement compared to Windows 8.

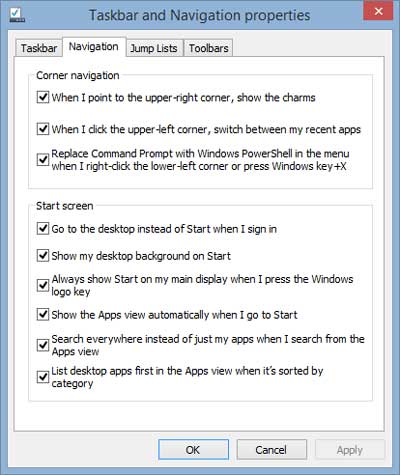
Taskbar and navigation properties inside of Windows 8.1 Preview

One of the most anticipated changes is the boot to Desktop option. It took a little hunting, but I did find it under Personalization > Taskbar and Navigation properties. It's there you can make Windows 8.1 go to the Desktop when you sign in. You can also have the Desktop background on the Start screen and set the Apps screen as the default when you left-click on the Start button.

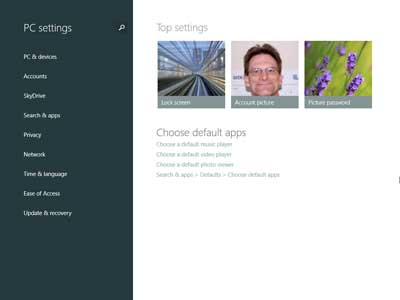
The redesigned PC settings inside of Windows 8.1 Preview

Another program that got a facelift was PC Settings. Microsoft redesigned it with expanded categories and sub-menus to include more settings. It's still not as complete as the Control Panel, but it's getting better. The new layout seems more proportionate on a computer screen, with the menu titles smaller. Overall, I would say the user interface inside of Windows 8.1 is an improvement over Windows 8. But without a Start menu, it will still be a hard sell to die-hard Windows users.

Restore the Start button and Start menu to Windows 8 with Start8

The biggest complaint I have heard about Windows 8 is that the Start button and Start menu are gone. No doubt this was a radical change in the way users interact with Windows. Being a Windows logo key fanatic since its introduction in Windows 95, I found the new Start screen to be less of a headache than most. But I still missed the Start button. The folks over at Stardock have recently released a great program called Start8 that brings both of them back and more.

Windows 7 style Start menu in Windows 8 using Start8

Start8 is, in my book, the ultimate Start button replacement for Windows 8. Now before I go on, let's see if we can make some sense about all of the Start items. The Start button is located by default on the left-hand side of the Taskbar and has the Windows logo on it (Windows 95 - Windows 7). The Start menu appears when you left-click on the Start button (Windows 95 - Windows 7). The Start screen is the Windows RT (Metro) interface used in Tablets and Smartphones (Windows 8).

Windows 8 style start menu in Windows 8 using Start8

With Start8, you can get back the Start button and Start menu with a choice of what style you would like to use (Windows 7 or Windows 8). The Windows 7 style looks and feels just like the original. The Windows 8 style is a hybrid, with the Start screen appearing in-place of the Start menu. Both are highly configurable and can use custom images for the Start button.

Here's a breakdown of the styles and included features:

    Windows 7 style
  • Choice of themes (Windows 7 rounded edges, Windows 8 squared edges, black selection edges)
  • Use large icons
  • Show recently used apps
  • Open submenus when you pause over them with your cursor
  • Highlight newly installed apps
  • Show user picture
  • Choice of which shortcuts to display on the right-hand side of the menu
  • Add additional shortcuts to the right-hand side of the menu
    Windows 8 style
  • Choice of four different sizes or full screen
  • Display Start menu full screen with the Taskbar still visible
  • Choice of what the Start button and Windows logo key do
  • Can default to the applications view

Start8 is produced by Stardock, makers of ModernMix and Decor8. Here's a quote from the Stardock website:

What is Start8?

Microsoft Windows® 8 is shipped without the "Start" menu. Stardock heard the cries from Windows 8 users. We put the "Start" menu back in Windows 8. We accurately recreated the most used desktop feature billions of users depend on every day and packed it with additional functionality.

    Innovation
  • Windows 7-style Start menu with Windows 8 enhancements
  • Search for Windows 8-style (Modern UI) apps
  • Pin desktop and Metro apps to the start menu
  • Jump List support
  • Unified Search for apps, settings and files
  • Boot directly to the Windows 8 desktop
  • One click access to shut down, devices, music, documents, and videos
    Control
  • Configurable Start menu size
  • Windows 8 Start screen accessible from the Start menu
  • Clean, streamlined UI enhances Start8's usability
    Customization
  • Optionally disable the desktop Windows 8 "hot spots"
  • Supports WindowFX 5.1 start menu animations
  • Includes .ADMX template (in Group Policy folder)

Start8 is only $4.99 and, in my opinion, worth every penny. For more information on Start8 or Stardock, follow the links below:

Stardock

Start8

How to enable the Advanced Boot Options menu at start up in Windows 8

When performing computer repair on a Windows-based system, the one feature I like is the Advanced Boot Options menu. By pressing the F8 key at startup, you would get the advanced boot options menu, enabling safe mode, boot logging, debugging, etc. With the fast startup options inside of Windows 8 and modern motherboards, getting to the boot options menu is hard. Here's how to get the Advanced Boot Options menu back in Windows 8.

Warning! There is no default timer when the Advanced Boot Menu option is enabled in Windows 8, and the system will wait for user input every time it starts or restarts. This works excellent when troubleshooting Windows 8. You can also choose which Windows Boot Manager (WBM) you want to use, Standard (Windows 8) or Legacy (Windows 7, Vista). The first thing we have to do is edit the Boot Configuration Data (BCD) store using an administrative command prompt and bcdedit.exe.

Bcdedit is a command-line tool that modifies the boot configuration data store. The boot configuration data store contains boot configuration parameters and controls how the operating system is booted. It needs to be run at an administrative command prompt.

How to open a Command Prompt with Administrator privileges in Windows 8.

How to enable/disable the advanced boot options menu in Windows 8

The standard advanced boot options menu in Windows 8

The first thing we have to do is turn on the advanced boot options. Type or cut/paste the following code into an administrative command prompt:

bcdedit /set {globalsettings} advancedoptions true<

To turn off the advanced boot options, type or cut / paste the following code into an administrative command prompt:

bcdedit /set {globalsettings} advancedoptions false

How to enable / disable the legacy advanced boot manager in Windows 8

The legacy advanced boot options menu in Windows 8

This next step will change which boot manager loads and is an option. If you want to boot using the older legacy boot manager used in Windows 7 and Vista, type or cut/paste the following code into an administrative command prompt:

bcdedit /set {default} bootmenupolicy legacy

To restore the boot menu to the default, type or cut/paste the following code into an administrative command prompt.

bcdedit /set {default} bootmenupolicy standard

Free computer diagnostics

Repairing a PC can sometimes be expensive, and that is why we offer free basic in-shop diagnostics. Give one of our professional and experienced technicians a call at (602) 795-1111, and let's see what we can do for you.

Check out our reviews

Geeks In Phoenix LLC, BBB Business Review

Customer service is #1

Here at Geeks in Phoenix, we take pride in providing excellent customer service. We aim to give the highest quality of service  from computer repair, virus removal, and data recovery.

Bring your computer to us and save

Repairing a computer can be time-consuming. That is why we base our in-shop service on the time we work on your computer, not the time it takes for your computer to work! From running memory checking software to scanning for viruses, these are processes that can take some time.

Contact us

If you have any questions, please feel free to give us a call at (602) 795-1111  and talk with one of our Geeks. Or you can send us a message from our contact page contact page , and one of our Geeks will get back to you as soon as possible. Or you can stop by and see us. Here are our hours and location.

Like Geeks in Phoenix on Facebook

Follow Geeks in Phoenix on Twitter

Watch Geeks in Phoenix on YouTube