Do you want to install Windows 11 but want to avoid using a Microsoft account to sign in? Or maybe you want to install Windows without BitLocker drive encryption. You can do both and more when you use Rufus to create custom Windows installation media.
There may be a time when you want to customize the installation options for Windows. Whether installing Windows with only a local user account or bypassing the Windows 11 hardware requirements, you might need to create a custom installation media for Windows at some point.
As a computer technician, I have had some experience building Windows images (including drivers and apps) for corporate distribution, and it is a reasonably complex process. It is not something the average computer user would want to do.
Now there are a lot of articles out there that tell you how to modify the registry during the installation of Windows. For an experienced Windows user, these registry tweaks can be tricky to implement.
But what if you could take all of those registry tweaks and incorporate them into an installation media and then use that to install Windows? You can do just that with Rufus. Rufus is a stand-alone program for creating bootable USB drives from ISO (International Organization for Standardization) files.
Rufus works exceptionally well for creating bootable USB drives from Windows and Linux ISO files, as well as for making a bootable UBCD (Ultimate Boot CD) USB drive for diagnostics. The list of options for each operating system varies, so here are the customizations you can make to the current version(s) of Windows installation media.
Windows 10
- Create a local account with username
- Set regional options to the same values as this user's
- Disable data collection (Skip privacy questions)
- Disable BitLocker device encryption
Windows 11 (includes all of the above plus)
- Remove requirement for 4GB + RAM, Secure Boot and TPM 2.0
- Remove requirement for an online Microsoft account
To create a bootable USB drive with Rufus, you will need an 8GB or larger USB drive, a Windows 10 or Windows 11 ISO file, and of course, Rufus. Remember that no matter what installation option you choose for Windows, you will need a legitimate product key to activate it.
- Download Rufus.
- Download and run the Windows Media Creation Tool for your version of Windows.
Windows 11 / Windows 10
The Windows Media Creation tool is a stand-alone program and does not require installation. Just start it up. If you're prompted for an administrator password or confirmation, type the password or provide confirmation. Accept the license terms, select the language, select ISO file as the media to use, and then select where to save the ISO file. Let the file download, and then proceed to the next step.
- Insert a USB drive (8TB or larger).
- Open Rufus. Since it is a stand-alone program, it does not require installation, just start it up. If you're prompted for an administrator password or confirmation, type the password or provide confirmation.
On the main screen you will find three (3) sections; Drive Properties, Format options, and Status.
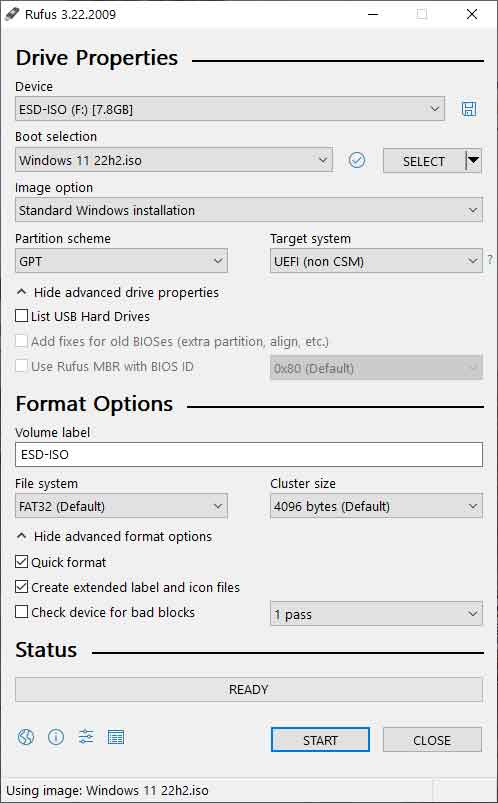
Under Drive properties, make sure the USB drive you want to use is selected in the Device pull-down menu.
Right below the Device pull-down menu, you will find the Boot selection. Left-click the Select button, navigate to the ISO file you downloaded and select it. Rufus will recognize the ISO file and load default settings based on the operating system.
Usually, the default settings work perfectly, so there is no need to change them. Just go down to the Status section and left-click on Start. The Windows User Experience dialog box appears with the customizations that are available for the version of Windows you are working with.
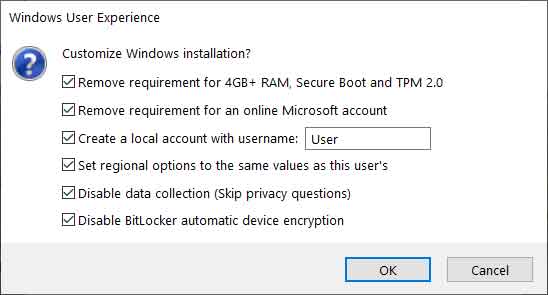
Select all of the options you want to include in your custom installation media and then left-click on OK. At this point you should be ready to go.
c62e7f3b-d560-4df9-86d5-8d51a3043f41|4|2.3|96d5b379-7e1d-4dac-a6ba-1e50db561b04