Geeks in Phoenix

Geek Blog


Backup your files with File History and Windows Backup in Windows 10

Updated August 12, 2020

Backing up your computer has never been exciting, but it needs to be done regularly. And with the increase of file-encrypting malware, having a good backup has never been more critical. Here's how to back up your files with File History and Windows Backup in Windows 10.

Backup your files with File History and Windows Backup in Windows 10

Windows 10 backup basics

Now there are two (2) different backup programs inside of Windows 10, Windows Backup, and File History, and each one does a specific type of backup. Windows Backup is geared more towards scheduled backups (nightly, weekly, etc.) and is usually used for full system backups / complete 'bare metal' system images. File History is more for personal files that frequently change, like Word documents and Excel spreadsheets, as it saves multiple versions of the same file.

File History creates multiple versions of the same file with time stamps in the names
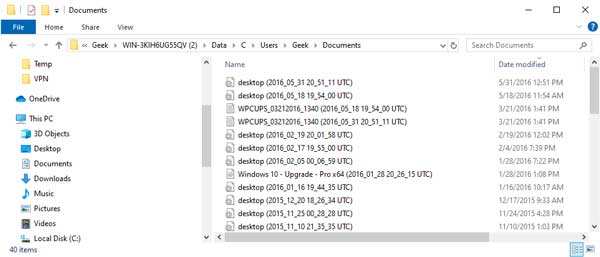
File History creates multiple versions of the same file with time-stamps in the names

The one thing that Windows Backup and File History have in common is that both of these programs can back up to an external drive or network folder. Windows Backup can also use writeable disks like CDs or DVDs.

With the recent outbreak of file-encrypting malware, if you're going to use a network folder, it is recommended you do not map a network folder to a drive letter (N:\Files), but instead use Uniform Naming Convention (UNC) (\\Server\Volume\Files).

Never use the same drive that Windows is installed on for File History or Windows Backup. If your computer gets a virus or the operating system gets corrupted, you may have to reformat the drive and reinstall Windows.

Remember, when not in use, store the media used for backups (external hard disks, DVDs, or CDs) in a secure place to prevent unauthorized people from having access to your files. It is also recommended to use a fire-proof location, like a data safe, to store the backup media.

Using File History to back up your files

File History will automatically create time-stamped versions of your files (documents, music, photos, etc.) on a set schedule. If the originals are lost, damaged, or deleted, you can restore them from an earlier point in time. You can schedule File History to run from every ten (10) minutes to daily. And you can also set the length time that File History keeps copies of your files, from 1 month to forever or whenever space is needed.

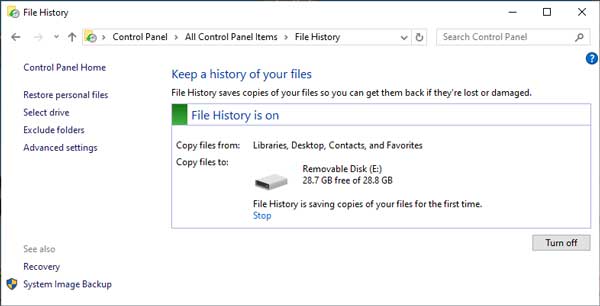
The main screen for File History

To use File History, you will need to either have an external drive or network folder to save the files. By default, File History will back up your folders (documents, photos, videos, etc.), but you can add additional folders to its configuration. Now configuring File History inside of Windows 10 can be a little confusing, as there are two (2) different places to change the settings, Settings and Control Panel.

How to open File History in Settings

  1. Left-click on the Start Windows logo menu and select Settings (the gear icon).
  2. Left-click on Update & security.
  3. In the left column, left-click on Backup.

How to open File History in the Control Panel

  1. Left-click on the Start Windows logo menu.
  2. Scroll down to Windows System and left-click on it to expand it out.
  3. Left-click on Control Panel.
  4. If viewing by category, left-click on Save backup copies of your file with File History. If viewing by large/small icons, left-click on File History.

or

  1. In the search box next to the Start Windows logo button, type Control Panel, and click on it from the results.
  2. If viewing by category, left-click on Save backup copies of your file with File History. If viewing by large/small icons, left-click on File History.

Here is a breakdown of what options can be changed and where to find them.

File History option Settings Control Panel
Turn on or off X X
Manually run File History X  
Change frequency (how often it runs) and duration (how long they are kept) of history X X
Add or remove folders X  
Exclude folders (useful for sub-folders) X X
Change where backups are stored X X
Clean up older versions   X
Restore files   X

Using Windows Backup to back up your files

The Windows Backup version included in Windows 10 is actually from Windows 7, hence the name in the Control Panel, Backup and Restore (Windows 7). If you used the version in Windows 7, everything will be familiar to you. With Windows Backup, you can back up just specific files and folders or do a complete system backup/system image. And you can schedule it to run whenever you want.

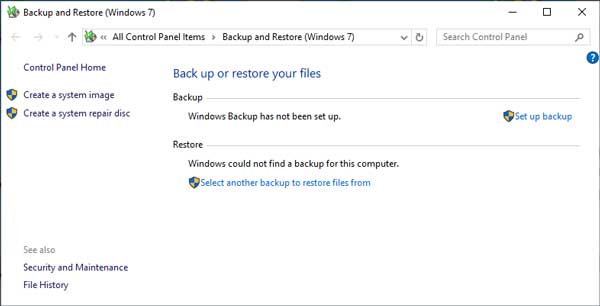
The main screen for Windows Backup

But unlike File History, Windows Backup creates a single backup that gets updated when it is run. No multiple file versions here, just the latest version of files at the time Windows Backup was run.

Along with using an external drive or network folder for backup, Windows Backup can also use CDs or DVDs. But if you're going to do a complete system backup on CD's or DVD's, be prepared with plenty of blank disks.

If you're creating a complete system image, remember to make a system repair disk to go along with it. If you ever need to restore your computer from a Windows Backup image, you will need to boot your computer from it. The link to create it is in the left-hand column.

How to open Windows Backup in Settings

  1. Left-click on the Start Windows logo menu and select Settings (the gear icon).
  2. Left-click on Update & security.
  3. In the left column, left-click on Backup.
  4. In the right column, left-click on Go to Backup and Restore (Windows 7).

How to open Windows Backup in the Control Panel

  1. Left-click on the Start Windows logo menu.
  2. Scroll down to Windows System and left-click on it to expand it out.
  3. Left-click on Control Panel.
  4. Left-click on Backup and Restore (Windows 7).

or

  1. In the search box next to the Start Windows logo button, type Control Panel, and click on it from the results.
  2. Left-click on Backup and Restore (Windows 7).

How to securely erase all of the data from your Windows based computer

Do you have an old Windows-based computer you would like to get rid of but want to make sure that all of your data is securely erased? Or maybe you would like to wipe all of the data from your hard drive and perform a clean Windows installation? Either way, you'll want to make the data is completely wiped out. Here's how to securely erase all of the data from your Windows-based computer.

Back-up all folder(s) and file(s) you want to save

This is the time to double and triple-check for any folder(s) and file(s) you may want to keep. If you plan on reinstalling Windows, make sure that you have all of the installation media available. If you need to create the recovery media stored on your computer, this is the time to do it. Once the hard drive is wiped clean, the recovery media images will be gone too.

Windows XP Backup

Windows 7 / Windows Vista Backup

Windows 8 Backup

Download and create bootable media with disk wiping software

The best way to completely wipe clean a hard drive is by booting the computer up on a CD/DVD or USB drive. This way, you can erase all of the space on the hard drive. There are several free utilities for doing this, including Darik's Boot And Nuke, CMRR - Secure Erase, and PC Disk Eraser. I recommend the Ultimate Boot CD (UBCD), which has all of these and more already built-in. Just download the image file (.ISO) and use your favorite disk burning software or Windows built-in disk burning to create the bootable media. You can even create a UBCD bootable USB drive.

Encrypt the contents of your hard drive

This step may seem unnecessary, but it makes data recovery virtually impossible on the drive you will wipe. Windows has a feature called Encrypting File System (EFS) built-in, but it's disabled by default. It allows files to be encrypted transparently with a File Encryption Key (FEK). For more on EFS, check out this Wikipedia article. So even if someone could recover the data on the drive after the wiping, it would be in deplorable condition. After that, the data would have to be unencrypted, and being in such a bad condition, would be hard, if not impossible.

  1. Open File Explorer / Windows Explorer (Windows logo key Windows logo key + E).
  2. Select the file(s) and/or folder(s) you want to encrypt.
  3. Right-click on the items selected and then left-click on Properties from the context menu that appears.
  4. On the General tab, left-click on Advanced.
  5. Left-click the check box for Encrypt contents to secure data.
  6. Left-click on OK. Be patient; encrypting the folders and files may take some time.

Insert bootable media and restart the system

When you restart your system, it should boot up on the media you created. Follow the on-screen instructions. If using the UBCD, navigate to HDD > Disk Wiping for the list of utilities. Each program will have similar data destruction settings. I always look for the latest Department of Defense standard (currently DOD 5220.22-M). If you really want to clean your hard drive, just run two or more of the disk wiping programs included on the UBCD.

If your system does not boot up on the media you just created, you may have to change the computer's boot order. Check the 'splash' screen that first appears when you start your computer. Sometimes there is an option for boot device or menu, usually an F key. If not, you will have to change it manually inside the BIOS (Basic Input Output System). The BIOS can generally be accessed by pressing the DEL or F2 key when the 'splash' screen appears. It's always recommended to check your motherboard documentation on which keys are used to access the BIOS and where in the BIOS to change the boot order.

Back up your files in Windows 8 with File History

File History in Windows 8 automatically backs up files in your libraries, contacts, favorites, Microsoft OneDrive, and your desktop. If the originals are lost, damaged, or deleted, you can restore all of them. You can also find different versions of your files from a specific point in time. Over time, you'll have a complete history of your files. File History is the replacement for Backup and Restore from previous versions of Windows.

How to use File History in Windows 8

  1. Go to the Start menu.
  2. Right-click the Start menu background to bring up the app commands.
  3. Select 'All apps'.
  4. Scroll to the 'Control Panel' tile and left-click on it.
  5. Under 'System and Security', left-click on 'Save backup copies of your files with File History'.

Or

  1. Go to the Start menu.
  2. Right-click the Start menu background to bring up the app commands.
  3. Select 'All apps'.
  4. Scroll to the 'Control Panel' tile and left-click on it.
  5. On the upper right side of the Control Panel, there is a 'View by:' pull-down menu (the default is Category). Left-click on the arrow to the right and select either 'Large icons' or 'Small icons'.
  6. Left-click on 'File History'.

Before you start using File History to back up your files, you'll need to set up a drive to save files to. It is recommended that you use an external drive or network location to help protect your files against a crash or other PC problem. File History only saves copies of files in your libraries, contacts, favorites, Microsoft OneDrive, and your desktop. If you have files or folders elsewhere that you want to be backed up, you can add them to one of your existing libraries or create a new library. You also change the frequency of the File History back up by clicking on Advanced settings on the left-hand side of the window.

How to restore a file using File History in Windows 8

  1. Go to the Start menu.
  2. Right-click the Start menu background to bring up the app commands.
  3. Select 'All apps'.
  4. Scroll to the 'Control Panel' tile and left-click on it.
  5. On the upper right side of the Control Panel, there is a 'View by:' pull-down menu (the default is Category). Left-click on the arrow to the right and select either 'Large icons' or 'Small icons'.
  6. Left-click on 'File History'.
  7. On the left-hand side of the File History window, left-click on 'Restore personal files'. Scroll side to side and select the date/time and the files you wish to restore.
  8. Click on the circular arrow at the bottom of the screen to restore the selected folder(s) and file(s) to their original location(s).

Back up your files in Windows Vista and Windows 7

To make sure you don't lose the files you create, modify, and store on your computer, you should regularly back them up. You can manually back up your files at any time or set up automatic backups.

  1. Click the Start button
  2. Click on All Programs
  3. Click on Maintenance
  4. Click on Backup and Restore

Do one of the following:

  • If you have never used Windows Backup before, click Set up backup, and then follow the wizard's steps. If you are prompted for an administrator password or confirmation, type the password or provide confirmation.
  • If you have created a backup before, you can wait for your regularly scheduled backup to occur, or you can manually create a new backup by clicking Back up now. If you are prompted for an administrator password or confirmation, type the password or provide confirmation.

Notes:

  • We recommend that you don't back up your files to the same hard disk that Windows is installed on.
  • Always store media used for backups (external hard disks, DVDs, or CDs) in a secure place to prevent unauthorized people from having access to your files; we recommend a fireproof location separate from your computer. You might also consider encrypting the data on your backup.

To create a new, full backup

After you create your first backup, Windows Backup will add new or changed information to your subsequent backups. If you're keeping your backups on a hard drive or network location, Windows Backup will automatically create a new, full backup for you when needed. If you're saving your backups on CDs or DVDs and can't find an existing backup disc, or if you want to create a new backup of all of the files on your computer, you can create a full backup. Here's how to create a full backup:

  1. Open Backup and Restore.
  2. In the left pane, click Create new, full backup.

Note:
You will only see this option if your backup is being saved on CDs or DVDs.

To set up backup after upgrading from a previous version of Windows

After you upgrade Windows, you will need to set up Windows Backup, even if you had a scheduled backup in the previous Windows version. This is because there are several changes to the backup program. Instead of selecting file types to back up, you can have Windows back up data files saved in libraries, on the desktop, and in default Windows folders, or you can choose specific libraries and folders to be backed up. You can also create a system image of your computer.

To set up your backup, follow these steps:

Open Backup and Restore.

Click Set up backup, and then follow the steps in the wizard. If you are prompted for an administrator password or confirmation, type the password or provide confirmation.

Ways to store backups
You can back up files to any of the following storage types:

  • Hard disks (internal or external)
  • Other removable disks
  • Writeable DVDs and CDs
  • Network locations

The first three options are often known collectively as media. You can also use an Internet-based file storage service. To decide which option to use, compare convenience, price, and ease of use, and consider the amount and size of files you want to back up.

Keep backups in a safe location
Always keep removable storage or media used for backups (such as external hard disks, DVDs, or CDs) in a secure place to prevent unauthorized people from having access to your files.

Storage devices

Internal hard disks
You can install (or have someone else install) a second internal hard disk in your computer and use it to back up files. Hard disks are relatively inexpensive and are not affected if you have a problem with your operating system. You can even install the disk in another computer if you buy a new computer, and you still want to use the disk for backups.

Note:
Never back up files to a location on the same hard disk that Windows is installed on because if your computer gets a virus or has a software failure, you might have to reformat the disk and reinstall Windows to recover from the problem.

External hard disks
If your computer has a USB port, you can attach an external hard disk to it and then back up files to the external disk. Be sure to buy an external hard disk with plenty of space for your backups (2 TB is a good choice). For maximum protection, keep your external hard disk in a fireproof location separate from the computer.

Writeable discs
You can also save your files to DVDs or CDs. Ensure the discs are writeable, which means that you can add, delete, or change the content. If you decide to use this method and have many files to back up, be sure you have enough discs to finish the job. The Back Up Files wizard tells you how much space you need each time you perform a backup and recommends the type of media to use. If you label the discs with the backup date and time, they will be easier to find later. For maximum protection, keep the discs in a fireproof location separate from your computer.

Network locations
If your computer is on a network, you can back up to a network location. Ensure that you have the right permissions for the network and that other users can't access your backup.

Using Backup in Windows XP

Using Backup in Windows XP

The Backup utility helps you create a copy of the information on a tape or storage device. Suppose the original data on your hard disk is accidentally erased or overwritten or becomes inaccessible because of a hard disk malfunction. In that case, you can use the copy to restore your lost or damaged data.

Notes:

  • To start Backup, click Start, point to Programs, point to Accessories, point to System Tools, and then click Backup.
  • The Removable Storage service must be started for Backup to work correctly.
  • You can also use the Automated System Recovery Wizard in the Backup utility to help you repair your system.
  • For information about using Backup, click the Help menu in Backup.

Backing up files and folders

Backup lets you back up data to a file or a tape. When you back up data to a file, you have to designate a file name and a location for the saved file. Backup files usually have the extension .bkf, but you can change it to any extension. A backup file can be saved to a hard disk, a floppy disk, or any removable or non-removable media on which you can save a file.

When you back up data to a tape, you must have a tape device connected to your computer. Tapes are managed by Removable Storage. Although Backup works together with Removable Storage, you might have to use Removable Storage to perform specific maintenance tasks, such as preparing and ejecting tapes.

The following four steps describe a simple backup operation:

Select files, folders, and drives for backup

Backup provides you with a tree view of the drives, files, and folders on your computer, which you can use to select the files and folders you want to back up. You can use this tree view the same way you use Windows Explorer to open drives and folders and select files.

Select storage media or file location for backed-up data

Backup provides two options for selecting storage media:

You can back up your data to a file on a storage device. A storage device can be a hard disk, a USB drive, or any removable or non-removable media to which you can save a file. This option is always available.

You can back up your data to a tape device. This option is available only if you have a tape device installed on your computer or connected to it. If you back up data to a tape device, the media will be managed by Removable Storage.

Set backup options

Backup provides an Options dialog box, which you can use to customize your backup operations. Using the Options dialog box, you can:

Select the type of backup that you want to do. Backup types include copy, daily, differential, incremental, and normal.

Select whether you want a log file to record your backup actions. If you select this option, you can also choose whether you want a complete log file or summary log file.

Select whether you want to back up data that is stored on mounted drives.

Designate file types that you want to exclude from a backup operation.

Select whether you want to verify that the data was backed up correctly.

Start the backup

When you start a backup operation, Backup will prompt you for information about the backup job and allow you to set advanced backup options. After you have provided the information or changed your backup options, Backup will start backing up the files and folders you selected.

If you have scheduled the backup to run unattended, you will still be prompted for information about the backup job. However, after you have provided the information, Backup will not start backing up files; instead, it will add the scheduled backup to the Task Scheduler.

Notes:

  • You must be an administrator or a backup operator to back up all files and folders. Suppose you are a member of the Users or Power Users group. In that case, you must be the owner of the files and folders you want to back up, or you must have one or more of the following permissions for the files and folders you want to back up: Read, Read and Execute, Modify, or Full Control.
  • The registry, the directory service, and other key system components are contained in the System State data. You must back up the System State data if you want to back up these components.
  • You can only back up the System State data on a local computer. You cannot back up the System State data on a remote computer.
  • You can schedule a backup so that it will run unattended at a specific time or frequency. You can schedule a backup after you click Start Backup.
  • If you have Windows Media Services running on your computer, and you want to back up the files associated with these services, see "Running Backup with Windows Media Services" in the Windows Media Services online documentation. You must follow the procedures outlined in the Windows Media Services online documentation before you can back up or restore files associated with Windows Media Services.
  • If you are using Removable Storage to manage media, or you are using Remote Storage to store data, you should regularly back up the files that are in the following folders:
    Systemroot\System32\Ntmsdata
    Systemroot\System32\Remotestorage
    This will ensure that all of your Remote Storage and Removable Storage data can be restored.

Free computer diagnostics

Repairing a PC can sometimes be expensive, and that is why we offer free basic in-shop diagnostics. Give one of our professional and experienced technicians a call at (602) 795-1111, and let's see what we can do for you.

Check out our reviews

Geeks In Phoenix LLC, BBB Business Review

Customer service is #1

Here at Geeks in Phoenix, we take pride in providing excellent customer service. We aim to give the highest quality of service  from computer repair, virus removal, and data recovery.

Bring your computer to us and save

Repairing a computer can be time-consuming. That is why we base our in-shop service on the time we work on your computer, not the time it takes for your computer to work! From running memory checking software to scanning for viruses, these are processes that can take some time.

Contact us

If you have any questions, please feel free to give us a call at (602) 795-1111  and talk with one of our Geeks. Or you can send us a message from our contact page contact page , and one of our Geeks will get back to you as soon as possible. Or you can stop by and see us. Here are our hours and location.

Like Geeks in Phoenix on Facebook

Follow Geeks in Phoenix on Twitter

Watch Geeks in Phoenix on YouTube