Geeks in Phoenix

Geek Blog


Try Windows 8 for free with Windows 8 Developer Preview

By now, you have probability started hearing the buzz about Windows 8. Maybe it's the new interface, Metro, which brings touch screen ease of use and the simple tile look of the Windows 7 phone to the desktop. Or maybe it's the Metro apps, that with a connected Windows Live account, can be downloaded and used on any Windows 8 computer you login to. Or, my favorite, the improved multi-monitor options. But did you know you can try it out right now for free with the Windows 8 Developer Preview?

Login Screen inside of Windows 8Developer Preview
The login screen inside of Windows 8 Developer Preview. You slide the screen upwards to get to the username and password fields.

Windows 8 Metro Interface
The Metro interface inside of Windows 8 Developer Preview. You scroll from left to right to access the different categories of tiles.

Now I have to warn you that the Windows 8 Developer Preview is a pre-beta version of Windows 8. Fun to play around with but in no way should you use it in a production environment. And remember that some of the features and/or functions may not work properly.

Windows 8 Windows Explorer
The new look of Windows Explorer inside of Windows 8 Developer Preview. Windows Explorer now sports a ribbon style toolbar.

You can upgrade an existing version of Windows XP, Windows Vista or Windows 7. But be forewarned that you cannot uninstall this release. You can also create a multi-boot setup, with Windows 8 on a separate partition. I use Oracle's VirtualBox to run experimental operating systems like this. I downloaded to latest version and it already had pre-configured settings for Windows 8.

Here's a quote from the Windows 8 Developer website:

The Windows 8 Developer Preview is a pre-beta version of Windows 8 for developers. These downloads include prerelease software that may change without notice. The software is provided as is, and you bear the risk of using it. It may not be stable, operate correctly or work the way the final version of the software will. It should not be used in a production environment. The features and functionality in the prerelease software may not appear in the final version. Some product features and functionality may require advanced or additional hardware, or installation of other software.

Note: You can't uninstall the Windows 8 Developer Preview. To go back to your previous operating system, you must reinstall it from restore or installation media.

System Requirements

The Windows 8 Developer Preview works great on the same hardware that powers Windows Vista and Windows 7:

  • 1 gigahertz (GHz) or faster 32-bit (x86) or 64-bit (x64) processor
  • 1 gigabyte (GB) RAM (32-bit) or 2 GB RAM (64-bit)
  • 16 GB available hard disk space (32-bit) or 20 GB (64-bit)
  • DirectX 9 graphics device with WDDM 1.0 or higher driver
  • Taking advantage of touch input requires a screen that supports multi-touch
  • To run Metro style Apps, you need a screen resolution of 1024 X 768 or greater

Notes about installing the Windows 8 Developer Preview

A clean install is supported on all builds, but you can upgrade if you are installing a download without the developer tools. You will receive the full set of migration options when setup is launched in Windows. To dual-boot, you must first boot from media and choose an alternative partition.

For more information on the Windows 8 Developer Preview, just follow the links below:

Windows Dev Center

Access your programs, files and websites quicker with Pin and Jump Lists in Windows 7

If you use a program or visit a website regularly in Windows 7, you may want to pin it to the Start menu or Taskbar for quicker access. When you pin a program or website to the Start menu or Taskbar, you can always see it there and easily access it with a single click. Windows 7 also includes Jump Lists, so that in addition to launching a program from the Start menu or Taskbar, you can now launch favorite and recent items from that program just by clicking the same button.

Pin a program to the Taskbar

Pin a program to the taskbar in Windows 7

You can pin a program directly to the Taskbar, so you can open it quickly and conveniently, rather than looking for the program in the Start menu.

How to pin a program to the Taskbar

If the program is already running, right-click the program's button on the Taskbar (or drag the button toward the desktop) to open the program’s Jump List, and then click Pin this program to Taskbar.
or
If the program isn't running, click Start, find the program’s icon, right-click the icon, and then click Pin to Taskbar.

You can also pin a program by dragging the program's shortcut from the desktop or Start menu to the Taskbar. Additionally, if you drag the shortcut of a file, folder, or website to the Taskbar, and the associated program isn't already pinned there, then that program is pinned to the Taskbar, and the item is pinned to the program’s Jump List.

Notes:
To remove a pinned program from the Taskbar, open the program's Jump List, and then click Unpin this program from Taskbar.
Folders and shortcuts to folders appear in the Windows Explorer Jump List when opened or pinned.
You can pin a program from the Start menu to the Taskbar, but not from the Taskbar to the Start menu.

Pin a program to the Start menu

Pin a program to the Start menu in Windows 7

You can pin a program to the top of the Start menu so that you can open those programs quickly and conveniently.

How to pin a program to the Start menu

Click Start, find the program, right-click it, and then click Pin to Start Menu.
or
Click Start, finding the program, and then dragging it to the top left section of the Start menu.

The program's icon appears at the top of the Start menu.

Geek Tip:
You might decide to pin frequently-used programs to the Taskbar and occasionally-used programs to the Start menu.

Note:
Jump Lists contain recently-opened items and appear on the Start menu next to pinned and recently-used programs. You can pin items to Jump Lists.

Pin a website to the Taskbar

Pin a website to the taskbar in Windows 7

You can also pin a frequently visited website to the Taskbar, just like you would a program.

How to pin a website to the Taskbar

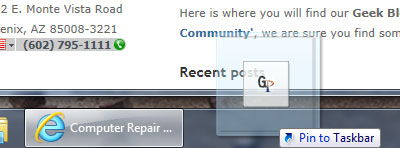
Click the webpage's tab and drag it to the Taskbar.

To remove a pinned website from the Taskbar:
Right-click the website icon on the Taskbar, and then click Unpin this program from Taskbar.

Using Jump Lists to open programs and items

Using Jump List on the taskbar in Windows 7

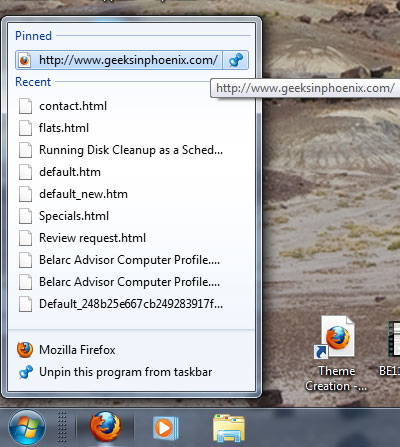
Jump Lists are lists of recently or frequently opened items, such as files, folders, tasks, or websites, organized by the program you use to open them. In addition to being able to open recent items using a Jump List, you can also pin favorite items to a Jump List so you can quickly get to the items that you use every day.

On the Taskbar, Jump Lists appear for programs that you've pinned to the Taskbar and programs that are currently running. You can view the Jump List for a program by right-clicking the Taskbar button or dragging the button toward the desktop. You open items from the Jump List by clicking them.

Managing programs and items with Jump Lists
On the Taskbar, Jump Lists appear for programs that you've pinned to the Taskbar and programs that are currently running. On the Start menu, Jump Lists appear for programs you've pinned to the Start menu and programs you've opened recently. (Jump Lists don't appear in All Programs on the Start menu.)

Jump Lists can include recently opened items, frequently opened items, tasks, or websites, in addition to any items that you've pinned.

You'll always see the same items in the Jump List for a program, regardless of whether you view the list on the Start menu or the Taskbar. For example, if you pin an item to a program’s Jump List on the Taskbar, it also appears in that program's Jump List on the Start menu.

Notes:
In addition to any pinned or currently open items, Jump Lists on the Taskbar contain several commands that you can use to close an item or unpin the program from the Taskbar.
You can drag an item from a Jump List to copy it to another location. For example, you can drag a document from a Jump List to an e-mail message if you want to send it to someone.

Working with Jump Lists on the Start menu
Jump Lists on the Start menu give you quick access to the things you use most often.

To view the Jump List for a program:
Click Start, point to a pinned program or a recently used program near the top of the Start menu, and then point to or click the arrow next to the program.

To open an item:
Click Start, point to a pinned program, or to a recently used program near the top of the Start menu to open the program's Jump List, and then click the item.

    To pin an item to a Jump List:
  1. Click Start, and then open the program's Jump List.
  2. Point to the item, click the pushpin icon and then click Pin to this list.
    To unpin an item:
  1. Click Start, and then open the Jump List for the program.
  2. Point to the item, click the pushpin icon and then click Unpin from this list.

Note:
The next time you open an item that you've unpinned, it might reappear in the Jump List. To remove an item from the list, right-click the item, and then click Remove from this list.

Working with Jump Lists on the Taskbar
Jump Lists on the Taskbar give you quick access to the things you use most often.

To view the Jump List for a program:
Right-click the program's button on the Taskbar.

To open an item from a Jump List:
Open the program's Jump List, and then click the item.

To pin an item to a Jump List:
Open the program's Jump List, point to the item, click the pushpin icon, and then click Pin to this list.

Notes:
You can also drag a file icon or a shortcut from the Start menu or the desktop to the Taskbar. This pins the item to the Jump List and also pins the program to the Taskbar if it isn't pinned already.
Folders are considered Windows Explorer items and appear in the Windows Explorer Jump List when pinned or opened.

To unpin an item:
Open the program's Jump List, point to the item, click the pushpin icon, and then click Unpin from this list.

Note:
The next time you open an item that you've unpinned, it might reappear in the Jump List. To remove an item from the list, right-click the item, and then click Remove from this list.

Quickly adjust the settings on your Windows 7 laptop / netbook with Windows Mobility Center

Have you ever needed to change a setting on your Windows 7 laptop/netbook quickly? Maybe adjust the screen brightness or turn on/off your wi-fi? You can do just that and more with Windows Mobility Center inside of Windows 7.

Windows Mobility Center in Windows 7
Windows Mobility Center inside of Windows 7

Windows Mobility Center displays the most commonly used laptop/netbook settings, such as brightness, volume, battery status, and wireless network status. Different tiles are displayed depending on your system, and some tiles are added by your laptop/netbook manufacturer.

Here are some of the settings you might find in the Windows Mobility Center. Remember, not all settings are available on all laptops.

  • Brightness. Move the slider to temporarily adjust the brightness of your display. To adjust the display brightness settings for your power plan, click the icon to open Power Options.
  • Volume. Move the slider to adjust the speaker volume of your laptop, or select the Mute check box.
  • Battery Status. View how much charge remains on your battery or select a power plan from the list.
  • Wireless Network. View the status of your wireless network connection or turn your wireless network adapter on or off.
  • Screen Rotation. Change the orientation of your Tablet PC screen from portrait to landscape or vice versa.
  • External Display. Connect an additional monitor to your laptop, or customize the display settings.
  • Sync Center. View the status of in-progress file sync, start a new sync, set up a sync partnership, or change your settings in Sync Center.

How to access Windows Mobility Manager on a Windows 7 based laptop or netbook

  • Click on the Start button, then All Programs, then Accessories, then Windows Mobility Manager.
  • Or
  • Click Start, and then type mobility center in the Start Search box.

Geek Tips:

    Windows Mobility Center on the Taskbar in Windows 7
  • Pin the Windows Mobility Manager to the Taskbar for even quicker access to it.
  • Click an icon to open options for that setting quickly. For example, click the Battery Status icon to open Power Options, and from there, select a power plan.

Notes:

If the Turn wireless on button is unavailable, you might need to use the hardware switch on your computer to turn on the wireless network adapter. For more information about turning the adapter on and off, check the documentation that came with your computer.

If a setting doesn't appear, it might be because the required hardware (such as a wireless network adapter) or drivers are missing. For example, if the Turn wireless on button is unavailable, you might need to use your computer's hardware switch to turn on the wireless adapter.

Free up more disk space with Windows 7 Disk Cleanup

During your computer's regular use, you will accumulate several unnecessary files (temporary setup/internet files, recycle bin, etc.). You can remove these files with the built-in Disk Cleanup (cleanmgr.exe) utility inside of Windows 7. And it can be run a couple of different ways and with different options.

Running Disk Cleanup (cleanmgr.exe) on demand

There are a couple of different ways to run Disk Cleanup on demand. The following procedure cleans up files associated with your user account. You can also use Disk Cleanup to clean up all the files on your computer.

Windows 7 Disk Cleanup dialog box with standard options

  1. Click Start, and then type Disk Cleanup in the Start Search box.
    or
    Click Start, then All Programs, then Accessories, then System Tools, then Disk Cleanup
  2. In the Drives list, click the hard disk drive that you want to clean up, and then click OK
  3. In the Disk Cleanup dialog box, on the Disk Cleanup tab, select the checkboxes for the file types that you want to delete, and then click OK
  4. In the message that appears, click Delete files

The More Options tab is available when you choose to clean files from all users on the computer. This tab includes two additional ways to free even more disk space:

Windows 7 Disk Cleanup dialog box with more options

  • Programs and Features. This option opens Programs and Features in Control Panel, where you can uninstall programs that you no longer use. The Size column in Programs and Features shows how much disk space each program uses.
  • System Restore and Shadow Copies. With this option, you can delete all but the most recent restore point on the disk.
    System Restore uses restore points to return your system files to an earlier point in time. If your computer is running normally, you can save disk space by deleting the earlier restore points.
    In some editions of Windows 7, restore points can include previous versions of files, known as shadow copies, and backup images created with Windows Complete PC Backup. These files and images will also be deleted.

Running Disk Cleanup (cleanmgr.exe) as a scheduled task

You can also run Disk Cleanup from a command prompt. This gives you a few more options, like predefined settings for running Disk Cleanup as a scheduled task in Task Scheduler. First, we need to bring up a command prompt.

Windows 7 Disk Cleanup dialog box with sageset options

  1. Click Start, and then type cmd in the Start Search box.
  2. In the search results list, right-click Command Prompt, and then click Run as Administrator.
  3. If you are prompted by User Account Control, click Continue.

You can start the Disk Cleanup tool by running cleanmgr.exe. Disk Cleanup supports the following command-line switches:

  • cleanmgr /d driveletter: - This switch selects the drive that you want Disk Cleanup to clean. Note that the /d switch is not used with /sagerun:n.
  • cleanmgr /sageset:n - This switch displays the Disk Cleanup Settings dialog box and creates a registry key to store the settings you select. The n value is stored in the registry and allows you to specify different tasks for Disk Cleanup to run. The n value can be any integer value from 0 to 65535. To get all the available options when you are using the /sageset switch, you may need to specify the drive letter that contains the Windows installation.
  • cleanmgr /sagerun:n - This switch runs the specified tasks that are assigned to the n value by using the /sageset switch. All drives in the computer will be enumerated, and the selected profile will be run against each drive.

How to run Disk Cleanup (cleanmgr.exe) on-demand and as a scheduled task inside of Windows 7.

Disable Windows hibernation and free up disk space

Updated October 6, 2022

If you're a hardcore computer user like me, your system runs 24/7 with no screen or power saver options (I turn off the monitors when not in use). I like to walk into my office and have it ready to go. So when I noticed that my version of Windows still had the Hiberfil.sys file and I do not use hibernation, it was time to remove this file and regain that drive space back (in my case, 16 GB).

The Hiberfil.sys is a hidden system file located in the drive's root folder where Windows is installed. The Windows Kernel Power Manager creates this file when you install Windows. The computer uses the Hiberfil.sys file to store a copy of the system memory on the drive when hibernation is turned on.

The size of the Hiberfil.sys file is approximately equal to how much Random Access Memory (RAM) is installed on the computer. The computer cannot go into hibernation if this file is not present. And even if you have disabled hibernation, your computer can still go to sleep. Here is the difference between sleep and hibernation:

  • Sleep: Windows can turn off the screen(s) and drive(s) while continuing to run in memory. A tap on the keyboard or moving the mouse will turn the screen(s) and drive(s) back on.
  • Hibernation: Windows takes the active memory, writes it to the Hiberfil.sys, and then turns the computer off. Pressing the power button will start Windows back up, where it loads the Hiberfil.sys file.

How to turn on or off hibernation in Windows

To disable hibernation, you must open a Command Prompt with Administrator privileges. Since this article covers multiple versions of Windows, click on the link below that matches your version of Windows for how to open an Admin Command Prompt. All links open in a new window.

How to open a Command Prompt with Administrator privileges in Windows 11

How to open a Command Prompt with Administrator privileges in Windows 10

How to open a Command Prompt with Administrator privileges in Windows 8

How to open a Command Prompt with Administrator privileges in Windows Vista and Windows 7

To delete the Hiberfil.sys file and make hibernation unavailable, follow these steps:

  1. Open a Command Prompt with Administrator privileges (see instructions above)
  2. At the Command Prompt, type powercfg.exe /hibernate off and press ENTER.
    Disable Windows Hibernation at the Command Prompt
  3. Type exit and then press ENTER to close the Command Prompt window.

To recreate the Hiberfil.sys file and make hibernation available, follow these steps:

  1. Open a Command Prompt with Administrator privileges (see instructions above)
    Renable Windows Hibernation at the Command Prompt
  2. At the Command Prompt, type powercfg.exe /hibernate on and press ENTER.
  3. Type exit and then press ENTER to close the Command Prompt window.

Free computer diagnostics

Repairing a PC can sometimes be expensive, and that is why we offer free basic in-shop diagnostics. Give one of our professional and experienced technicians a call at (602) 795-1111, and let's see what we can do for you.

Check out our reviews

Geeks In Phoenix LLC, BBB Business Review

Customer service is #1

Here at Geeks in Phoenix, we take pride in providing excellent customer service. We aim to give the highest quality of service  from computer repair, virus removal, and data recovery.

Bring your computer to us and save

Repairing a computer can be time-consuming. That is why we base our in-shop service on the time we work on your computer, not the time it takes for your computer to work! From running memory checking software to scanning for viruses, these are processes that can take some time.

Contact us

If you have any questions, please feel free to give us a call at (602) 795-1111  and talk with one of our Geeks. Or you can send us a message from our contact page contact page , and one of our Geeks will get back to you as soon as possible. Or you can stop by and see us. Here are our hours and location.

Like Geeks in Phoenix on Facebook

Follow Geeks in Phoenix on Twitter

Watch Geeks in Phoenix on YouTube