Geeks in Phoenix

Geek Blog


Manage e-mail, sync files and more for free with Windows Live Essentials 2011

Note: Windows Live Essentials reached end-of-life on January 10, 2017, and is no longer available for download.

Are you looking for a program to manage your e-mail? Or maybe one to write a blog with? Want to remotely connect computers and sync files between them? How about creating a photo gallery or movie? You can do all of these and more for free with Windows Live Essentials 2011.

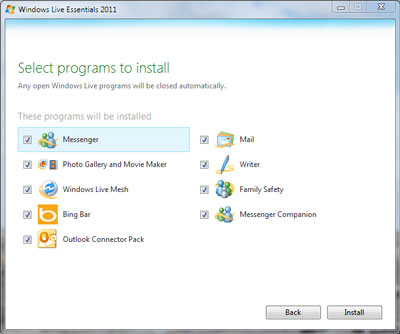
Windows Live Essentials installation options

If you're familiar with Windows, some of these programs you will already know about. Photo Gallery, Movie Maker and Messenger, for example, have been around for a few years. Writer and Family Safety, on the other hand, are new. And Outlook Express users will be happy to learn that Windows Live Mail is an updated version of OE. You can import all of your settings from an existing version of Outlook Express into it.

Main screen in Windows Live Mesh
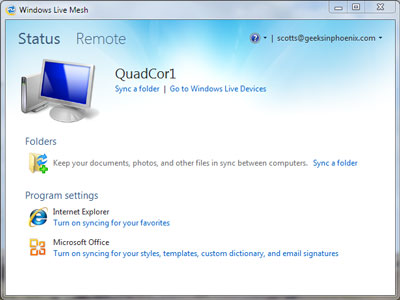
The main screen in Windows Live Mesh

With Windows Live Mesh, you can synchronize files, folders and program settings between different computers, PC or MAC. Or you can sync files to the cloud using SkyDrive. You can also use Live Mesh to connect remotely to another computer. There are so many programs / features included in Windows Live Essentials it's hard to list them all. Here's a quote from the Windows Live website:

Windows Live Essentials is a suite of products available in one easy download. Get them all at once, or choose just the ones you want.

Mail
Manage multiple email accounts, calendars, and your contacts, even when you're offline.

Family Safety
Help keep your kids safe online.

Mesh
Kiss your zip drive goodbye—keep your files and photos synced on your PCs. And connect remotely to all of your files and programs.

Writer
Create stunning blog posts in minutes, with photos, videos, maps, and more. Then publish them to any of your favorite blog service providers.

Messenger Companion
Bring your friends along when you browse the web. See and comment on links your friends have shared as you visit websites in Internet Explorer.

Outlook Connector Pack
Manage Hotmail from within Outlook.

Bing Bar
Get search results from Bing without leaving the site you're on.

Silverlight
See rich, interactive websites with this browser plug-in.

Windows Live Essentials is available for 32-bit or 64-bit versions of Windows 7, Windows Vista with Service Pack 2, Windows Server 2008 R2 or Windows Server 2008 with Service Pack 2. For more information on Windows Live Essentials, follow the links below:

Windows Live Essentials

Try Windows 8 for free with Windows 8 Developer Preview

By now, you have probability started hearing the buzz about Windows 8. Maybe it's the new interface, Metro, which brings touch screen ease of use and the simple tile look of the Windows 7 phone to the desktop. Or maybe it's the Metro apps, that with a connected Windows Live account, can be downloaded and used on any Windows 8 computer you login to. Or, my favorite, the improved multi-monitor options. But did you know you can try it out right now for free with the Windows 8 Developer Preview?

Login Screen inside of Windows 8Developer Preview
The login screen inside of Windows 8 Developer Preview. You slide the screen upwards to get to the username and password fields.

Windows 8 Metro Interface
The Metro interface inside of Windows 8 Developer Preview. You scroll from left to right to access the different categories of tiles.

Now I have to warn you that the Windows 8 Developer Preview is a pre-beta version of Windows 8. Fun to play around with but in no way should you use it in a production environment. And remember that some of the features and/or functions may not work properly.

Windows 8 Windows Explorer
The new look of Windows Explorer inside of Windows 8 Developer Preview. Windows Explorer now sports a ribbon style toolbar.

You can upgrade an existing version of Windows XP, Windows Vista or Windows 7. But be forewarned that you cannot uninstall this release. You can also create a multi-boot setup, with Windows 8 on a separate partition. I use Oracle's VirtualBox to run experimental operating systems like this. I downloaded to latest version and it already had pre-configured settings for Windows 8.

Here's a quote from the Windows 8 Developer website:

The Windows 8 Developer Preview is a pre-beta version of Windows 8 for developers. These downloads include prerelease software that may change without notice. The software is provided as is, and you bear the risk of using it. It may not be stable, operate correctly or work the way the final version of the software will. It should not be used in a production environment. The features and functionality in the prerelease software may not appear in the final version. Some product features and functionality may require advanced or additional hardware, or installation of other software.

Note: You can't uninstall the Windows 8 Developer Preview. To go back to your previous operating system, you must reinstall it from restore or installation media.

System Requirements

The Windows 8 Developer Preview works great on the same hardware that powers Windows Vista and Windows 7:

  • 1 gigahertz (GHz) or faster 32-bit (x86) or 64-bit (x64) processor
  • 1 gigabyte (GB) RAM (32-bit) or 2 GB RAM (64-bit)
  • 16 GB available hard disk space (32-bit) or 20 GB (64-bit)
  • DirectX 9 graphics device with WDDM 1.0 or higher driver
  • Taking advantage of touch input requires a screen that supports multi-touch
  • To run Metro style Apps, you need a screen resolution of 1024 X 768 or greater

Notes about installing the Windows 8 Developer Preview

A clean install is supported on all builds, but you can upgrade if you are installing a download without the developer tools. You will receive the full set of migration options when setup is launched in Windows. To dual-boot, you must first boot from media and choose an alternative partition.

For more information on the Windows 8 Developer Preview, just follow the links below:

Windows Dev Center

Disable Windows hibernation and free up disk space

Updated October 6, 2022

If you're a hardcore computer user like me, your system runs 24/7 with no screen or power saver options (I turn off the monitors when not in use). I like to walk into my office and have it ready to go. So when I noticed that my version of Windows still had the Hiberfil.sys file and I do not use hibernation, it was time to remove this file and regain that drive space back (in my case, 16 GB).

The Hiberfil.sys is a hidden system file located in the drive's root folder where Windows is installed. The Windows Kernel Power Manager creates this file when you install Windows. The computer uses the Hiberfil.sys file to store a copy of the system memory on the drive when hibernation is turned on.

The size of the Hiberfil.sys file is approximately equal to how much Random Access Memory (RAM) is installed on the computer. The computer cannot go into hibernation if this file is not present. And even if you have disabled hibernation, your computer can still go to sleep. Here is the difference between sleep and hibernation:

  • Sleep: Windows can turn off the screen(s) and drive(s) while continuing to run in memory. A tap on the keyboard or moving the mouse will turn the screen(s) and drive(s) back on.
  • Hibernation: Windows takes the active memory, writes it to the Hiberfil.sys, and then turns the computer off. Pressing the power button will start Windows back up, where it loads the Hiberfil.sys file.

How to turn on or off hibernation in Windows

To disable hibernation, you must open a Command Prompt with Administrator privileges. Since this article covers multiple versions of Windows, click on the link below that matches your version of Windows for how to open an Admin Command Prompt. All links open in a new window.

How to open a Command Prompt with Administrator privileges in Windows 11

How to open a Command Prompt with Administrator privileges in Windows 10

How to open a Command Prompt with Administrator privileges in Windows 8

How to open a Command Prompt with Administrator privileges in Windows Vista and Windows 7

To delete the Hiberfil.sys file and make hibernation unavailable, follow these steps:

  1. Open a Command Prompt with Administrator privileges (see instructions above)
  2. At the Command Prompt, type powercfg.exe /hibernate off and press ENTER.
    Disable Windows Hibernation at the Command Prompt
  3. Type exit and then press ENTER to close the Command Prompt window.

To recreate the Hiberfil.sys file and make hibernation available, follow these steps:

  1. Open a Command Prompt with Administrator privileges (see instructions above)
    Renable Windows Hibernation at the Command Prompt
  2. At the Command Prompt, type powercfg.exe /hibernate on and press ENTER.
  3. Type exit and then press ENTER to close the Command Prompt window.

My favorite left hand Windows keyboard shortcuts

Updated April 19, 2023

One of the most useful items I use daily is keyboard shortcuts. Especially shortcuts that I can perform with just my left hand, allowing me to keep my right hand on the mouse. You can use keyboard shortcuts to open frequently used files, folders, and programs like File Explorer. Windows has a ton of built-in keyboard shortcuts (see links at the bottom of this article), plus you can create your own custom keyboard shortcuts. Here are my favorite left-hand keyboard shortcuts.

Left hand Windows keyboard shortcuts

Press To
Windows logo key + E Open File Explorer
Windows logo key + R Open the Run dialog box
Windows logo key + D Display the Desktop
Windows logo key + F Search for a file or folder (Windows 7 / 8.1)
Windows logo key + S Search for a file or folder (Windows 10 / Windows 11)
CTRL + A Select all
CTRL + X Cut
CTRL + C Copy
CTRL+ V Paste
CTRL + ALT + (KEY) Custom keyboard shortcut (see below)

Create your own Windows keyboard shortcuts

You can create keyboard shortcuts that use CTRL + ALT + (your choice of a key) for frequently used files, folders, and programs. You will need to have a shortcut to the file, folder, or program you want to open first. You can use an existing shortcut (on your desktop or the Start menu) or create a new one.

How to create a shortcut in Windows

Once you have a shortcut:

  1. Right-click on the shortcut
  2. From the context menu, click Properties
  3. On the Properties box, select the Shortcut tab
    The shortcut key box inside of a Windows shortcut
  4. Click inside the Shortcut key box and press the key which you want to combine with CTRL + ALT

Note:
You can not use the following keys for keyboard shortcuts: ESC, ENTER, TAB, SPACEBAR, PRINT SCREEN, SHIFT, or BACKSPACE.

For more information on Windows keyboard shortcuts, follow the links below:

Windows 11 keyboard shortcuts

Windows 10 keyboard shortcuts

Windows logo key keyboard shortcuts

General keyboard shortcuts

Natural keyboard shortcuts

Dialog box keyboard shortcuts

Accessibility keyboard shortcuts

Windows Explorer keyboard shortcuts

Stitching panoramic images for the web with Microsoft Research HD View

A while back. I wrote an article about creating panoramic images with Microsoft Image Composite Editor (ICE) and Photosynth. With ICE and Photosynth, you can create panoramic images and then upload them to the Photosynth website. But what if you wanted to upload them to your website? That's where HD View comes into the picture.

Microsoft HD View is a new viewer to display large images (gigapixels) across the internet. It allows you to create panoramic images for web pages that do not take a lot of bandwidth. When someone views the image, they are only downloading what is required for that view. It is only when they pan or zoom that more of the image is downloaded. HD View / Deep Zoom is now included in ICE, also as a stand-alone command-line utility, and (here's the best), a Photoshop plug-in.

HD View / Deep Zoom export in Microsoft Image Composite Editor

HD View / Deep Zoom export in Photoshop plug-in

So if you're a Photoshop user, you can now export those panoramic images that Photoshop can create directly to HD View / Deep Zoom format. The Photoshop plug-in is available in both 32-bit and 64-bit. Here's a quote from the HD View website:

About HD View
HD View is a new viewer developed by Microsoft Research's Interactive Visual Media group to aid in the display and interaction with very large images. The HDView development team included Johannes Kopf, Matt Uyttendaele, Howard Good, and Michael Cohen along with Jonathan Fay of the Next Media group.

Recent advances in camera and sensor technology and software for stitching images together has led to the creation of images containing billions of pixels (gigapixels). These images are often panoramic, that is, they cover very wide fields of view. Since monitors typically contain only one to two million pixels, it is only possible to actually see 1/1000th of such image data at once. Also, viewing very wide fields of view require unwrapping of an image projected onto a curved surface (think of a map of the world) which can cause distortions.

HD View leverages current graphics hardware to allow smooth panning and zooming as well as the viewing transformation described below.

HD View was developed with a number of goals in mind. It should:

  • allow smooth panning and zooming on large images,
  • only download enough data to create the current view (and possibly look ahead to the next), and
  • always display the current field of view with an appropriate projection. This means that when zoomed way in you should be presented with a standard perspective projection providing a sense of immersion, and when zoomed out you experience a curved projection so that get a full overview of the scene. In between the projection should smoothly transition.
  • Finally, it should be easy to create your own HD View content and present it to the world via the web.

The HD View plug-in currently supports all major browsers on the Windows platform. The first time that you visit a page with HD View content you will be prompted to install the HD View plug-in.

For more information on HD View / Deep Zoom, follow the links below:

Microsoft Deep Zoom

HD View Utilities (32 bit)

HD View Utilities (64 bit)

Free computer diagnostics

Repairing a PC can sometimes be expensive, and that is why we offer free basic in-shop diagnostics. Give one of our professional and experienced technicians a call at (602) 795-1111, and let's see what we can do for you.

Check out our reviews

Geeks In Phoenix LLC, BBB Business Review

Customer service is #1

Here at Geeks in Phoenix, we take pride in providing excellent customer service. We aim to give the highest quality of service  from computer repair, virus removal, and data recovery.

Bring your computer to us and save

Repairing a computer can be time-consuming. That is why we base our in-shop service on the time we work on your computer, not the time it takes for your computer to work! From running memory checking software to scanning for viruses, these are processes that can take some time.

Contact us

If you have any questions, please feel free to give us a call at (602) 795-1111  and talk with one of our Geeks. Or you can send us a message from our contact page , and one of our Geeks will get back to you as soon as possible. Or you can stop by and see us. Here are our hours and location.

Like Geeks in Phoenix on Facebook

Follow Geeks in Phoenix on Twitter

Watch Geeks in Phoenix on YouTube